本节笔记整理
CSS笔记整理:
在标签上设置style属性:
background-color: #2459a2;
height: 48px;
...

编写css样式:
1. 标签的style属性
2. 写在head里面 style标签中写样式
(1)- id选择器
      #i1{
        background-color: #2459a2;
        height: 48px;
      }

(2)- class选择器 ******

      .名称{
        ...
      }

      <标签 class='名称'> </标签>

(3)- 标签选择器
        div{
            ...
        }


        所有div设置上此样式

(4)- 层级选择器(空格) ******
       .c1 .c2 div{

       }
(5)- 组合选择器(逗号) ******
        #c1,.c2,div{

       }

(6)- 属性选择器 ******
       对选择到的c1标签再通过属性再进行一次筛选
       .c1[n='alex']{ width:100px; height:200px; }

PS:
    - 优先级,标签上style优先(行间样式),编写顺序,就近原则(位置上下)

2.5 css样式也可以写在单独文件中
<link rel="stylesheet" href="commons.css" />

3、注释
/*   */

4、边框
 - 宽度,样式solid/dotted,颜色  (border: 4px dotted red;)
 - border-left...

5、
height,         高度 百分比(在已知高度的div内可以用百分比)
width,          宽度 像素,百分比
text-align:ceter, 水平方向居中
line-height,垂直方向根据标签高度
vertical-align:ceter, 垂直方向居中(用起来比较麻烦)
color、     字体颜色
font-size、 字体大小
font-weight 字体加粗 bold

6、float
让标签浪起来,块级标签也可以堆叠
div:没有设置高度,自己撑不起来,内容多少,会根据内容大小撑起来,独占一行
老子管不住:
【针对父div没有设置高度和浮动,孩子div:float,在最后一个孩子下面添加下面代码,把父div撑起来。】
    <div style="clear: both;"></div>(比较low)

7、display
display: none; -- 让标签消失
display: inline;
display: block;
display: inline-block;
         具有inline,默认 自己有多少占多少
         具有block,可以设置设置高度,宽度,padding  margin
******
行内标签:无法设置(高度,宽度,padding  margin)
块级标签:可以设置高度,宽度,padding  margin

8、内外边距
padding:内边距,增大/缩小自己内部边距
margin:外边距,增大/缩小外部边距

9、当前div居中(有宽度)样式:margin:0, auto
  当遇到positon浮动起来,居中失效

上节作业问题:
    1、css重用

        <style>
            如果整个页面的宽度 > 900px时:
            {
                .c{
                   共有
                }
                .c1{
                    独有
                }
            }

            .c2{
                独有
            }
        </style>

        <div class='c c1'></div>
        <div class='c c2'></div>
    2、自适应 和 改变大小变形
        页面最外层: => 最外层像素的宽度设置为绝对宽度

        自适应:media

    3、默认img标签,有一个1px的边框(体现在IE中)
        img{
            border: 0;
        }

上节内容回顾
    1、块级和行内
    2、form标签
            <form action='http://sssss' methed='GET' enctype='multi'>
                <div>asdfasdf</div>
                <input type='text' name='q' />
                <input type='text' name='b' />
                # 上传文件
                <input type='file' name='f' />
                <input type='submit' />
            </form>
            GET: http://sssss?q=用户输入的值
                 http://sssss?q=用户输入的值&b=用户输入的内容

            POST:
                请求头
                请求内容
    3、display: block; inline; inline-block; none
    4、float:
        <div>
            <div style='float:left;'>f</div>
            <div style='clear:both;'></div>
        </div>

    5、margin: 0 auto;
    6、padding, ---> 自身发生变化
    7、<dl class='nav'>  # 获取dl:dl.nav
        <dt></dt>       # 获取dt: dl.nav dt

CSS补充
    position:
        a. fiexd => 固定在页面的某个位置

        b. relative + absolute  ==>相对父标签绝对定位
           relative单独存在无意义,
           absolute单独存在意义不大

            <div style='position:relative;'>
                <div style='position:absolute;top:0;left:0;'></div>
            </div>

    opcity: 0.5 透明度
    z-index: 层级顺序   谁大谁在上层
    position div居中(margin:0 auto失效):
        top:50%,
        left:50%,
        margin-left:-div(width)/2,
        margin-top:-div(height)/2
    overflow:
        hidden:超过隐藏
        auto:超过出现滚动条
    :hover{} 鼠标滑过的效果

    background-image:url('image/4.gif'); # 默认,div大,图片重复访
    background-repeat: repeat-y;

    background-position-x:
    background-position-y:
    或
    background-position:x, y

    综上简写格式:background: url("") x y no-repeat;
    background: url("icon_cohui.png") 0 -20px no-repeat;

    示例:输入框右边放置图标

小结:
cursor: pointer 鼠标手形
text-decoration: none 取消a标签下划线
placeholder='' 该提示会在输入字段为空时显示,并会在字段获得焦点时消失(input框),仅支持最新浏览器,老版本浏览器不支持哦
value = '' 默认值  (input)
ul: 块级标签
top: 绝对定位 一般与position同用
html中的属性名或变量名,习惯使用'-'中划线,且后缀名都是首字母大写(连着写)->zxUsonCohui
python是'_'下划线
position:使用后,margin/padding失效;父标签(relative)不会根据子标签(absolute)调整宽高
CSS全套笔记(点击跳转)
RGB颜色对照表(点击跳转)
推荐模块网站:BootStrap(https://www.bootcss.com/) CSSmoban.com
挺美的404页面:https://x.autoimg.cn/dealer/err/404.html
图标插件:fontawesome.io/icons/ link引用即可(选择4.7.0版本...min.css)
Position:
div居中:
1、div本身是块级标签,独占一行,如果没有设置宽度,使用margin: 0 auto 不生效
2、所以,如果想要div居中,必须给div一个宽度再使用margin: 0 auto(上下边距:0,左右边距:auto)即可
3、position div 居中:
position div居中(margin:0 auto失效):
top:50%,
left:50%,
margin-left:-div(width)/2,
margin-top:-div(height)/2
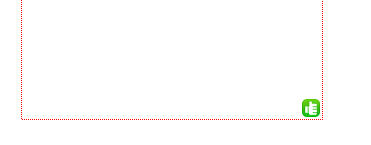
background的综合实例:
<!DOCTYPE html>
<html lang="en">
<head>
    <meta charset="UTF-8">
    <title>Title</title>
    <style>
        .pg-header{
            position: relative;

            border: 1px dotted red;
            width: 300px;
            height: 300px;
            margin: 0 auto;
        }
        .pg-header .zan{
            /*border: 1px solid red;*/
            /*width: 200px;*/
            /*height: 200px;*/

            width: 20px;
            height: 20px;
            position: absolute;
            bottom: 0;
            right: 0;

            /*写法2*/
            background-image: url("icon_18_118.png");
            background-repeat: no-repeat;
            background-position-x: 0;
            background-position-y: -20px;
            /*写法1*/
            /*background: url("icon_18_118.png") 0 -20px no-repeat;*/
        }
    </style>
</head>
<body>
    <div class="pg-header">
        <!--获取每一个小图标-->
        <div class="zan"></div>
    </div>
</body>
</html>

用户登录输入框-low版本:

 1 <!DOCTYPE html>
 2 <html lang="en">
 3 <head>
 4     <meta charset="UTF-8">
 5     <title>Title</title>
 6
 7     <!--存在的小问题:输入满时,被图片覆盖,在此已解决,input-->
 8     <!--padding-right:输入框向右内部增大30px,这30px是不能输入内容的,虚空间-->
 9     <!--width:向左剪短30px,即可-->
10
11     <style>
12         .pg-body{
13             border: 1px dotted red;
14             width: 400px;
15             height: 200px;
16             margin: 0 auto;
17         }
18         .pg-body .user{
19             width: 300px;
20             height: 30px;
21             /*border: 1px solid blue; !*测试用*!*/
22             margin: 0 auto; /*没有长宽无法居中*/
23
24             position: relative;
25         }
26         .pg-body .user .img-user{
27             position: absolute;
28             right: 5px;
29             top: 8px;
30
31             width: 16px;
32             height: 16px;
33             /*行内标签span没有高度也无法撑起来*/
34             display: inline-block;
35
36             background-image: url("i_name.jpg");
37             /*background-repeat: no-repeat;*/
38             /*border: 1px solid red;*/
39         }
40     </style>
41 </head>
42 <body>
43     <!--中间div居中-->
44     <div class="pg-body">
45         <!--用户注册登录框-->
46         <div class="user">
47             <input type="text" name="user" style="width: 270px; height: 30px; padding-right: 30px">
48
49             <!--第二层级放置图标,因为input占据整个地方,无法插入任何内容-->
50             <span class="img-user"></span>
51         </div>
52     </div>
53 </body>
54 </html>

用户登录输入框-修订:
<!DOCTYPE html>
<html lang="en">
<head>
    <meta charset="UTF-8">
    <title>Title</title>

    <!--存在的小问题:输入满时,被图片覆盖,在此已解决,input-->
    <!--padding-right:输入框向右内部增大30px,这30px是不能输入内容的,虚空间-->
    <!--width:向左剪短30px,即可-->

    <style>
        .pg-body{
            border: 1px dotted red;
            width: 400px;
            height: 200px;
            margin: 0 auto;
        }
        .pg-body .user{
            width: 300px;
            height: 30px;
            /*border: 1px solid blue; !*测试用*!*/
            margin: 0 auto; /*没有长宽无法居中*/

            position: relative;
        }
        .pg-body .user .img-user{
            position: absolute;
            right: 5px;
            top: 8px;

            width: 16px;
            height: 16px;
            /*行内标签span没有高度也无法撑起来*/
            display: inline-block;

            background-image: url("i_name.jpg");
            /*background-repeat: no-repeat;*/
            /*border: 1px solid red;*/
        }
    </style>
</head>
<body>
    <!--中间div居中-->
    <div class="pg-body">
        <!--用户注册登录框-->
        <div class="user">
            <input type="text" name="user" style="width: 270px; height: 30px; padding-right: 30px">

            <!--第二层级放置图标,因为input占据整个地方,无法插入任何内容-->
            <span class="img-user"></span>
        </div>
    </div>
</body>
</html>

鼠标滑过的效果:

 1 <!DOCTYPE html>
 2 <html lang="en">
 3 <head>
 4     <meta charset="UTF-8">
 5     <title>Title</title>
 6     <style>
 7         .pg-header{
 8             height: 48px;
 9             background-color: #d58512;
10             color: white;
11
12             position: fixed;
13             top: 0;
14             left: 0; /* 层级自动撑起来 */
15             right: 0;
16         }
17         .w{
18             width: 980px;
19             line-height: 48px; /*也可以写在pg-header*/
20             margin: 0 auto; /* w 居中*/
21         }
22
23         .pg-header .menu{
24             display: inline-block; /*a:行内标签不能撑大,想撑大(padding/margin),又不想占整行:inline-block*/
25             padding: 0 auto; /*0 auto 0 auto: 上、右、下、左*/
26         }
27         /*鼠标滑过的效果*/
28         .pg-header .menu:hover{/*没有重复的情况下,可以跳过w选择器*/
29             background-color: #ac2925;
30         }
31     </style>
32 </head>
33 <body style="margin: 0 auto;">
34     <div class="pg-header">
35         <div class="w">
36             <a class="logo">LOGO</a>
37             <a class="menu">全部</a>
38             <a class="menu">24区</a>
39             <a class="menu">1024区</a>
40         </div>
41     </div>
42 </body>
43 </html>

position定位:
<!DOCTYPE html>
<html lang="en">
<head>
    <meta charset="UTF-8">
    <title>Title</title>
    <style>
        .pg-body-common{
            border: 1px dotted red;
        }
        .pg-body{
            width: 500px;
            height: 600px;

            /*div水平居中*/
            margin: 0 auto;
        }
        .pg-body .pg-body-child{
            width: 500px;
            height: 200px;

            /*父级相对定位*/
            position: relative;
        }
        .pg-body .pg-body-child .sign{
            width: 30px;
            height: 30px;
            background-color: black;

            /*子级绝对定位*/
            position: absolute;
        }
        .pg-body .pg-body-child .sign_1{
            /*子级绝对定位位置*/
            right: 0;
            bottom: 0;
        }
        .pg-body .pg-body-child .sign_2{
            /*子级绝对定位位置*/
            left: 0;
            bottom: 0;
        }
        .pg-body .pg-body-child .sign_3{
            /*子级绝对定位位置*/
            right: 0;
            top: 0;
        }
    </style>
</head>
<body>
    <div class="pg-body pg-body-common">
        <div class="pg-body-child pg-body-common">
            <div class="sign sign_1"></div>
        </div>
        <div class="pg-body-child pg-body-common">
            <div class="sign sign_2"></div>
        </div>
        <div class="pg-body-child pg-body-common">
            <div class="sign sign_3"></div>
        </div>
    </div>
</body>
</html>

position实现三个层级的堆叠:
<!DOCTYPE html>
<html lang="en">
<head>
    <meta charset="UTF-8">
    <title>Title</title>
    <style>
        /*第一层,最底层*/
        .pg-body-1{
            background-color: #d58512;
            height: 6000px;
        }
        .pg-body-2{
            background-color: #ac2925;
            /*遮住整个屏幕*/
            position: fixed;
            top: 0;
            left: 0;
            right: 0;
            bottom: 0;
            /*透明度*/
            opacity: 0.5;
            /*层级优先级:次之*/
            z-index: 9;
        }
        .pg-body-3{
            background-color: #ffffff;
            width: 600px;
            height: 200px;

            /*层级优先级:优先, 谁的值大,谁在上面*/
            z-index: 10;

            /*也需要fixed固定层级*/
            position: fixed;

            /*居中优化*/
            /*margin: 0 auto;/*因为position已经让该层浮动起来了,这种div居中方式就会失效*/
            /*有效方式:
                    top,left有绝对值改为百分比-即左上角占屏幕的百分比
                    bottom,right有绝对值改为百分比-即右下角占屏幕的百分比
            */
            bottom: 50%;
            right: 50%;
            /*再设置:根据div长宽相对右下角偏置右、下距离*/
            margin-bottom: -100px;/*下:height/2 = 200/2 = 100 负值*/
            margin-right: -300px;/*右:width/2 = 600/2 = 300 负值*/

            /*拓展,关闭按钮,js再具体学习*/
            /*display: none;!*默认为none,不显示*!*/


            /*指定显示位置*/
            /*top: 40px;*/
            /*left: 100px;*/
        }
    </style>
</head>
<body>
    <!--第一层,最底层-->
    <div class="pg-body-1">
        <input type="text" name="user" />
        <input type="password" name="pwd" />
        <input type="submit" value="提交1" />
    </div>
    <!--第二层-->
    <!--第二层起着遮盖作用,不含任何内容-->
    <div class="pg-body-2"></div>
    <!--第三层-->
    <!--居中优化-->
    <div class="pg-body-3">
        <input type="text" name="user" />
        <input type="password" name="pwd" />
        <input type="submit" value="提交3" />
    </div>
</body>
</html>
position头部固定:
position: fixed;
top: 0;
right: 0;
left: 0;
position定位之返回顶部1:

 1 <!DOCTYPE html>
 2 <html lang="en">
 3 <head>
 4     <meta charset="UTF-8">
 5     <title>Title</title>
 6     <style>
 7         .back-top{
 8             background: #4cae4c;
 9             color: #ffffff;
10             width: 40px;
11             height: 60px;
12
13             position: fixed;
14             right: 20px;
15             bottom: 20px;
16         }
17     </style>
18 </head>
19 <body style="margin: 0 auto;">
20     <!--层级分布-->
21     <div onclick="GoTop();" class="back-top">返回顶部</div>
22     <div style="height: 5000px; background-color: #d58512;">内容</div>
23     <script>
24         function GoTop() {
25             //老师的代码过期了,还需要再加下面的一行
26             document.documentElement.scrollTop = 0;
27
28             document.body.scrollTop = 0;
29         }
30     </script>
31
32 </body>
33 </html>
position定位之返回顶部2:

 1 <!DOCTYPE html>
 2 <html lang="en">
 3 <head>
 4     <meta charset="UTF-8">
 5     <title>Title</title>
 6     <style>
 7         .back-top{
 8             background: #4cae4c;
 9             color: #ffffff;
10             width: 40px;
11             height: 60px;
12
13             position: fixed;
14             right: 20px;
15             bottom: 20px;
16         }
17     </style>
18 </head>
19 <body style="margin: 0 auto;">
20     <!--层级分布-->
21     <div onclick="GoTop();" class="back-top">返回顶部</div>
22     <div style="height: 5000px; background-color: #d58512;">内容</div>
23     <script>
24         function GoTop() {
25             //老师的代码过期了,还需要再加下面的一行
26             document.documentElement.scrollTop = 0;
27
28             document.body.scrollTop = 0;
29         }
30     </script>
31
32 </body>
33 </html>
后台管理页面布局
p标签默认有边距:margin: 0;
position小结:
fixed:永远固定在窗口的某个位置
relative:单独存在无意义
absolute:第一次定位,可以在指定位置,当滑轮滚动时,就不在了。
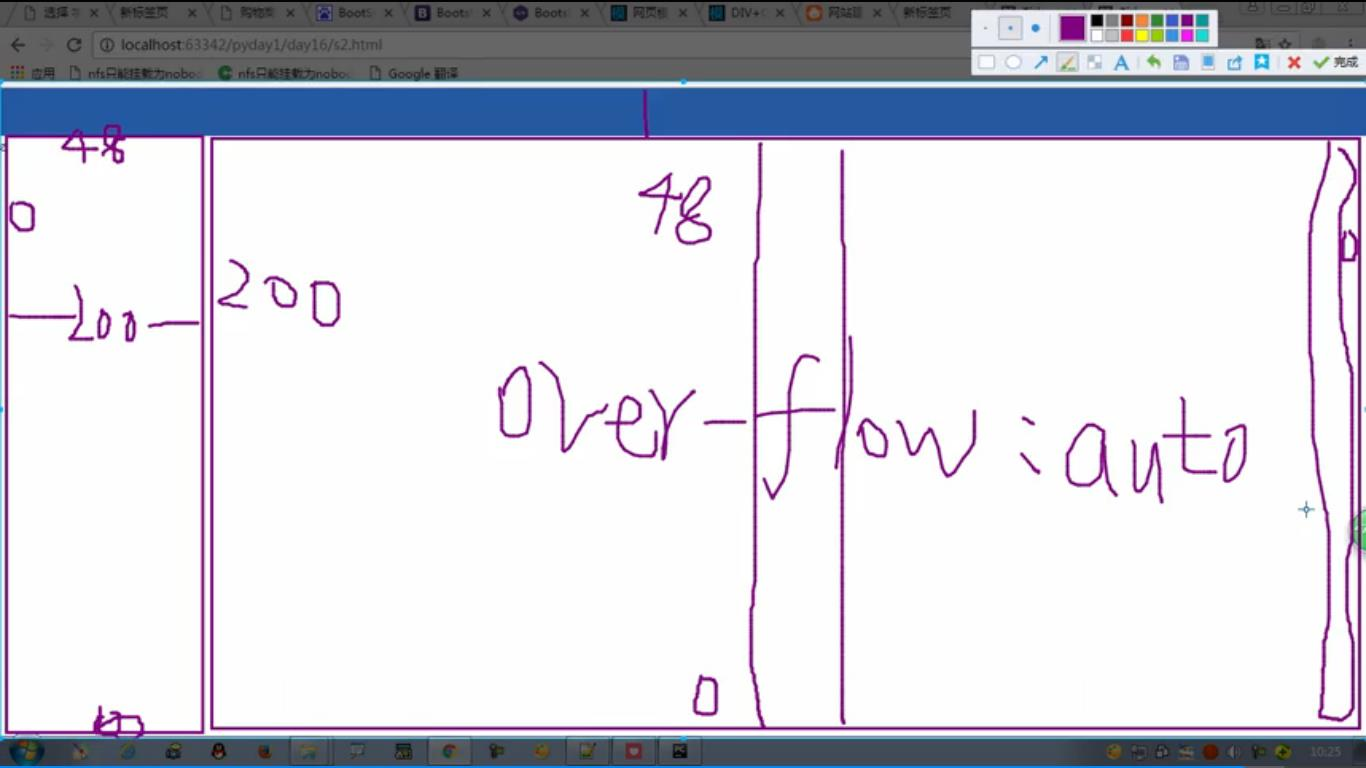
通过一个overflow进行两种布局切换
1、左侧菜单跟随滚动条滑动(左右滚动条:min-width)
2、左侧菜单以及上下不动(左右滚动条:min-width)
第一种布局方式:无法实现两种布局之间的切换:fixed + overflow
<!DOCTYPE html>
<html lang="en">

<!--第一种布局方式:无法实现两种布局之间的切换
    fixed + overflow
-->
<head>
    <meta charset="UTF-8">
    <title>Title</title>
    <style>
        body{
            margin: 0;
        }
        .pg-header{
            background-color: #a6e1ec;
            height: 48px;
            line-height: 48px;
        }
        .pg-body{
            /*height: 6000px;*/
            /*background-color: #d5d5d5;*/
            margin-top: 48px;
        }
        .pg-body .Lmenu{
            background-color: #d5d5d5;
            width: 200px;

            /*第一种布局方式*/
            position: fixed;
            left: 0;
            bottom: 0;
            top: 48px;
            overflow: auto;

            /*width: 20%;*/
            /*min-width: 200px;*/
        }
        .pg-body .Rcontent{
            background-color: #E6E6FA;
            /*width: 80%;*/

            position: fixed;
            right: 0;
            top: 48px;
            bottom: 0;
            left: 200px;
            overflow: auto;
        }
        .pg-body .Rcontent .content{
            background-color: #E6E6FA;
        }
        .pg-footer{
        }
    </style>
</head>
<body>
    <div class="pg-header"></div>
    <div  class="pg-body">
        <!--左-->
        <div class="Lmenu"></div>
        <!--右-->
        <div class="Rcontent">
            <div class="content">
                <p>智汇部落</p>
                <p>智汇部落</p>
                <p>智汇部落</p>
                <p>智汇部落</p>
                <p>智汇部落</p>
                <p>智汇部落</p>
                <p>智汇部落</p>
                <p>智汇部落</p>
                <p>智汇部落</p>
                <p>智汇部落</p>
                <p>智汇部落</p>
                <p>智汇部落</p>
                <p>智汇部落</p>
                <p>智汇部落</p>
                <p>智汇部落</p>
                <p>智汇部落</p>
                <p>智汇部落</p>
                <p>智汇部落</p>
                <p>智汇部落</p>
                <p>智汇部落</p>
                <p>智汇部落</p>
                <p>智汇部落</p>
                <p>智汇部落</p>
                <p>智汇部落</p>
                <p>智汇部落</p>
                <p>智汇部落</p>
                <p>智汇部落</p>
            </div>
        </div>
    </div>
    <div  class="pg-footer"></div>
</body>
</html>
第二种布局方式:可以实现两种布局之间的切换:absolute + overflow
<!DOCTYPE html>
<html lang="en">

<!--第三种经典布局方式:可以实现两种布局之间的切换
    absolute + overflow
-->
<head>
    <meta charset="UTF-8">
    <title>Title</title>
    <style>
        body{
            margin: 0;
        }
        .pg-header{
            background-color: #a6e1ec;
            height: 48px;
            line-height: 48px;
        }
        .pg-body{
            /*height: 6000px;*/
            /*background-color: #d5d5d5;*/
            margin-top: 48px;
        }
        .pg-body .Lmenu{
            background-color: #d5d5d5;
            width: 200px;

            /*经典布局方式*/
            position: absolute;
            left: 0;
            bottom: 0;
            top: 48px;

            /*去掉overflow就是第二种经典布局方式*/
            overflow: auto;

            /*width: 20%;*/
            /*min-width: 200px;*/
        }
        .pg-body .Rcontent{
            background-color: #E6E6FA;
            /*width: 80%;*/

            position: absolute;
            right: 0;
            top: 48px;
            bottom: 0;
            left: 200px;

             /*去掉overflow就是第二种经典布局方式*/
            overflow: auto;
        }
        .pg-body .Rcontent .content{
            background-color: #E6E6FA;
        }
        .pg-footer{
        }
    </style>
</head>
<body>
    <div class="pg-header"></div>
    <div  class="pg-body">
        <!--左-->
        <div class="Lmenu"></div>
        <!--右-->
        <div class="Rcontent">
            <div class="content">
                <p>智汇部落</p>
                <p>智汇部落</p>
                <p>智汇部落</p>
                <p>智汇部落</p>
                <p>智汇部落</p>
                <p>智汇部落</p>
                <p>智汇部落</p>
                <p>智汇部落</p>
                <p>智汇部落</p>
                <p>智汇部落</p>
                <p>智汇部落</p>
                <p>智汇部落</p>
                <p>智汇部落</p>
                <p>智汇部落</p>
                <p>智汇部落</p>
                <p>智汇部落</p>
                <p>智汇部落</p>
                <p>智汇部落</p>
                <p>智汇部落</p>
                <p>智汇部落</p>
                <p>智汇部落</p>
                <p>智汇部落</p>
                <p>智汇部落</p>
                <p>智汇部落</p>
                <p>智汇部落</p>
                <p>智汇部落</p>
                <p>智汇部落</p>
            </div>
        </div>
    </div>
    <div  class="pg-footer"></div>
</body>
</html>
后台头部布局
头像圆形:border-radius: 50%
多层position,涉及分层,用z-index解决被覆盖的问题
hover的拓展:父亲的下两个儿子长得不一样
<!DOCTYPE html>
<html lang="en">
<head>
    <meta charset="UTF-8">
    <title>Title</title>
    <style>
        .item{
            background-color: #d5d5d5;
            width: 300px;
        }
        .item:hover {
            color: #31b0d5;
        }

        .item:hover .b{
            color: #ac2925;
        }
        /*不好*/
        /*.b:hover{*/
            /*color: #ac2925;*/
        /*}*/
    </style>
</head>
<body>
    <div class="item">
        <!--鼠标滑过,显示不同颜色-->
        <div class="a">智汇部落</div>
        <div class="b">资源网站</div>
    </div>
</body>
</html>

消息提醒小插件:
.pg-header .icons .msgInt{
            /* 让span标签可以设置宽高 */
            display: inline-block;
            /* 圆形消息内增,一般都是:7px 3px */
            padding: 7px 3px;
            /*背景填充*/
            background-color: red;
            /* 让它占自己的高度,1px通用 */
            line-height: 1px;
            /* border:圆形角 */
            border-radius: 50%;
}

头部布局实例:
<!DOCTYPE html>
<html lang="en">

<!--第三种经典布局方式:
    absolute + overflow
-->
<head>
    <meta charset="UTF-8">
    <title>后台布局设计页面-3-内容开展</title>
    <!--各种图标引用-->
    <!--<link rel="stylesheet" href="images/fontawesome-free-5.10.1-web/css/fontawesome.min.css" />-->
    <link rel="stylesheet" href="images/font-awesome-4.7.0/css/font-awesome.min.css" />
    <style>
        body{
            margin: 0;
        }
        img{
            border: 0;
        }
        a{
            text-decoration: none;
        }

        .left{
            float: left;
        }
        .right{
            float: right;
        }

        .pg-header{
            background-color: #a6e1ec;
            height: 48px;
            line-height: 48px;
        }
        .pg-header .logo{
            width: 200px;
            text-align: center;
        }
        .pg-header .headPic{
            /*border: 1px solid red;*/
            /*width: 200px;*/
            text-align: center;
            margin-right: 50px;

            /*detailInfo*/
            position: relative;
        }

        .pg-header .icons{
            color: #F8F8FF;
            padding: 0 20px;
        }
        .pg-header .icons:hover{
            background-color: #006dcc;
        }
        .pg-header .icons .msgInt{
            /* 让span标签可以设置宽高 */
            display: inline-block;
            /* 圆形消息内增,一般都是:7px 3Px */
            padding: 7px 3px;
            /*背景填充*/
            background-color: red;
            /* 让它占自己的高度,1px通用 */
            line-height: 1px;
            /* 圆形角 */
            border-radius: 50%;
        }

        .pg-header .headPic .Pic{
            display: block; /*a标签下:inline-block效果一样*/
            padding: 0 20px;
        }
        .pg-header .headPic .detailInfo{
            /*默认隐藏*/
            display: none;
            text-align: left;
            /*border: 1px solid red;*/
            background-color: #F8F8FF;
            width: 130px;

            position: absolute;
            top: 48px;
            right: 4px;

            z-index: 20;
        }
        .pg-header .headPic .detailInfo a{
            display: block;
        }
        .pg-header .headPic:hover{
            background-color: #006dcc;
        }

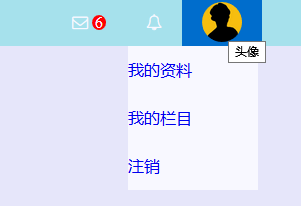
        .pg-header .headPic:hover .detailInfo{
            display: block;
        }
        /*.pg-header .headPic .detailInfo:hover{*/
            /*display: block;*/
        /*}*/

        .pg-header .headPic a img{
            /*img是行内标签*/
            /*我想当鼠标滑过时候,给头像两边宽度加大些*/
            /*display: block; !*img标签下:inline-block效果不太一样,block后,底下有点缝隙*!*/
            /*padding: 0 20px;*/

            width: 40px;
            height: 40px;
            margin-top: 4px;
            /*圆形头像*/
            border-radius: 50%;
        }

        .pg-body{
            margin-top: 48px;
        }
        .pg-body .Lmenu{
            background-color: #d5d5d5;
            width: 200px;
            /*经典布局方式*/
            position: absolute;
            left: 0;
            bottom: 0;
            top: 48px;
            /*去掉overflow就是第二种经典布局方式*/
            overflow: auto;

        }
        .pg-body .Rcontent{
            background-color: #E6E6FA;

            position: absolute;
            right: 0;
            top: 48px;
            bottom: 0;
            left: 200px;

            overflow: auto;

             /*detailInfo*/
            z-index: 9;
        }
        .pg-body .Rcontent .content{
            background-color: #E6E6FA;
        }

        .pg-footer{
        }
    </style>
</head>
<body>
    <div class="pg-header">
        <!--Logo-->
        <div class="logo left">智汇部落</div>
        <!--头像-->
        <div class="headPic right">
            <!--鼠标滑过效果演示-背景变色-->
            <!--不是单独给img标签设置成block-->
            <a class="Pic" href="#">
                <img src="images/headpic.jpg" alt="头像" title="头像" />
            </a>
            <!--鼠标滑过-下拉菜单-->
            <div class="detailInfo">
                <a href="#">我的资料</a>
                <a href="#">我的栏目</a>
                <a href="#">注销</a>
            </div>
        </div>

        <!--小图标提醒-->
        <div class="icons right">
            <i class="fa fa-bell-o" aria-hidden="true"></i>
        </div>
        <div class="icons right">
            <!-- i标签就相当于span标签 -->
            <i class="fa fa-envelope-o" aria-hidden="true"></i>
            <span class="msgInt">6</span>
        </div>
        <!--因为父级已经给了高度48px,子级没有超出父级预设高度48px,看似把父级撑起来了,其实不是撑起来了-->
        <!--可以不用清除浮动-->
    </div>

    <div  class="pg-body">
        <!--左-->
        <div class="Lmenu"></div>
        <!--右-->
        <div class="Rcontent">
            <div class="content"></div>
        </div>
    </div>

    <div  class="pg-footer"></div>
</body>
</html>

自适应响应式页面:
<!DOCTYPE html>
<html lang="en">
<head>
    <meta charset="UTF-8">
    <title>Title</title>
    <style>
        .main{
            height: 40px;
            background-color: red;
        }

        @media (min-width: 700px) {
            .main2{
                background-color: dodgerblue;
            }
        }
    </style>
</head>
<body style="margin: 0 auto">
    <div class="main main2"></div>
</body>
</html>

登录样式,设置label:
<!DOCTYPE html>
<html>
<head lang="en">
    <meta charset="UTF-8">
    <title></title>
    <style>
        label{
            width: 80px;
            text-align: right;
            display: inline-block;
        }
    </style>
</head>
<body>
    <form action="index" method="post">
        <p>
            <label for="user">用户名:</label>
            <input id="user" type="text" name="user" />
        </p>
        <p>
            <label for="pwd">密码:</label>
            <input id="pwd" type="text" name="password" />
            <input type="submit" value="登录" />
        </p>
    </form>
</body>
</html>

后记
1、搜索框input与submit按钮在不同浏览器上显示高度不一致的问题:
解决方法:
1)利用table(不利于SEO)
2)将两者的border设为0,即border:0
2、代码换行,内联元素(内联块元素)之间有间隙,可通过相应的设置解决;
3、内联元素在float以后,变成了行内块元素,但又不同于行内块元素,因为它不会因为代码换行有间隙,但又具有浮动功能。
4、margin-top有塌陷;==》可通过overflow:hidden解决
5、margin上下边距有重合问题(浮动元素和行内块元素均没有这种重合问题);==》可通过overflow:hidden解决;
6、三种清除浮动的方式;==》1)可通过coerflow:hidden解决;2)clear:both;3)clearfix:after...
7、.xx div(2层样式) .oo (一层样式)如果两者都有共同样式,一层的权重低,不能生效。==> body .oo就可以了(也改成2层);
8、left./top/right/bottom都是针对定位来起作用的,单独使用无效果。
9、相对定位:保留初始位置;
绝对定位:脱离文档流,不保留初始位置。
父级设置相对定位,不设置偏移,可以作为子级绝对定位的参照。如果父级设置绝对定位,margin: 0 auto;==>auto不生效
以上7-9:==>参考demo:相对定位篇
10、line-height:元素高度+padding(上下)
11、单个(不支持多个)块元素(行内块元素)相对父级居中:margin: 0 auto; 单个或多个内联元素(行内块元素)相对父级居中:text-align/line-height;
12、li标签给它宽、高、背景,就会显示出来,是圆点,低版本浏览器显示方块,===>可以使用优雅方式来降级,即可以看就行了,因为低版本浏览器用户量越来越少了。
===>可以使用: border-radius:50%;
13、ul>li标签做导航,利于SEO优化。

