我们的应用可能会用到地图定位等功能,但是无论高德还是百度直接接入到应用中都会导致体积增大,甚至导致65535方法数问题,所以用插件的方式接入是个不错的选择。
这里我用了Apkplug这个插件框架,下面是我的接入过程。
##百度地图接入
这里介绍一下将百度地图作为插件并接入宿主的例子,例子没有将完备的功能接入,只是将一个定位界面接入,在宿主中点击一下按钮,弹出定位界面。
###一、插件开发
其实比较麻烦的是账号申请,key申请,所以先介绍一下这些相关的。
注册的话,这里不做详细介绍,我第一次注册,怎么都要求我上传什么身份证正反面照片,我没传,第二次登陆的时候好像就不需要了,你遇到相同的情况,可以先退出,再登陆,也许可以绕过上传证件照。
申请key,这个跟高德地图的操作差不多,但是使用时有所差别,下面会说,先看一下key的申请。
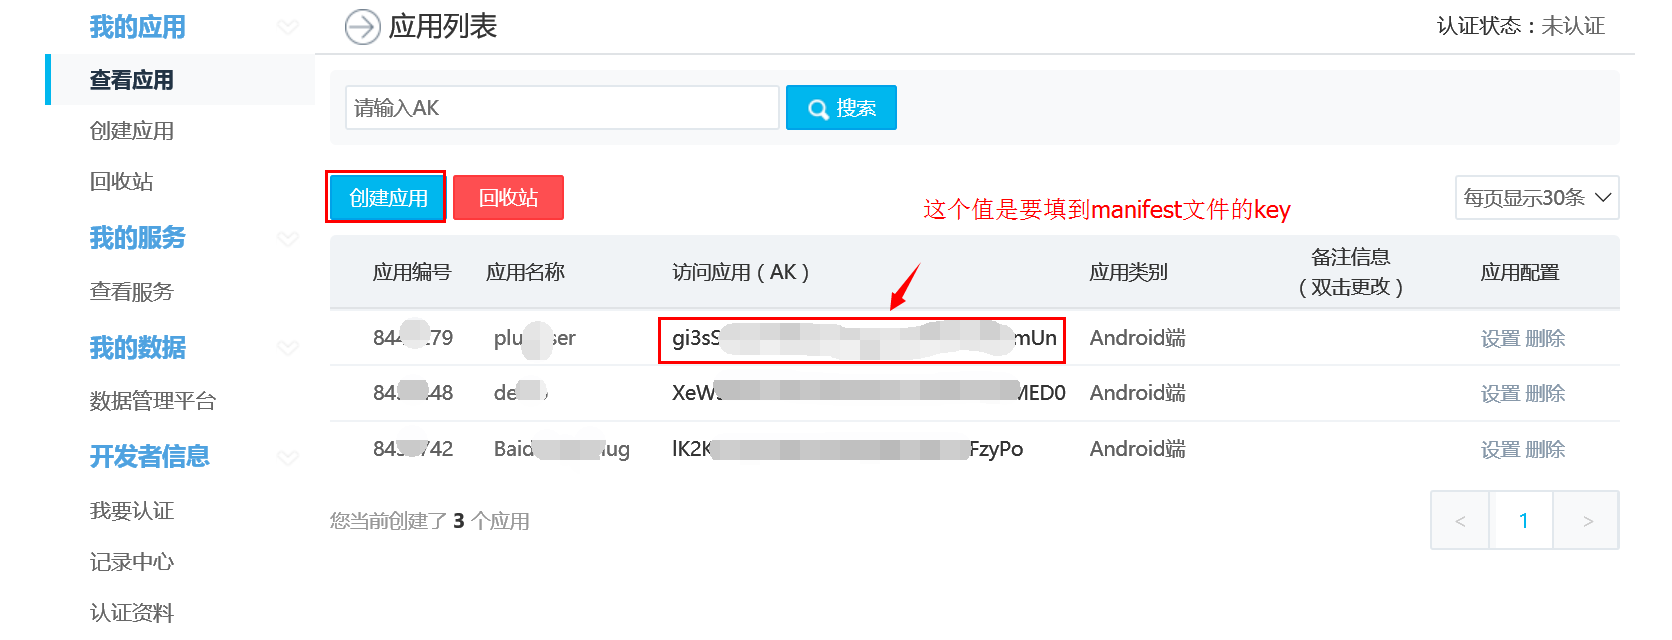
这里是百度地图的控制台

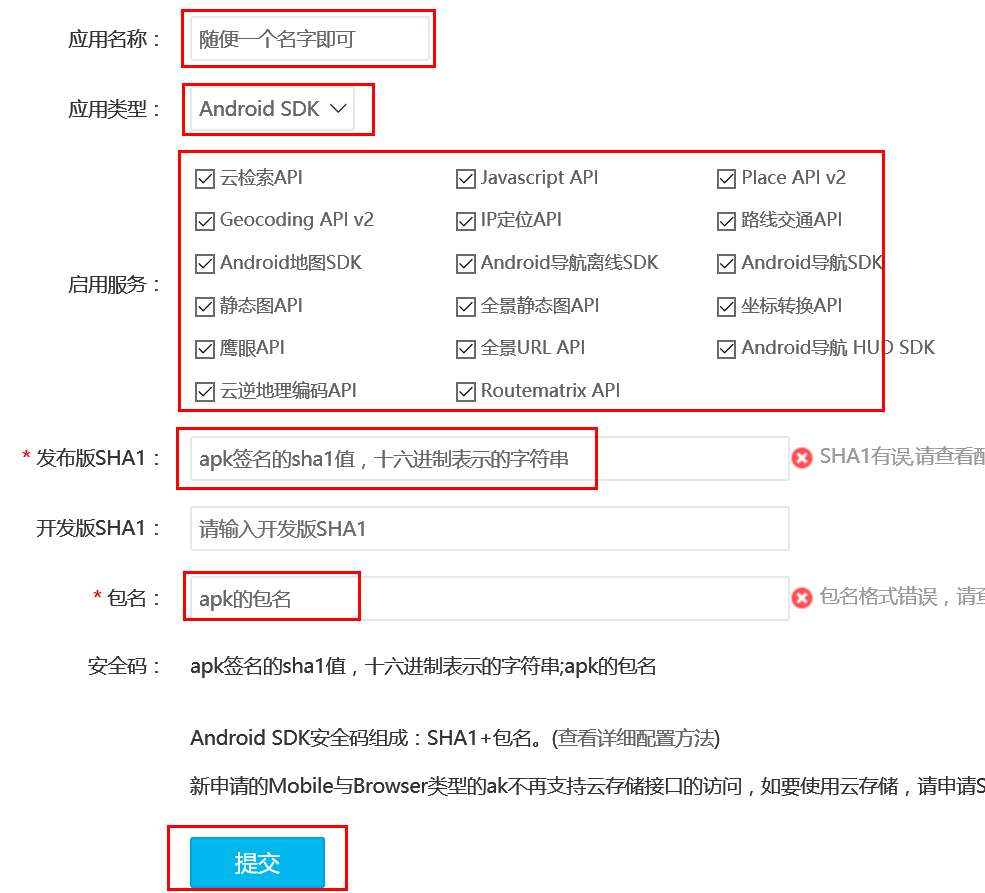
点击创建应用后,如下图所示:

其中,apk签名sha1值的取得参考这里
这里需要注意的是,一个应用想使用这个key,需要签名、包名、key值相对应。地图sdk是在插件中接入的,所以key值需要配置在插件里,但是百度地图sdk读取包名时,会读取宿主的,所以在创建key时,直接使用宿主包名,但是将生成的key配置到插件。如果为了测试时插件独立运行,可以单独为插件生成一套相应key,但是加入宿主时,必须换成宿主key
key的问题搞清楚后,就没有太多坑了。按照百度地图文档添加一个定位界面即可。
 <com.baidu.mapapi.map.MapView
    android:id="@+id/bmapView"
    android:layout_width="fill_parent"
    android:layout_height="fill_parent"
    android:clickable="true"
    android:layout_below="@+id/textView" />
这是activity中代码:
    mMapView = (MapView) findViewById(R.id.bmapView);
    baiduMap = mMapView.getMap();
    // 开启定位图层
    baiduMap.setMyLocationEnabled(true);
    // 定位初始化
    mLocationClient = new LocationClient(this);
    mLocationClient.registerLocationListener(myListener);
    LocationClientOption option = new LocationClientOption();
    option.setOpenGps(true); // 打开gps
    option.setCoorType("bd09ll"); // 设置坐标类型
    option.setScanSpan(1000);
    mLocationClient.setLocOption(option);
    mLocationClient.start();
这些都在百度地图文档中可以查到,不做详细介绍,包括初始化、权限、及组件的配置,直接参考百度文档。没什么坑可说。先用插件单独运行一下,能实现功能就算完成了。
然后按照套路,给插件设置plugin.xml
<plugin-features
    Bundle-Name="AMapPlug"
    Bundle-SymbolicName="com.apkplug.amapplug"
    Bundle-Version="1.0.0"
    date="2016.07.20"
    provider-name="APKPLUG"
    Bundle-Activity="com.apkplug.baidumapplug.MenuActivity"
    start-level ="1"
    start-up="true"
>
</plugin-features>
这样一个插件就完成了。唯一需要注意的是上面提到的key的问题。
###宿主开发
宿主开发中,需要将百度地图的权限配置过来,是android 6.0的话记得手动获取权限。其他没啥坑了,按照套路来就行。
我这里直接启动activity
Intent intent = new Intent();
                    intent.setClassName(MainActivity.this, "com.apkplug.baidumapplug.MainActivity");
                    intent.addFlags(Intent.FLAG_ACTIVITY_NEW_TASK);
                    startActivity(intent);
这里面还使用了一个异步启动的例子:
org.osgi.framework.Bundle[] bundles = FrameworkFactory.getInstance().getFrame().getSystemBundleContext().getBundles();
            for(org.osgi.framework.Bundle bundle : bundles){
                if(bundle.getName().equals("BaiduMapPlug")){

                    bundle.start(new StartCallback() {
                        @Override
                        public void onSuccess(org.osgi.framework.Bundle bundle) {
                            Intent intent = new Intent();
                            intent.setClassName(MainActivity.this, "com.apkplug.baidumapplug.MainActivity");
                            intent.addFlags(Intent.FLAG_ACTIVITY_NEW_TASK);
                            startActivity(intent);
                            Log.e(this.getClass().getName(),bundle.getName());
                        }

                        @Override
                        public void onFail(org.osgi.framework.Bundle bundle, Throwable throwable) {
                            StringWriter sw = new StringWriter();
                            PrintWriter pw = new PrintWriter(sw);
                            throwable.printStackTrace(pw);

                            System.out.println(sw.toString()); // stack trace as a string
                            Log.e(this.getClass().getName(),throwable.toString());
                        }
                    });
                }
            }
如果一个插件,在初始化的时候很费时,则可以选择异步启动。
demo地址:
插件地址:https://github.com/apkplug/SDKDemo/tree/master/BaiduMapPlug
宿主地址:https://github.com/apkplug/SDKDemo/tree/master/BaiduMapPlugUser
##高德地图插件开发
下面介绍高德地图的接入过程,我把高德地图的一个简单定位功能放到了插件里,从宿主点一下按钮就跳到插件的定位界面。
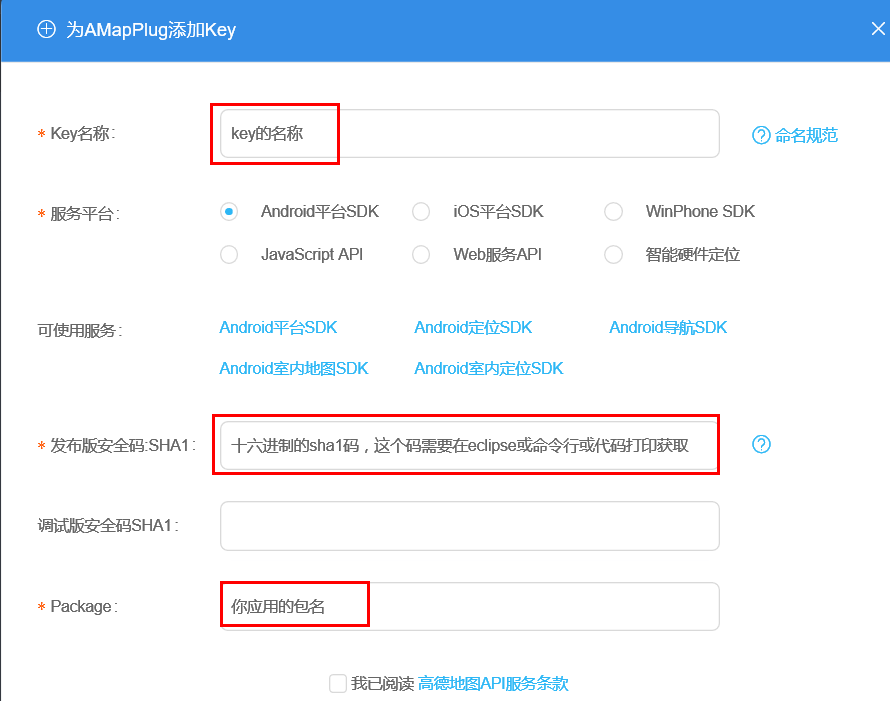
###1 插件开发 首先注册高德,注册好后,比较关键的就是key的使用,高德地图的各种接口调用都要检测key,也是因为有人反映key的各种问题,所以这个例子重点说的其实是key的事。
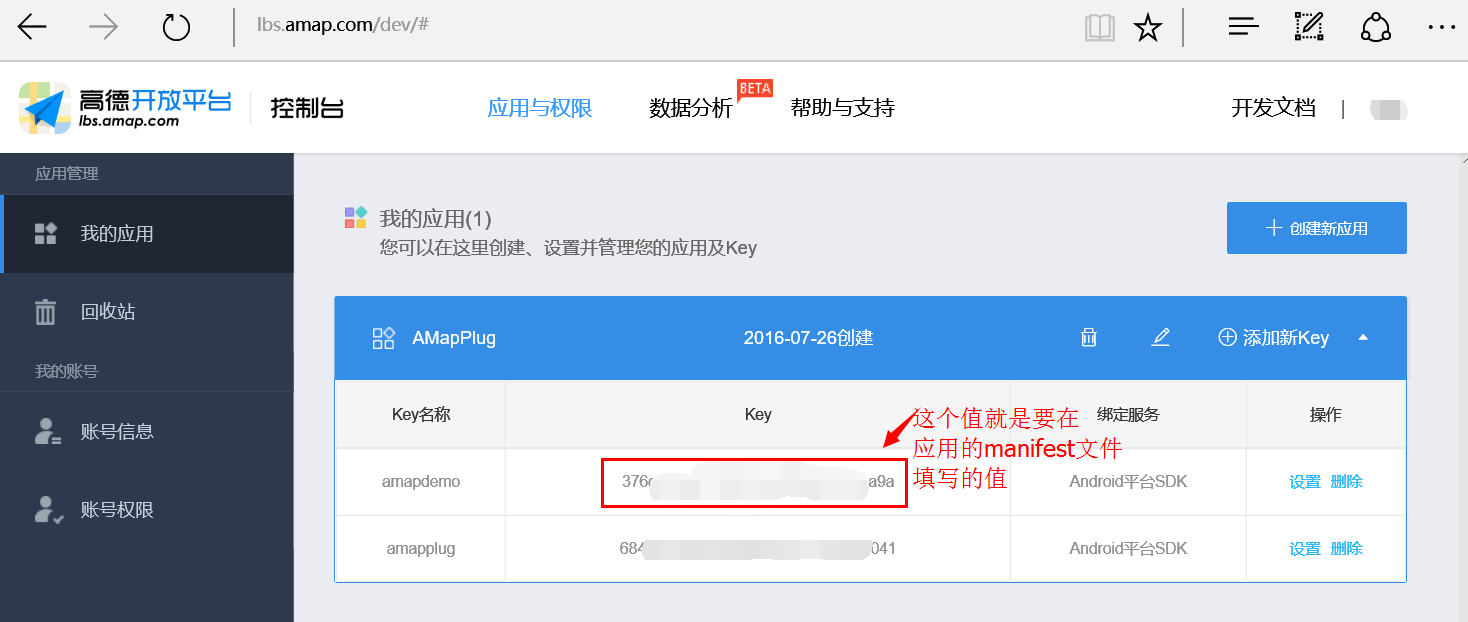
key的管理在控制台:


上面提到获取sha1值的方法:参考这里
搞定了key的问题,就好办了,下面做一个定位的界面
在你的界面中加入地图控件
<com.amap.api.maps.MapView
    android:id="@+id/map"
    android:layout_width="match_parent"
    android:layout_height="match_parent">
</com.amap.api.maps.MapView>
然后在代码中进行设置
    mlocationClient = new AMapLocationClient(getContext());
    mLocationOption = new AMapLocationClientOption();

    mMapView = ((MapView)getView().findViewById(R.id.map));
    mMapView.onCreate(savedInstanceState);
    aMap = mMapView.getMap();

    //对界面的监听,这个要先设置
    aMap.setLocationSource(new LocationSource() {
        @Override
        public void activate(final OnLocationChangedListener onLocationChangedListener) {
            mlocationClient.setLocationListener(new AMapLocationListener() {
                @Override
                public void onLocationChanged(AMapLocation aMapLocation) {
                    onLocationChangedListener.onLocationChanged(aMapLocation);
                }
            });

            mLocationOption.setLocationMode(AMapLocationClientOption.AMapLocationMode.Hight_Accuracy);
            mlocationClient.setLocationOption(mLocationOption);
            mlocationClient.startLocation();
        }

        @Override
        public void deactivate() {
            if (mlocationClient != null) {
                mlocationClient.stopLocation();
                mlocationClient.onDestroy();
            }
            mlocationClient = null;
        }
    });
    aMap.getUiSettings().setMyLocationButtonEnabled(true);// 设置默认定位按钮是否显示

    aMap.setMyLocationEnabled(true);// 设置为true表示显示定位层并可触发定位,false表示隐藏定位层并不可触发定位,默认是false
    // 设置定位的类型为定位模式 ,可以由定位、跟随或地图根据面向方向旋转几种
    aMap.setMyLocationType(AMap.LOCATION_TYPE_LOCATE);
这样界面就好了,你单独运行插件应该就能定位了,如果返回错误码,提示你key错了,那你需要再好好看看上面设置key的说明。
然后按照套路,给插件设置plugin.xml
<plugin-features
    Bundle-Name="AMapPlug"
    Bundle-SymbolicName="com.apkplug.amapplug"
    Bundle-Version="1.0.0"
    date="2016.07.20"
    provider-name="APKPLUG"
    Bundle-Activity="com.apkplug.amapplug.MenuActivity"
    start-level ="1"
    start-up="true"
>
</plugin-features>
###2 宿主开发
宿主不需要特殊说明什么,按照套路来,初始化、安装插件。按照高德地图说明文档配置权限。
直接用intent启动插件就行
            Intent intent = new Intent();
            intent.setClassName(MainActivity.this, "com.apkplug.amapplug.MenuActivity");
            intent.addFlags(Intent.FLAG_ACTIVITY_NEW_TASK);
            startActivity(intent);
demo代码:
插件工程:https://github.com/apkplug/SDKDemo/tree/master/AMapPlug
宿主工程:https://github.com/apkplug/SDKDemo/tree/master/AMapPlugUser
来源:oschina
链接:https://my.oschina.net/u/2886525/blog/733502