结论
任何框架与spring进行整合的时候都是spring来整合其余框架,也就是spring一直都是主控方,其余的框架是将自己的某些东西交给spring来进行管理。
对于spring与mybatis整合也是不例外的,主要是mybatis将自己的sqlSessionFactory交给spring来进行管理。
整合思路
mybatis实现思路
通过SqlSessionFactory->SqlSession->mapper文件->通过mapper去出现增删改查,所以mybatis的根源就是SqlSessionFactory,那么spring整合mybatis其实就是将mybatis的SqlSessionFactory交给spring来管理。
整合步骤
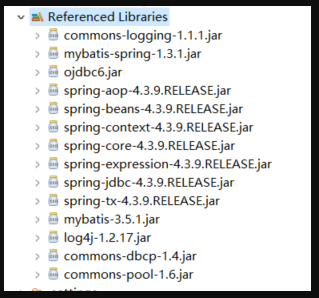
需要的jar
mybatis的
mybatis.jar
spring的
spring-beans.jar
spring-core.jar
spring-context.jar
spring-txt.jar
spring-expression.jar
spring-aop.jar
spring-jdbc.jar
spring-web.jar(如果是web项目则需要)
数据库的
commons-pool.jar
ojdbc.jar
commons-dbcp.jar // 数据源
日志包
common-logging.jar
log4.jar
spring与mybatis整合的包
mybatis-spring.jar

mybatis部分
如果是单独使用mybatis是需要有两类配置文件的,其中一个就是mybatis的核心配置文件,另外一类就是mybatis的mapper配置文件。
mybatis的核心配置文件基本配置
<?xml version="1.0" encoding="UTF-8"?>
<!DOCTYPE configuration
  PUBLIC "-//mybatis.org//DTD Config 3.0//EN"
  "http://mybatis.org/dtd/mybatis-3-config.dtd">

<configuration>
	<!-- 别名配置 -->
	<typeAliases>
		<typeAlias type="com.mybatis.domain.Student" alias="Studnet"/>
	</typeAliases>

	<environments default="development">
		<environment id="development">
			<!-- 数据库连接(这里案例是使用的mysql数据库) -->
			<transactionManager type="JDBC" />
			<dataSource type="POOLED">
				<property name="driver" value="com.mysql.jdbc.Driver"/>
				<property name="url" value="jdbc:mysql://localhost:3306/test"/>
				<property name="username" value="root"/>
				<property name="password" value="admin"/>
			</dataSource>
		</environment>
	</environments>
	<mappers>
  		<mapper resource="top/twolovelypig/mapper/StudentMapper.xml"/>
  	</mappers>
</configuration>
可以看到在核心配置文件中它配置的是数据库连接,以及mapper文件。但是现在要想将mybatis的的sqlSessionfactory交给spring来管理,数据库连接这一步就交给spring配置文件来进行配置。所以实际上mybatis的配置文件只有下面的内容:
<?xml version="1.0" encoding="UTF-8"?>
<!DOCTYPE configuration
  PUBLIC "-//mybatis.org//DTD Config 3.0//EN"
  "http://mybatis.org/dtd/mybatis-3-config.dtd">

  <configuration>
  	<!-- 本来在mybatis的配置文件中需要配置下面两方面的信息,一个是数据库信息,一个是加载mapper映射文件,现在数据
  	库信息在spring的配置文件中配置了,但是加载mapper文件还是在mybatis的核心配置文件里面配置 -->
  	<!-- 数据库信息 -->

  	<!-- mapper文件 -->
  	<mappers>
  		<mapper resource="top/twolovelypig/mapper/StudentMapper.xml"/>
  	</mappers>

  </configuration>
mybatis的映射文件
这个映射文件就是建立表与类之间的关系.
<?xml version="1.0" encoding="UTF-8"?>
<!DOCTYPE mapper PUBLIC "-//mybatis.org//DTD Mapper 3.0//EN"
	"http://mybatis.org/dtd/mybatis-3-mapper.dtd">

<mapper namespace="top.twolovelypig.mapper.StudentMapper">
	<insert id="addStudent" parameterType="top.twolovelypig.entity.Student">
		insert into student(stu_no, stu_name, stu_age) values(#{stuNo}, #{stuName}, #{stuAge})
	</insert>

</mapper>
spring部分
spring的配置文件
<?xml version="1.0" encoding="UTF-8"?>
<beans xmlns="http://www.springframework.org/schema/beans"
	xmlns:xsi="http://www.w3.org/2001/XMLSchema-instance"
	xsi:schemaLocation="http://www.springframework.org/schema/beans http://www.springframework.org/schema/beans/spring-beans.xsd">

	<!-- 加载属性文件需要使用到PreferencesPlaceholderConfigurer这个类 -->
	<bean id="config" class="org.springframework.beans.factory.config.PreferencesPlaceholderConfigurer">
		<property name="locations">
			<array>
				<value>classpath:db.properties</value>
			</array>
		</property>
	</bean>

	<!-- 配置数据库信息(替代mybatis的配置文件) -->
	<bean id="dataSource" class="org.apache.commons.dbcp.BasicDataSource">
		<!-- 下面这些name里面的值就是上面BasicDataSource类里面的属性 -->
		<property name="driverClassName" value="${driver}"></property>
		<property name="url" value="${url}"></property>
		<property name="username" value="${username}"></property>
		<property name="password" value="${password}"></property>
		<property name="maxActive" value="${maxActive}"></property>
		<property name="maxIdle" value="${maxIdle}"></property>
	</bean>
</beans>
在前面已经说过需要在spring的配置文件中建立数据库连接的配置,这个配置需要用到spring,mybatis整合包中的BasicDataSource类,然后往里面注入一些属性来进行配置。在上面的配置中用到了属性文件,具体内容如下:
db.properties
driver=oracle.jdbc.OracleDriver
url=jdbc:oracle:thin:@127.0.0.1:1521:ORCL
username=scott
password=tiger
maxIdle=1000
maxActive=200
需要注意的是这里建立的是java普通项目,如果是为webxlm的话,就需要在web.xml中加载spring的配置文件,代码如下
web.xml
<context-param>
		<param-name>contextConfigLocation</param-name>
		<param-value>classpath:applicationContext.xml</param-value>
	</context-param>

	<listener>
		<listener-class>org.springframework.web.context.ContextLoaderListener</listener-class>
	</listener>
整合部分
整合的时候有几个点需要注意。
第一个就是dao实现类需要继承SqlSessionDaoSupport,在这个类中有有一个属性是sqlSessionFactory
package top.twolovelypig.dao.impl;

import org.apache.ibatis.session.SqlSession;
import org.mybatis.spring.support.SqlSessionDaoSupport;

import top.twolovelypig.entity.Student;
import top.twolovelypig.mapper.StudentMapper;

// 这里继承SqlSessionDaoSupport这个类是为了获取sqlSession这个对象
public class StudentDao extends SqlSessionDaoSupport implements StudentMapper {

	@Override
	public void addStudent(Student student) {
		SqlSession sqlSession = super.getSqlSession();
		StudentMapper studentDao = sqlSession.getMapper(StudentMapper.class);
		studentDao.addStudent(student);
	}
}
第二个就是配置文件中需要在springioc容器中创建mybatis的核心类SQLSessionFactory并且注入到dao实现类中。
完整的spring配置文件
applicationContext.xml
<?xml version="1.0" encoding="UTF-8"?>
<beans xmlns="http://www.springframework.org/schema/beans"
	xmlns:xsi="http://www.w3.org/2001/XMLSchema-instance"
	xsi:schemaLocation="http://www.springframework.org/schema/beans http://www.springframework.org/schema/beans/spring-beans.xsd">

	<!-- 加载属性文件需要使用到PreferencesPlaceholderConfigurer这个类 -->
	<bean id="config" class="org.springframework.beans.factory.config.PreferencesPlaceholderConfigurer">
		<property name="locations">
			<array>
				<value>classpath:db.properties</value>
			</array>
		</property>
	</bean>

	<bean name="studentMapper" class="top.twolovelypig.dao.impl.StudentDao">
		<!-- 将spring配置的sqlSessionFactory对象交给DAO -->
		<property name="sqlSessionFactory" ref="sqlSessionFactory"></property>
	</bean>

	<bean id="studentService" class="top.twolovelypig.service.impl.StudenService">
		<property name="studentMapper" ref="studentMapper"></property>
	</bean>

	<!-- 配置数据库信息(替代mybatis的配置文件) -->
	<bean id="dataSource" class="org.apache.commons.dbcp.BasicDataSource">
		<!-- 下面这些name里面的值就是上面BasicDataSource类里面的属性 -->
		<property name="driverClassName" value="${driver}"></property>
		<property name="url" value="${url}"></property>
		<property name="username" value="${username}"></property>
		<property name="password" value="${password}"></property>
		<property name="maxActive" value="${maxActive}"></property>
		<property name="maxIdle" value="${maxIdle}"></property>
	</bean>

	<!-- 在springioc容器中创建mybatis的核心类SQLSessionFactory -->
	<bean id="sqlSessionFactory" class="org.mybatis.spring.SqlSessionFactoryBean">
		<property name="dataSource" ref="dataSource"></property>
		<!-- 加载mybaits的配置文件 -->
		<property name="configLocation" value="classpath:mybatisConfig.xml"></property>
	</bean>
</beans>
spring产生动态mapper对象的三种方法
第一种
spring整合mybatis主要就是为了动态mapper,上面的方式就是在dao实现类中继承SqlSessionDaoSupport,然后拿到父类的session对象,通过session对象获取mapper
第二种
第二种方式就是将第一种方式的实现类去掉。这里所说的去掉不是真的去掉,实际上是框架已经帮我们写好了,我们只需要配置一下即可。
修改spring的配置文件
<!-- <bean name="studentMapper" class="top.twolovelypig.dao.impl.StudentDao">
		将spring配置的sqlSessionFactory对象交给DAO
		<property name="sqlSessionFactory" ref="sqlSessionFactory"></property>
	</bean> -->

	<bean id="studentMapper" class="org.mybatis.spring.mapper.MapperFactoryBean">
		<property name="mapperInterface" value="top.twolovelypig.mapper.StudentMapper"></property>
		<property name="sqlSessionFactory" ref="sqlSessionFactory"></property>
	</bean>
上面注释的部分是第一种方式,也就是自己写了实现类,然后该dao的实现类继承了SqlSessionDaoSupport并且需要自己去配置sqlSessionFactory(这个是继承的类里面的属性),取代第一种方式的就是注释代码的下面那部分代码,这里需要使用到的类是MapperFactoryBean(spring与mybatis整合的包提供的)。该类主要配置两个属性,第一个就是mapperInterface,也就是我们的接口,第二个就是sqlSessionFactory,至于第二个无聊是使用哪种方式都是不可少的。
<font color="red">注:无论是第一种还是第二种还是都是有几个实现类或者说有几个接口就都需要配置一次,上面是只有一个mapper,所以只是配置了一次,但是如果有多个mapper的时候就需要配置多次</font>
第三种
上面已经说过了前面两种方式的缺陷就是有几个mapper就需要配置几次,所以第三种方式就是为了解决这个问题,也就是通过包扫描的方式来进项配置。第三种配置方式如下:
spring的配置文件applicationContext.xml
<!--  第一种方式
	<bean name="studentMapper" class="top.twolovelypig.dao.impl.StudentDao">
		将spring配置的sqlSessionFactory对象交给DAO
		<property name="sqlSessionFactory" ref="sqlSessionFactory"></property>
	</bean> -->

	<!-- 第二种方式
	<bean id="studentMapper" class="org.mybatis.spring.mapper.MapperFactoryBean">
		<property name="mapperInterface" value="top.twolovelypig.mapper.StudentMapper"></property>
		<property name="sqlSessionFactory" ref="sqlSessionFactory"></property>
	</bean> -->

	<!-- 第三种方式(包扫描形式) -->
	<bean id="mappers" class="org.mybatis.spring.mapper.MapperScannerConfigurer">
		<property name="sqlSessionFactoryBeanName" value="sqlSessionFactory"></property>
		<!--指定批量产生那个包中的mapper对象  -->
		<property name="basePackage" value="top.twolovelypig.mapper"></property>
	</bean>

	<bean id="studentService" class="top.twolovelypig.service.impl.StudenService">
		<!-- 需要注意的是使用第三种方式的时候在ioc容器中mapper名称默认就是接口名(第一个字母小写) -->
		<property name="studentMapper" ref="studentMapper"></property>
	</bean>
有几个地方需要注意:
- 使用包扫描的时候使用的类是
MapperScannerConfigurer,与第二种方式的类是不同的 - 上面说无论那种方式都是需要配置
sqlSessionFactory的,但是前面两种类里面的属性名都是sqlSessionFactory,使用第三种方式的时候属性名是sqlSessionFactoryBeanName,而且该属性是一个string类型,而不是一个对象,所以后面不是使用ref,而是使用value - 当使用宝扫描的时候mapper的名称默认就是接口的名称(第一个字母是小写的),比如上面的
studentService里面就使用到了studentMapper,不过可以看到配置文件里面是没有配置studentMapper的,这里可以引用是因为该接口名称就是StudentMapper
来源:oschina
链接:https://my.oschina.net/u/4165098/blog/3077578