
微服务会把一个单个大项目拆分成多个独立的小服务,这些小服务之间的调用采用的是http restful,spring cloud提供了ribbon+restTemplate 。ribbon是一个负载均衡的客户端。
1.首先接着上篇博客的服务,启动eureka-server工程,启动eureka-client-say-hi工程,它的端口为8792,然后更改端口由8792-》8793,并启动,发现注册中心8792为Down了

此时点击EditConfiguration 将Single instance only前面对勾去掉;然后启动两个实例
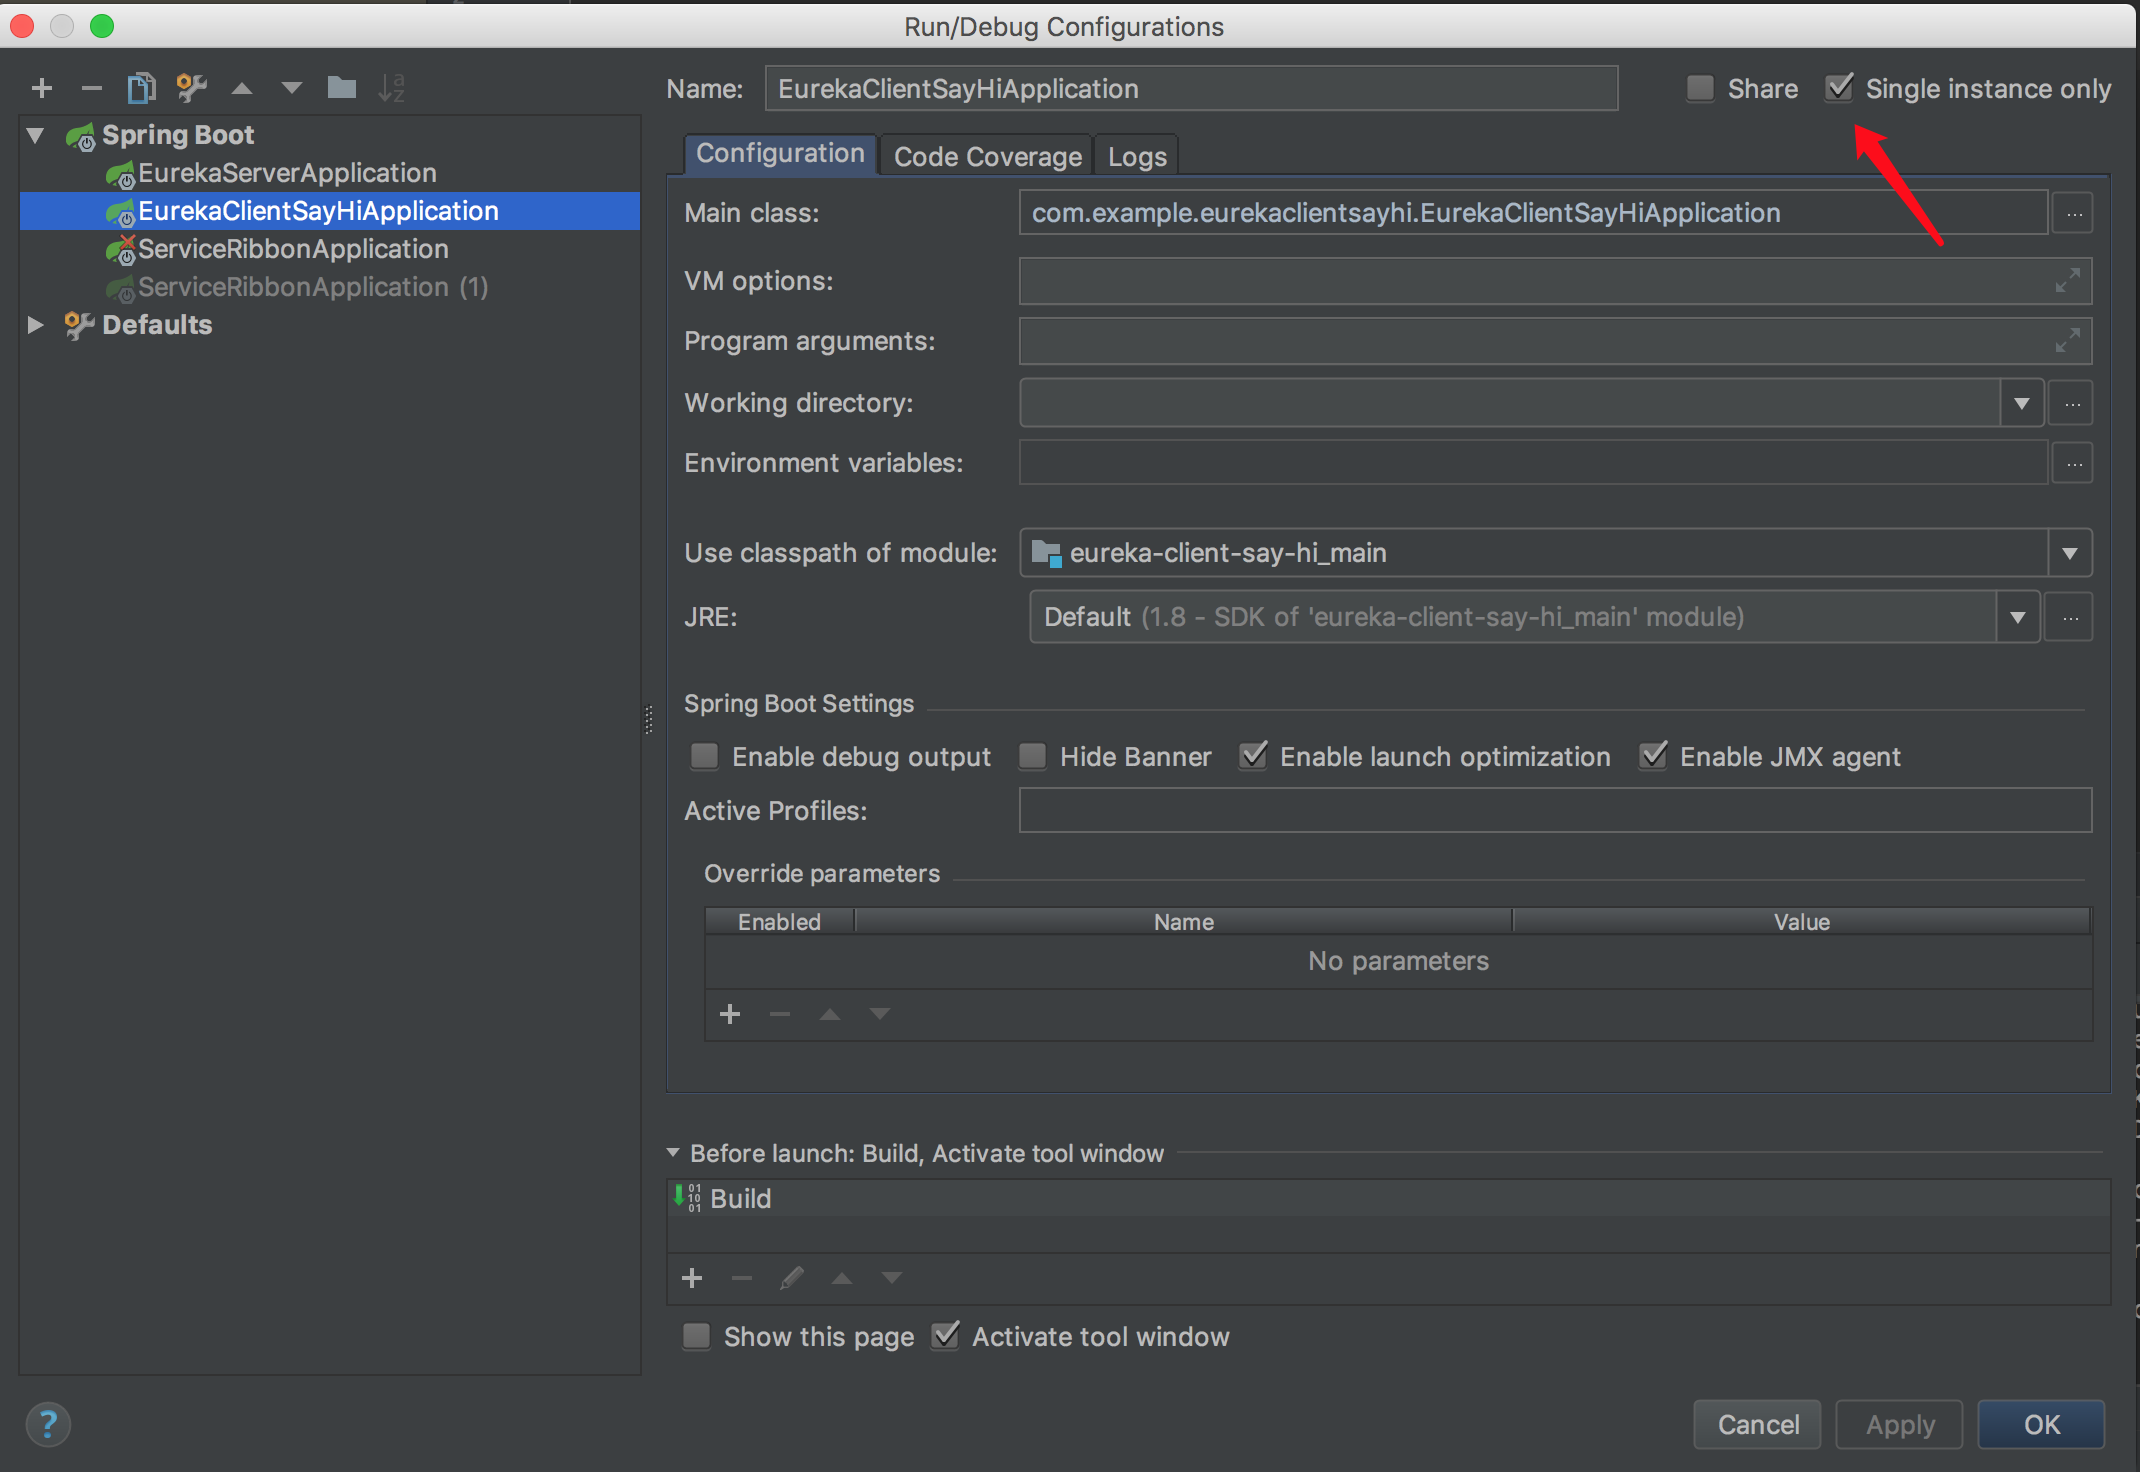
此时发现eureka-server注册了2个实例,这就相当于一个小的集群。

2.新建一个服务消费者
build.gradle文件
buildscript {
	ext {
		springBootVersion = '2.0.4.RELEASE'
	}
	repositories {
		mavenCentral()
	}
	dependencies {
		classpath("org.springframework.boot:spring-boot-gradle-plugin:${springBootVersion}")
	}
}

apply plugin: 'java'
apply plugin: 'eclipse'
apply plugin: 'org.springframework.boot'
apply plugin: 'io.spring.dependency-management'

group = 'com.example'
version = '0.0.1-SNAPSHOT'
sourceCompatibility = 1.8

repositories {
	mavenCentral()
}


ext {
	springCloudVersion = 'Finchley.SR1'
}

dependencies {
	compile('org.springframework.boot:spring-boot-starter-web')
	compile('org.springframework.cloud:spring-cloud-starter-netflix-eureka-client')
	compile('org.springframework.cloud:spring-cloud-starter-netflix-ribbon')
	testCompile('org.springframework.boot:spring-boot-starter-test')
}

dependencyManagement {
	imports {
		mavenBom "org.springframework.cloud:spring-cloud-dependencies:${springCloudVersion}"
	}
}
application.yml文件
server:
  port: 8794

spring:
  application:
    name: service-ribbon

eureka:
  client:
    service-url:
      defaultZone: http://localhost:8791/eureka/
主方法
package com.example.serviceribbon;

import org.springframework.boot.SpringApplication;
import org.springframework.boot.autoconfigure.SpringBootApplication;
import org.springframework.cloud.client.discovery.EnableDiscoveryClient;
import org.springframework.cloud.client.loadbalancer.LoadBalanced;
import org.springframework.cloud.netflix.eureka.EnableEurekaClient;
import org.springframework.context.annotation.Bean;
import org.springframework.web.client.RestTemplate;

@EnableDiscoveryClient   //向服务中心注册
@EnableEurekaClient
@SpringBootApplication
public class ServiceRibbonApplication {

    public static void main(String[] args) {
        SpringApplication.run(ServiceRibbonApplication.class, args);
    }


    @Bean   //注入一个Bean
    @LoadBalanced  //表明该bean具有负载均衡的功能
    RestTemplate restTemplate() {
        return new RestTemplate();
    }
}
HelloService.java
package com.example.serviceribbon;

import org.springframework.beans.factory.annotation.Autowired;
import org.springframework.stereotype.Service;
import org.springframework.web.client.RestTemplate;

@Service
public class HelloService {

    @Autowired
    RestTemplate restTemplate;

//通过之前注入ioc容器的restTemplate来消费eureka-client-say-hi服务的“/hi”接口,在这里我们直接用的程序名替代了具体的url地址,在ribbon中它会根据服务名来选择具体的服务实例,根据服务实例在请求的时候会用具体的url替换掉服务名:
    public String hiService() {
        return restTemplate.getForObject("http://EUREKA-CLIENT-SAY-HI/hi", String.class);
    }
}
HelloController.java
package com.example.serviceribbon;


import org.springframework.beans.factory.annotation.Autowired;
import org.springframework.web.bind.annotation.RequestMapping;
import org.springframework.web.bind.annotation.RestController;

@RestController
public class HelloController {
    @Autowired
    HelloService helloService;

    @RequestMapping("/hi")
    public String sayHi() {
        return helloService.hiService();
    }
}
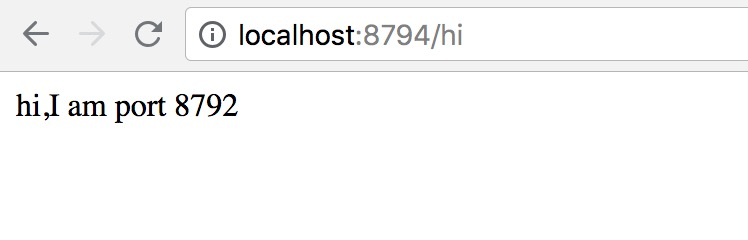
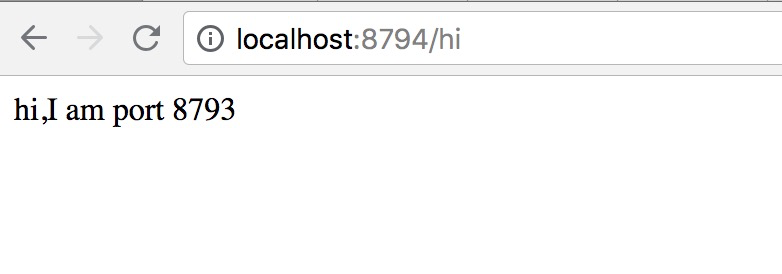
此时启动该项目service-ribbon,访问http://localhost:/hi,出现以下两种情况
此时的注册中心:

以上情况进行解读:
一个服务注册中心,eureka-server 端口为8791
eureka-client-say-hi项目跑了两个实例,端口分别为8792和8793分别向服务注册中心注册;
service-ribbon端口为8794,向服务注册中心注册;
当service-ribbon通过restTemplate调用eureka-client-say-hi的接口时,因为ribbon进行了负载均衡,会轮流调用eureka-client-say-hi,8792,和8793两个实例的hi接口。
来源:oschina
链接:https://my.oschina.net/u/2263272/blog/1925771