文章目录
AudioRecorder与MediaRecorder的比较
以下内容来自博客:https://www.cnblogs.com/Amandaliu/archive/2013/02/04/2891604.html 若有侵权,立即删除
1. AudioRecord
-
主要是实现边录边播(AudioRecord+AudioTrack)以及对音频的实时处理(如会说话的汤姆猫、语音)
-
优点:语音的实时处理,可以用代码实现各种音频的封装
-
缺点:输出是PCM语音数据,如果保存成音频文件,是不能够被播放器播放的,所以必须先写代码实现数据编码以及压缩
示例:
- 使用AudioRecord类录音,并实现WAV格式封装。录音20s,输出的音频文件大概为3.5M左右(已写测试代码)
2、MediaRecorder
-
已经集成了录音、编码、压缩等,支持少量的录音音频格式,大概有.aac(API = 16) .amr .3gp
-
优点:大部分以及集成,直接调用相关接口即可,代码量小
-
缺点:无法实时处理音频;输出的音频格式不是很多,例如没有输出mp3格式文件
示例:
- 使用MediaRecorder类录音,输出amr格式文件。录音20s,输出的音频文件大概为33K(已写测试代码)
3、音频格式比较
-
WAV格式:录音质量高,但是压缩率小,文件大
-
AAC格式:相对于mp3,AAC格式的音质更佳,文件更小;有损压缩;一般苹果或者Android SDK4.1.2(API 16)及以上版本支持播放
-
AMR格式:压缩比比较大,但相对其他的压缩格式质量比较差,多用于人声,通话录音
-
至于常用的mp3格式,使用MediaRecorder没有该视频格式输出。一些人的做法是使用AudioRecord录音,然后编码成wav格式,再转换成mp3格式
AudioRecorder
以下内容来自博客:https://blog.csdn.net/hellofeiya/article/details/8968534 若有侵权,立即删除
构造参数
public AudioRecord (int audioSource, int sampleRateInHz, int channelConfig, int audioFormat, int bufferSizeInBytes)
| 参数名 | 说明 |
|---|---|
| audioSource | 音频源:指的是从哪里采集音频。这里我们当然是从麦克风采集音频,所以此参数的值为MIC |
| sampleRateInHz | the sample rate expressed in Hertz. Examples of rates are (but not limited to) 44100, 22050 and 11025. 采样率越高,音质越高。 |
| channelConfig | describes the configuration of the audio channels. See CHANNEL_IN_MONO and CHANNEL_IN_STEREO , MONO单声道,STEREO立体声 |
| audioFormat | the format in which the audio data is represented. See ENCODING_PCM_16BIT and ENCODING_PCM_8BIT. 编码制式和采样大小:采集来的数据当然使用PCM编码(脉冲代码调制编码,即PCM编码。PCM通过抽样、量化、编码三个步骤将连续变化的模拟信号转换为数字编码。) android支持的采样大小16bit 或者8bit。当然采样大小越大,那么信息量越多,音质也越高,现在主流的采样大小都是16bit,在低质量的语音传输的时候8bit足够了。 |
| bufferSizeInBytes | the total size (in bytes) of the buffer where audio data is written to during the recording. New audio data can be read from this buffer in smaller chunks than this size. SeegetMinBufferSize(int, int, int) to determine the minimum required buffer size for the successful creation of an AudioRecord instance. Using values smaller than getMinBufferSize() will result in an initialization failure. 采集数据需要的缓冲区的大小,如果不知道最小需要的大小可以在getMinBufferSize()查看。 |
AudioTrack
public AudioTrack (int streamType, int sampleRateInHz, int channelConfig, int audioFormat, int bufferSizeInBytes, int mode)
代码解析
1. 创建一个AudioRecorder对象及初始化
    /**
     * 创建一个AudioRecorder对象及初始化
     * @param rawAudioName,原始音频路径
     * @param wavAudioName,wav音频路径
     * @return
     */
    private void creatAudioRecord(String rawAudioName, String wavAudioName) {
        // 获取音频文件路径
        this.rawAudioName = rawAudioName;
        this.wavAudioName = wavAudioName;

        // 获得缓冲区字节大小
        bufferSizeInBytes = AudioRecord.getMinBufferSize(AudioFileFunc.AUDIO_SAMPLE_RATE,
                AudioFormat.CHANNEL_IN_MONO, AudioFormat.ENCODING_PCM_16BIT);

        // 创建AudioRecord对象
        audioRecord = new AudioRecord(AudioFileFunc.AUDIO_INPUT, AudioFileFunc.AUDIO_SAMPLE_RATE,
                AudioFormat.CHANNEL_IN_MONO, AudioFormat.ENCODING_PCM_16BIT, bufferSizeInBytes);
    }
2. 启动录音
creatAudioRecord();
audioRecord.startRecording();
// 让录制状态为true
isRecord = true;
// 开启音频文件写入线程
new Thread(new AudioRecordThread()).start();
3. 录音线程
    class AudioRecordThread implements Runnable {
        @Override
        public void run() {
            writeDateTOFile();//往文件中写入裸数据
            copyWaveFile(rawAudioName, wavAudioName, AUDIO_SAMPLE_RATE, CHANNELS);//给裸数据加上头文件
        }
    }
4. 获取录音裸数据
audioRecord.read(audiodata, 0, bufferSizeInBytes);
    private void writeDateTOFile() {
        // new一个byte数组用来存一些字节数据,大小为缓冲区大小
        byte[] audiodata = new byte[bufferSizeInBytes];
        FileOutputStream fos = null;
        int readsize = 0;
        try {
            File file = new File(rawAudioName);
            if (file.exists()) {
                file.delete();
            }
            fos = new FileOutputStream(file);// 建立一个可存取字节的文件
        } catch (Exception e) {
            e.printStackTrace();
        }
        while (isRecord == true) {
            readsize = audioRecord.read(audiodata, 0, bufferSizeInBytes);
            if (AudioRecord.ERROR_INVALID_OPERATION != readsize && fos!=null) {
                try {
                    fos.write(audiodata);
                } catch (IOException e) {
                    e.printStackTrace();
                }
            }
        }
        try {
            if(fos != null)
                fos.close();// 关闭写入流
        } catch (IOException e) {
            e.printStackTrace();
        }
    }
5. 给数据加header,转换成wav格式
    // 这里得到可播放的音频文件
    private void copyWaveFile(String inFilename, String outFilename, long longSampleRate, int channels) {
        FileInputStream in = null;
        FileOutputStream out = null;
        long totalAudioLen = 0;
        long totalDataLen = totalAudioLen + 36;

        long byteRate = 16 * AudioFileFunc.AUDIO_SAMPLE_RATE * channels / 8;
        byte[] data = new byte[bufferSizeInBytes];
        try {
            in = new FileInputStream(inFilename);
            out = new FileOutputStream(outFilename);
            totalAudioLen = in.getChannel().size();
            totalDataLen = totalAudioLen + 36;
            WriteWaveFileHeader(out, totalAudioLen, totalDataLen,
                    longSampleRate, channels, byteRate);
            while (in.read(data) != -1) {
                out.write(data);
            }
            in.close();
            out.close();
        } catch (FileNotFoundException e) {
            e.printStackTrace();
        } catch (IOException e) {
            e.printStackTrace();
        }
    }

    /**
     * 这里提供一个头信息。插入这些信息就可以得到可以播放的文件。
     * 为我为啥插入这44个字节,这个还真没深入研究,不过你随便打开一个wav
     * 音频的文件,可以发现前面的头文件可以说基本一样哦。每种格式的文件都有
     * 自己特有的头文件。
     */
    private void WriteWaveFileHeader(FileOutputStream out, long totalAudioLen,
                                     long totalDataLen, long longSampleRate, int channels, long byteRate)
            throws IOException {
        byte[] header = new byte[44];
        header[0] = 'R'; // RIFF/WAVE header
        header[1] = 'I';
        header[2] = 'F';
        header[3] = 'F';
        header[4] = (byte) (totalDataLen & 0xff);
        header[5] = (byte) ((totalDataLen >> 8) & 0xff);
        header[6] = (byte) ((totalDataLen >> 16) & 0xff);
        header[7] = (byte) ((totalDataLen >> 24) & 0xff);
        header[8] = 'W';
        header[9] = 'A';
        header[10] = 'V';
        header[11] = 'E';
        header[12] = 'f'; // 'fmt ' chunk
        header[13] = 'm';
        header[14] = 't';
        header[15] = ' ';
        header[16] = 16; // 4 bytes: size of 'fmt ' chunk
        header[17] = 0;
        header[18] = 0;
        header[19] = 0;
        header[20] = 1; // format = 1
        header[21] = 0;
        header[22] = (byte) channels;
        header[23] = 0;
        header[24] = (byte) (longSampleRate & 0xff);
        header[25] = (byte) ((longSampleRate >> 8) & 0xff);
        header[26] = (byte) ((longSampleRate >> 16) & 0xff);
        header[27] = (byte) ((longSampleRate >> 24) & 0xff);
        header[28] = (byte) (byteRate & 0xff);
        header[29] = (byte) ((byteRate >> 8) & 0xff);
        header[30] = (byte) ((byteRate >> 16) & 0xff);
        header[31] = (byte) ((byteRate >> 24) & 0xff);
        header[32] = (byte) (2 * 16 / 8); // block align
        header[33] = 0;
        header[34] = 16; // bits per sample
        header[35] = 0;
        header[36] = 'd';
        header[37] = 'a';
        header[38] = 't';
        header[39] = 'a';
        header[40] = (byte) (totalAudioLen & 0xff);
        header[41] = (byte) ((totalAudioLen >> 8) & 0xff);
        header[42] = (byte) ((totalAudioLen >> 16) & 0xff);
        header[43] = (byte) ((totalAudioLen >> 24) & 0xff);
        out.write(header, 0, 44);
    }
6. 停止录音
    private void stop() {
        if (audioRecord != null) {
            System.out.println("stopRecord");
            isRecord = false;//停止文件写入
            audioRecord.stop();
            audioRecord.release();//释放资源
            audioRecord = null;
        }
    }
MediaRecorder
workflow
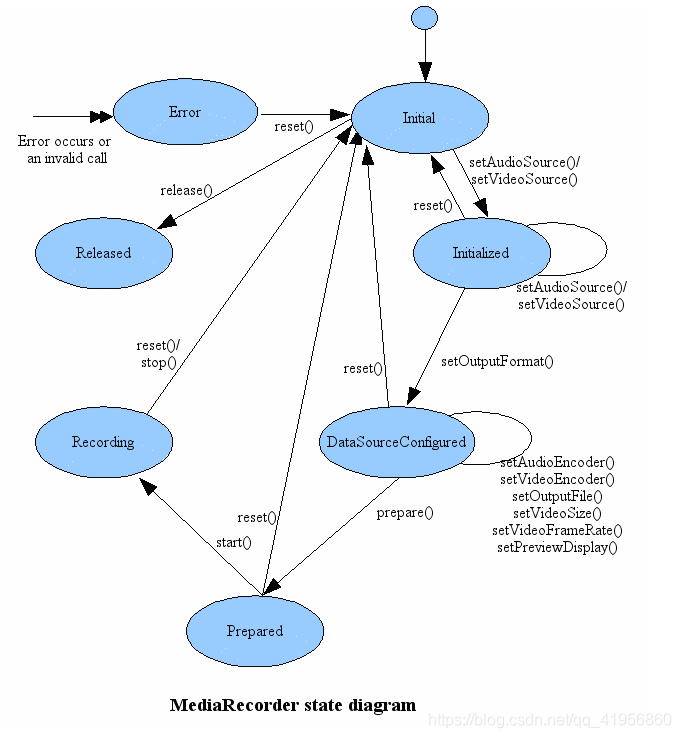
A common case of using MediaRecorder to record audio works as follows:
MediaRecorder recorder = new MediaRecorder();
 recorder.setAudioSource(MediaRecorder.AudioSource.MIC);
 recorder.setOutputFormat(MediaRecorder.OutputFormat.THREE_GPP);
 recorder.setAudioEncoder(MediaRecorder.AudioEncoder.AMR_NB);
 recorder.setOutputFile(PATH_NAME);
 recorder.prepare();
 recorder.start();   // Recording is now started
 ...
 recorder.stop();
 recorder.reset();   // You can reuse the object by going back to setAudioSource() step
 recorder.release(); // Now the object cannot be reused
Error/Info Listener
Applications may want to register for informational and error events in order to be informed of some internal update and possible runtime errors during recording. Registration for such events is done by setting the appropriate listeners (via calls (to setOnInfoListener(OnInfoListener) and/or setOnErrorListener(OnErrorListener)). In order to receive the respective callback associated with these listeners, applications are required to create MediaRecorder objects on threads with a Looper running (the main UI thread by default already has a Looper running).
usually method
| name | function |
|---|---|
| setAudioSamplingRate(int) | set sample rate |
| setAudioSource(int audio_source) | 设置声音来源,一般传入 MediaRecorder. AudioSource.MIC参数指定录制来自麦克风的声音。 |
来源:CSDN
作者:qq_41956860
链接:https://blog.csdn.net/qq_41956860/article/details/102981280