1.开启docker远程访问
[root@izwz9eftauv7x69f5jvi96z docker]# vim /usr/lib/systemd/system/docker.service
#修改ExecStart这行
ExecStart=/usr/bin/dockerd  -H tcp://0.0.0.0:2375  -H unix:///var/run/docker.sock
#重新加载配置文件
[root@izwz9eftauv7x69f5jvi96z docker]# systemctl daemon-reload
#重启服务
[root@izwz9eftauv7x69f5jvi96z docker]# systemctl restart docker.service
#查看端口是否开启
[root@izwz9eftauv7x69f5jvi96z docker]# netstat -nlpt
#直接curl看是否生效
[root@izwz9eftauv7x69f5jvi96z docker]# curl http://127.0.0.1:2375/info
如下图则表示正确
[root@localhost ~]# vim /usr/lib/systemd/system/docker.service
[root@localhost ~]# systemctl daemon-reload
[root@localhost ~]# systemctl restart docker.service
[root@localhost ~]# netstat -nlpt
Active Internet connections (only servers)
Proto Recv-Q Send-Q Local Address Foreign Address State PID/Program name
tcp 0 0 0.0.0.0:3306 0.0.0.0:* LISTEN 6818/mysqld
tcp 0 0 0.0.0.0:111 0.0.0.0:* LISTEN 1/systemd
tcp 0 0 0.0.0.0:6000 0.0.0.0:* LISTEN 7069/X
tcp 0 0 192.168.122.1:53 0.0.0.0:* LISTEN 7176/dnsmasq
tcp 0 0 0.0.0.0:22 0.0.0.0:* LISTEN 6442/sshd
tcp 0 0 127.0.0.1:631 0.0.0.0:* LISTEN 6467/cupsd
tcp 0 0 127.0.0.1:25 0.0.0.0:* LISTEN 6996/master
tcp6 0 0 :::2375 ::? LISTEN 10748/dockerd
tcp6 0 0 :::111 ::? LISTEN 1/systemd
tcp6 0 0 :::6000 ::? LISTEN 7069/X
tcp6 0 0 :::22 ::? LISTEN 6442/sshd
tcp6 0 0 ::1:631 ::? LISTEN 6467/cupsd
tcp6 0 0 ::1:25 ::? LISTEN 6996/master
[root@localhost ~]# curl http://127.0.0.1:2375/info
{“ID”:“DXGE:STKC:6QAH:F44M:KXT6:QBQC:UISX:BNAO:V35V:KF6L:AVPM:FG67”,“Containers”:4,“ContainersRunning”:0,“ContainersPaused”:0,“ContainersStopped”:4,“Images”:2,“Driver”:“overlay2”,“DriverStatus”:[[“Backing Filesystem”,“xfs”],[“Supports d_type”,“true”],[“Native Overlay Diff”,“true”]],“SystemStatus”:null,“Plugins”:{“Volume”:[“local”],“Network”:[“bridge”,“host”,“macvlan”,“null”,“overlay”],“Authorization”:null,“Log”:[“awslogs”,“fluentd”,“gcplogs”,“gelf”,“journald”,“json-file”,“local”,“logentries”,“splunk”,“syslog”]},“MemoryLimit”:true,“SwapLimit”:true,“KernelMemory”:true,“CpuCfsPeriod”:true,“CpuCfsQuota”:true,“CPUShares”:true,“CPUSet”:true,“IPv4Forwarding”:true,“BridgeNfIptables”:false,“BridgeNfIp6tables”:false,“Debug”:false,“NFd”:22,“OomKillDisable”:true,“NGoroutines”:37,“SystemTime”:“2019-05-17T01:49:45.777647545-07:00”,“LoggingDriver”:“json-file”,“CgroupDriver”:“cgroupfs”,“NEventsListener”:0,“KernelVersion”:“3.10.0-957.el7.x86_64”,“OperatingSystem”:“CentOS Linux 7 (Core)”,“OSType”:“linux”,“Architecture”:“x86_64”,“IndexServerAddress”:“https://index.docker.io/v1/",“RegistryConfig”:{“AllowNondistributableArtifactsCIDRs”:[],“AllowNondistributableArtifactsHostnames”:[],“InsecureRegistryCIDRs”:[“127.0.0.0/8”],“IndexConfigs”:{“docker.io”:{“Name”:“docker.io”,“Mirrors”:[“http://f1361db2.m.daocloud.io/”],“Secure”:true,“Official”:true}},“Mirrors”:[“http://f1361db2.m.daocloud.io/”]},“NCPU”:4,“MemTotal”:1019826176,“GenericResources”:null,“DockerRootDir”:"/var/lib/docker",“HttpProxy”:"",“HttpsProxy”:"",“NoProxy”:"",“Name”:“localhost.localdomain”,“Labels”:[],“ExperimentalBuild”:false,“ServerVersion”:“18.09.6”,“ClusterStore”:"",“ClusterAdvertise”:"",“Runtimes”:{“runc”:{“path”:“runc”}},“DefaultRuntime”:“runc”,“Swarm”:{“NodeID”:"",“NodeAddr”:"",“LocalNodeState”:“inactive”,“ControlAvailable”:false,“Error”:"",“RemoteManagers”:null},“LiveRestoreEnabled”:false,“Isolation”:"",“InitBinary”:“docker-init”,“ContainerdCommit”:{“ID”:“bb71b10fd8f58240ca47fbb579b9d1028eea7c84”,“Expected”:“bb71b10fd8f58240ca47fbb579b9d1028eea7c84”},“RuncCommit”:{“ID”:“2b18fe1d885ee5083ef9f0838fee39b62d653e30”,“Expected”:“2b18fe1d885ee5083ef9f0838fee39b62d653e30”},“InitCommit”:{“ID”:“fec3683”,“Expected”:“fec3683”},“SecurityOptions”:[“name=seccomp,profile=default”],“ProductLicense”:"Community Engine”,“Warnings”:["WARNING: API is accessible on http://0.0.0.0:2375 without encryption.\n Access to the remote API is equivalent to root access on the host. Refer\n to the ‘Docker daemon attack surface’ section in the
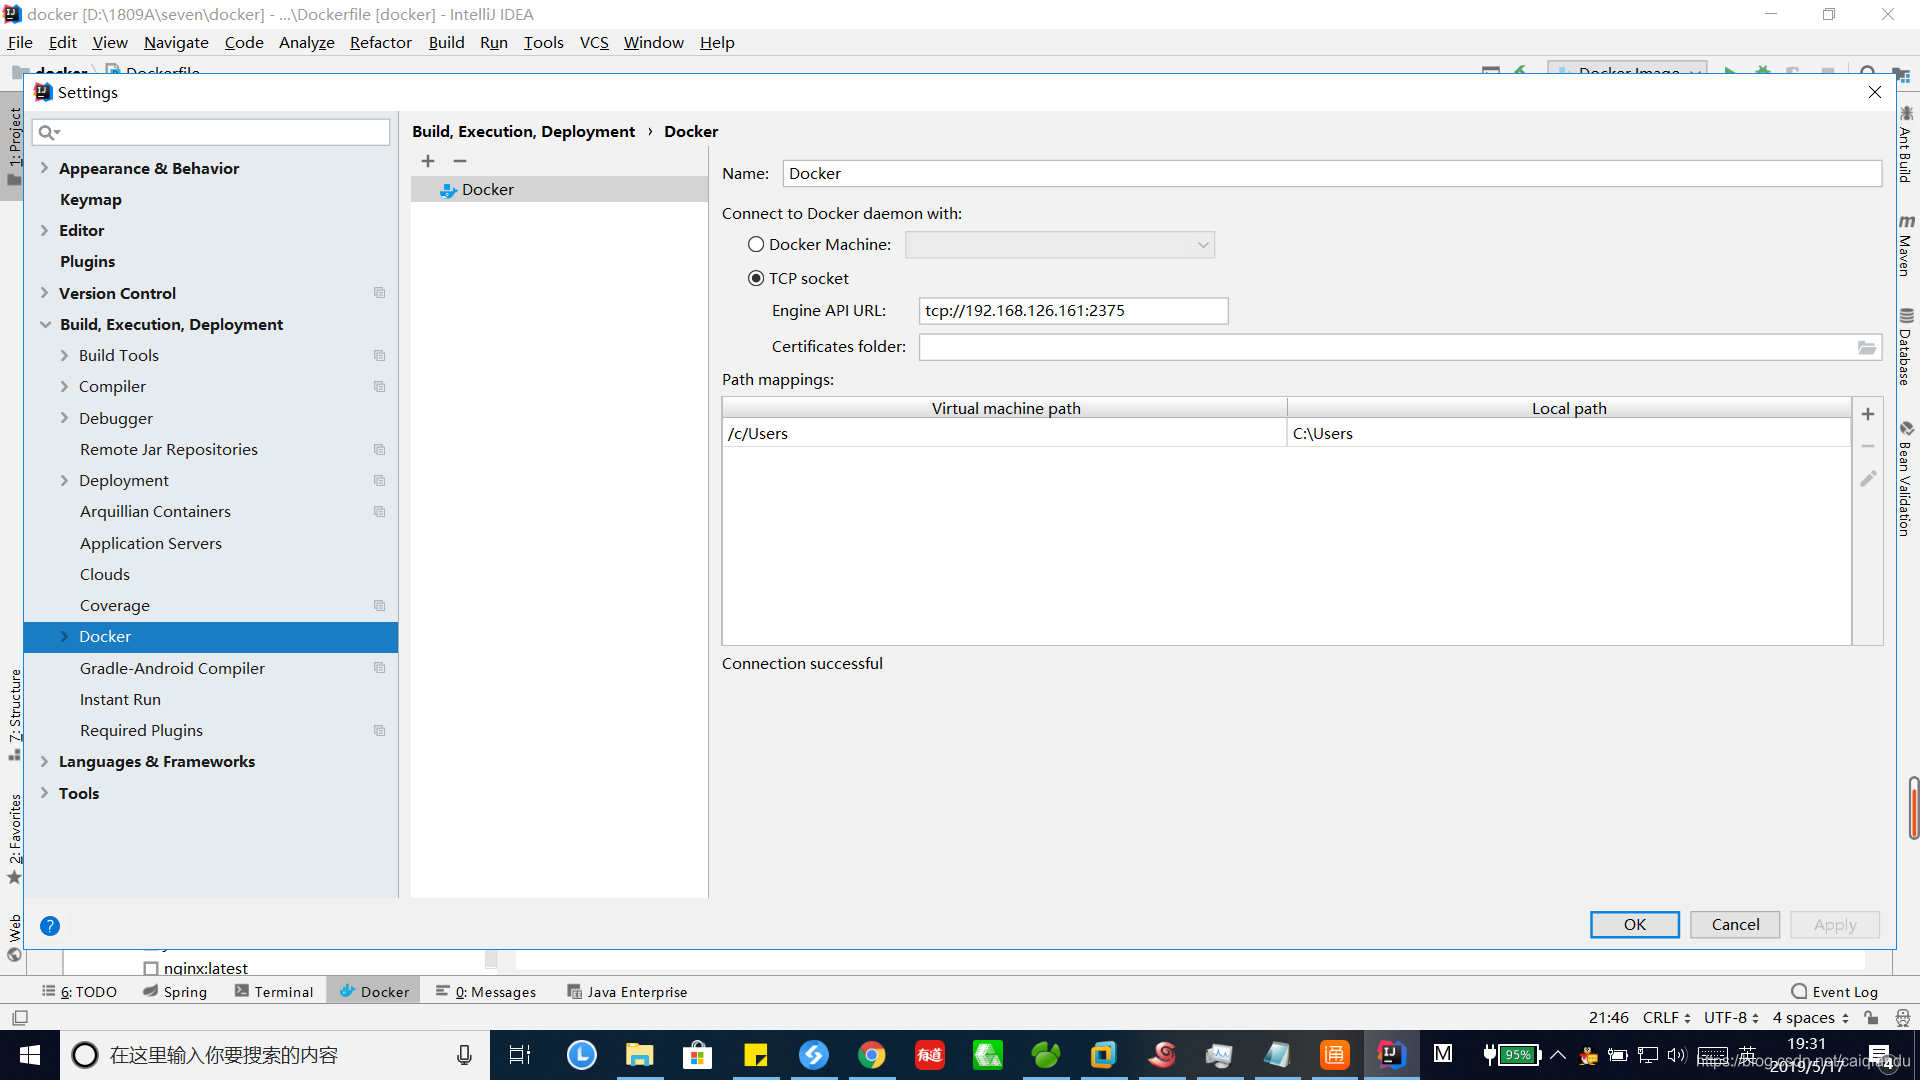
2.整合idea
3.写一个测试类
@RestController
public class TestController {
   @GetMapping("test")
    public  String test(){
        return "hello docker";

    }
}
4.修改pom文件
<?xml version="1.0" encoding="UTF-8"?>
<project xmlns="http://maven.apache.org/POM/4.0.0" xmlns:xsi="http://www.w3.org/2001/XMLSchema-instance"
         xsi:schemaLocation="http://maven.apache.org/POM/4.0.0 http://maven.apache.org/xsd/maven-4.0.0.xsd">
    <modelVersion>4.0.0</modelVersion>
    <parent>
        <groupId>org.springframework.boot</groupId>
        <artifactId>spring-boot-starter-parent</artifactId>
        <version>2.1.5.RELEASE</version>
        <relativePath/> <!-- lookup parent from repository -->
    </parent>
    <groupId>com.jk</groupId>
    <artifactId>docker</artifactId>
    <version>0.0.1-SNAPSHOT</version>
    <name>docker</name>
    <description>Demo project for Spring Boot</description>

    ***<properties>
        <java.version>1.8</java.version>
        <docker.image.prefix>cqd</docker.image.prefix>
    </properties>***

    <dependencies>
        <dependency>
            <groupId>org.springframework.boot</groupId>
            <artifactId>spring-boot-starter-web</artifactId>
        </dependency>

        <dependency>
            <groupId>org.springframework.boot</groupId>
            <artifactId>spring-boot-starter-test</artifactId>
            <scope>test</scope>
        </dependency>
    </dependencies>

    <build>
        <plugins>
            <plugin>
                <groupId>org.springframework.boot</groupId>
                <artifactId>spring-boot-maven-plugin</artifactId>
            </plugin>
            ***<plugin>
                <groupId>com.spotify</groupId>
                <artifactId>docker-maven-plugin</artifactId>
                <version>1.0.0</version>
                <configuration>
                    <imageName>${docker.image.prefix}/${project.artifactId}</imageName>
                    <dockerDirectory></dockerDirectory>
                    <resources>
                        <resource>
                            <targetPath>/</targetPath>
                            <directory>${project.build.directory}</directory>
                            <include>${project.build.finalName}.jar</include>
                        </resource>
                    </resources>
                </configuration>
            </plugin>***
        </plugins>
    </build>

</project>
5.配置Dockerfile文件
#指定基础镜像,在其上进行定制
FROM java:8

#维护者信息
MAINTAINER cqd

#这里的 /tmp 目录就会在运行时自动挂载为匿名卷,任何向 /tmp 中写入的信息都不会记录进容器存储层
VOLUME /tmp

#复制上下文目录下的target/demo-1.0.0.jar 到容器里
COPY target/docker-0.0.1-SNAPSHOT.jar  docker-0.0.1.jar

#bash方式执行,使demo-1.0.0.jar可访问
#RUN新建立一层,在其上执行这些命令,执行结束后, commit 这一层的修改,构成新的镜像。
RUN bash -c "touch /docker-0.0.1.jar"

#声明运行时容器提供服务端口,这只是一个声明,在运行时并不会因为这个声明应用就会开启这个端口的服务
EXPOSE 8080

#指定容器启动程序及参数   <ENTRYPOINT> "<CMD>"
ENTRYPOINT ["java","-jar","docker-0.0.1.jar"]
6.创建docker镜像

7.启动
Deploying 'cqd/dockerdemo:1.0 Dockerfile: Dockerfile'...
Building image...
Step 1/7 : FROM java:8


 ---> d23bdf5b1b1b

Step 2/7 : MAINTAINER cqd


 ---> Using cache

 ---> cd615ea81be0

Step 3/7 : VOLUME /tmp


 ---> Using cache

 ---> cea3a706686b

Step 4/7 : COPY target/docker-0.0.1-SNAPSHOT.jar  docker-0.0.1.jar


 ---> 2a49652392cf

Step 5/7 : RUN bash -c "touch /docker-0.0.1.jar"


 ---> Running in 5b75d96f9540

Removing intermediate container 5b75d96f9540

 ---> 60c8093c84cc

Step 6/7 : EXPOSE 8080


 ---> Running in 31e78de6d97f

Removing intermediate container 31e78de6d97f

 ---> 19fd017dc210

Step 7/7 : ENTRYPOINT ["java","-jar","docker-0.0.1.jar"]


 ---> Running in bc8303e5d70b

Removing intermediate container bc8303e5d70b

 ---> 1a0066e5a8e2

Successfully built 1a0066e5a8e2

Successfully tagged cqd/dockerdemo:1.0

'cqd/dockerdemo:1.0 Dockerfile: Dockerfile' has been deployed successfully.
8.客户端访问

9.也可以直接用在docker客户端上直接执行:
[root@localhost ~]# docker run -p 28081:8080 --name cqd2 cqd/dockerdemo:1.0

  .   ____          _            __ _ _
 /\\ / ___'_ __ _ _(_)_ __  __ _ \ \ \ \
( ( )\___ | '_ | '_| | '_ \/ _` | \ \ \ \
 \\/  ___)| |_)| | | | | || (_| |  ) ) ) )
  '  |____| .__|_| |_|_| |_\__, | / / / /
 =========|_|==============|___/=/_/_/_/
 :: Spring Boot ::        (v2.1.5.RELEASE)

来源:CSDN
作者:四方度爷
链接:https://blog.csdn.net/caiqiandu/article/details/90299453