扩展
Linux日志文件总管logrotate http://linux.cn/article-4126-1.html
xargs用法详解 http://blog.csdn.net/zhangfn2011/article/details/6776925
1. rsync工具介绍
rsync 是一个比较重要的工具,需要熟练掌握,在工作中很有可能每天都会用到这个工具。例如我们从 A 机器传输文件到 B 机器,或者通过远程去备份一些数据,都会使用这个工具。rsync 不仅可以通过网络传输数据,也可以在本机传输数据,类似于 cp 。
假设现在有一个 A 目录和 B 目录,现在的需求是把 A 目录下的数据拷贝到B目录下去,但是 A 目录下的数据会一直在更新或增加,也就是说 A 目录下的数据一直在变动,现在需要每小时拷贝一次到 B 目录去,如果只使用 cp 命令的话,只能是从头到尾把文件覆盖一遍。但是如果 A 目录只增加了一个很小的文件,也要从头到尾的覆盖的话,很耗费时间和磁盘资源。所以我们才需要使用 rsync 工具, rsync 能实现增量的拷贝, rsync 只会拷贝增加的或更新的文件, rsync 也支持远程同步传输文件。
- 安装 rsync 包
[root@sc ~]# yum install -y rsync
- 例如我把 /etc/passwd 文件通过 rsync 命令拷贝到 /tmp 目录下,而且能够看到详细的信息,rsync 命令与其说是拷贝不如说是发送,在显示的信息里也显示了传输速度
[root@sc ~]# rsync -av /etc/passwd /tmp/1.txt
sending incremental file list
passwd

sent 1,874 bytes  received 35 bytes  3,818.00 bytes/sec
total size is 1,782  speedup is 0.93
[root@sc ~]#
- 远程传输命令格式,需要加上用户名和 IP 地址,后面跟传输的目标目录
如果不写用户名的话,就会默认为当前终端的用户名,例如我当前终端使用的是 root 用户,那么默认就是传输到对方的 root 上,如果我当前终端使用的是 user1 或者其他什么用户,就会按照这个用户名去传输,对方没有这个用户的话也仍然会要求输入密码
[root@sc ~]# rsync -av /etc/passwd root@192.168.85.129:/tmp/1.txt
root@192.168.85.129's password:
sending incremental file list

sent 45 bytes  received 12 bytes  2.92 bytes/sec
total size is 1,782  speedup is 31.26
[root@sc ~]#
2. rsync常用选项
rsync含义:是一个远程数据同步工具。
rsync [OPTION] … SRC DEST
rsync [OPTION] … SRC [user@]host:DEST
rsync [OPTION] … [user@]host:SRC DEST
rsync [OPTION] … SRC [user@]host::DEST
rsync [OPTION] … [user@]host::SRC DEST
SRC:源文件,DEST:目标目录或者文件,[user@]host:远程服务器,host:代表IP
| 参数 | 参数含义 |
|---|---|
| -a | 包含-rtplgoD。 |
| -r | 同步目录时要加上,类似 cp 时的 -r 选项。 |
| -v | 同步时显示一些信息,让我们知道同步的过程。 |
| -l | 保留软连接。 |
| -L | 加上该选项后,同步软链接时会把源文件给同步。 |
| -p | 保持文件的权限属性。 |
| -o | 保持文件的属主。 |
| -g | 保持文件的属组。 |
| -D | 保持设备文件信息。 |
| -t | 保持文件的时间属性。 |
| –delete | 删除DEST中SRC没有的文件。 |
| –exclude | 过滤指定文件,如–exclude “logs”会把文件名包含logs的文件或者目录过滤掉,不同步。 |
| -P | 显示同步过程,比如速率,比-v更加详细。 |
| -u | 加上该选项后,如果DEST中的文件比SRC新,则不同步。 |
| -z | 传输时压缩。 |
rsync主要参数示例:
- 现在我们开始实践使用一下这些选项,我用 /root/111 目录作为源目录,然后以/tmp 作为目标目录,-av 选项是最常用的选项,能够看到同步的过程
[root@sc ~]# rsync -av /root/111/ /tmp/111_dest/
sending incremental file list
created directory /tmp/111_dest
./
2.txt
aming4
yum.log.1 -> /tmp/yum.log
222/
aming1/
aminglinux/

sent 286 bytes  received 112 bytes  796.00 bytes/sec
total size is 12  speedup is 0.03
[root@sc ~]#
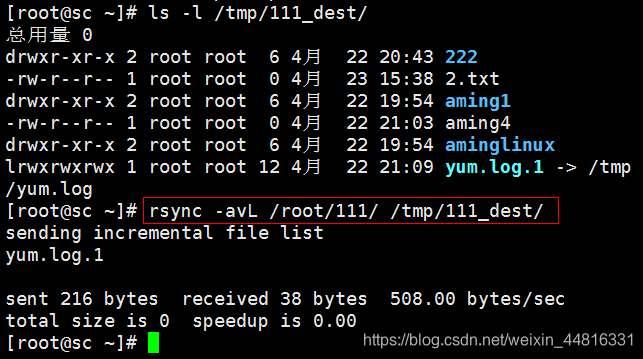
- 加 -L 选项会把 -a 选项里包含的 -l 选项覆盖掉,-L 选项会把源目录下的软链接文件的指向文件拷贝过去:
如果拷贝软链接文件的指向文件时,该软连接的指向文件不存在就会报错
- – delete 选项会删除目标目录中,源目录没有的文件,例如目标目录有一个123.txt的文件,但是源目录没有这个文件,那么同步时就会把目标目录下123.txt文件删除掉
[root@test01 ~]# rsync -avPL --delete /tmp/111/ root@192.168.85.131:/tmp/123/
root@192.168.85.131's password:
sending incremental file list
deleting 1.txt
./

sent 127 bytes  received 28 bytes  11.48 bytes/sec
total size is 0  speedup is 0.00
- –exclude 选项可以过滤指定的文件,并且可以过滤多个,例如我把 x 开头的文件都过滤掉
[root@test01 111]# rsync -avLP --exclude "x*" /tmp/111/ root@192.168.85.131:/tmp/123/
root@192.168.85.131's password:
sending incremental file list
./

sent 122 bytes  received 19 bytes  56.40 bytes/sec
total size is 0  speedup is 0.00
- -P 选项可以看到传输的速率信息
[root@test01 111]# rsync -avLP /tmp/111/ root@192.168.85.131:/tmp/123/
root@192.168.85.131's password:
sending incremental file list
x.log
              0 100%    0.00kB/s    0:00:00 (xfr#1, to-chk=1/7)
x.txt
              0 100%    0.00kB/s    0:00:00 (xfr#2, to-chk=0/7)

sent 235 bytes  received 54 bytes  192.67 bytes/sec
total size is 0  speedup is 0.00
- -u 选项能够避免覆盖目标目录下较新的文件
目标目录下的文件更新,如果不加 -u 就会覆盖这个更新的文件
[root@test01 111]# rsync -avPu /tmp/111/ root@192.168.85.131:/tmp/123/
root@192.168.85.131's password:
sending incremental file list
./
123
              0 100%    0.00kB/s    0:00:00 (xfr#1, to-chk=5/7)
345
              0 100%    0.00kB/s    0:00:00 (xfr#2, to-chk=4/7)
456
              0 100%    0.00kB/s    0:00:00 (xfr#3, to-chk=3/7)
678
              0 100%    0.00kB/s    0:00:00 (xfr#4, to-chk=2/7)

sent 316 bytes  received 95 bytes  30.44 bytes/sec
total size is 0  speedup is 0.00
- -z 是 zip 的意思,压缩是为了传输的过程中节省带宽,加快传输速度,不过只有文件数量多的情况下才看得到效果
[root@test01 111]# rsync -avPuz /tmp/111/ root@192.168.85.131:/tmp/123/
root@192.168.85.131's password:
sending incremental file list

sent 153 bytes  received 12 bytes  66.00 bytes/sec
total size is 0  speedup is 0.00
3. rsync通过ssh同步
- 通过ssh方式同步
[root@test01 ~]# rsync -av /etc/passwd 192.168.85.131:/tmp/sc.txt
root@192.168.85.131's password:
sending incremental file list
passwd

sent 1,230 bytes  received 35 bytes  81.61 bytes/sec
total size is 1,138  speedup is 0.90
- 也可以反过来同步,也就是将对方机器的文件,同步到自己的机器上
[root@test01 ~]# rsync -av 192.168.85.131:/tmp/sc.txt /tmp/808.txt
root@192.168.85.131's password:
receiving incremental file list
sc.txt

sent 43 bytes  received 1,230 bytes  68.81 bytes/sec
total size is 1,138  speedup is 0.89
- 如果对方使用的不是22端口的话,可以加上-e来指定端口,在这里,我指定的是22端口
[root@test01 ~]# rsync -av -e "ssh -p 22" /etc/passwd 192.168.85.131:/tmp/777.txt
root@192.168.85.131's password:
sending incremental file list
passwd

sent 1,230 bytes  received 35 bytes  101.20 bytes/sec
total size is 1,138  speedup is 0.90
4. rsync通过服务同步
这种方式可以理解为,在远程主机上建立一个rsync服务器,在服务器上配置好rsync的各种应用,然后将本机作为rsync的一个客户端连接远程rsync服务器
rsync还可以通过服务的方式同步,这种方式首先需要开启一个服务,服务是cs架构的,也就是客户端和服务端。服务端要开启一个rsync服务,并且需要监听一个端口,默认是873端口,这个端口是可以自定义的,然后客户端可以通过这个端口与服务端进行通信,得以传输数据。
启动服务之前要编辑配置文件,这个配置文件的路径是:/etc/rsyncd.conf ,配置的信息不一定必须要写在这个路径的文件里,也可以写在其他的文件里,不过在开启服务的时候就得加上–configfile=配置文件的路径,加上这个参数是为了指定配置文件的路径,如果是写在/etc/rsyncd.conf文件里,则不需要指定配置文件的路径。
- 把下面的文件写入到 vim /etc/rsyncd.conf 下
[root@test01 ~]# vim /etc/rsyncd.conf

# gid = nobody
# use chroot = yes
# max connections = 4
# pid file = /var/run/rsyncd.pid
# exclude = lost+found/
# transfer logging = yes
# timeout = 900
# ignore nonreadable = yes
# dont compress   = *.gz *.tgz *.zip *.z *.Z *.rpm *.deb *.bz2

# [ftp]
#        path = /home/ftp
#        comment = ftp export area

#新添加的写到下面

port=873                        #指定在哪个端口启动rsyncd服务,默认是873端口。
log file=/var/log/rsync.log     #指定日志文件路径。
pid file=/var/run/rsyncd.pid    #指定pid路径,这个文件的作用涉及服务的启动、停止等进程管理操作。
address=192.168.85.130          #指定启动rsyncd服务的IP。假如你的机器有多个IP,就可以指定由其中一个启动rsyncd服务,如果不指定该参数,默认是在全部IP上启动。
[test]                          #指定模块名,里面内容自定义。
path=/tmp/rsync                 #指定数据存放的路径。
use chroot=true                 #use chroot true(准确的)/false(错误的):表示在传输文件前首先chroot到path参数所指定的目录下。这样做的原因是实现额外的安全防护,但缺点是需要以roots权限,并且不能备份指向外部的符号连接所指向的目录文件。默认情况下chroot值为true,如果你的数据当中有软连接文件,阿铭建议你设置成false。
max connections=4               #指定最大的连接数,默认是0,即没有限制。
read only=no                    #read only ture/false:如果为true,则不能上传到该模块指定的路径下。
list=true                       #表示当用户查询该服务器上的可用模块时,该模块是否被列出,设定为true则列出,false则隐藏。
uid=root                        #指定传输文件时以哪个用户/组的身份传输。
gid=root                        #指定传输文件时以哪个用户/组的身份传输。
auth users=test                 #auth users:指定传输时要使用的用户名。
secrets file=/etc/rsyncd.passwd #指定密码文件,该参数连同上面的参数如果不指定,则不使用密码验证。注意该密码文件的权限一定要是600。格式:用户名:密码
hosts allow=192.168.85.130 1.1.1.1 2.2.2.2  192.168.133.0/24  #hosts allow:表示被允许连接该模块的主机,可以是IP或者网段,如果是多个,中间用空格隔开。
- 启动 rsync 服务
[root@test01 ~]# rsync --daemon  #启动 rsync 服务
[root@test01 ~]# ps aux |grep rsync  #查看进程是否用 rsync
root      7982  2.5  0.0 114744   568 ?        Ss   14:44   0:00 rsync --daemon
root      7984  0.0  0.0 112724   984 pts/1    R+   14:45   0:00 grep --color=auto rsync
[root@test01 ~]# netstat -lntp  #监听 ip 端口
Active Internet connections (only servers)
Proto Recv-Q Send-Q Local Address           Foreign Address         State       PID/Program name
tcp        0      0 192.168.85.130:873      0.0.0.0:*               LISTEN      7982/rsync
tcp        0      0 0.0.0.0:22              0.0.0.0:*               LISTEN      5988/sshd
tcp        0      0 127.0.0.1:25            0.0.0.0:*               LISTEN      6229/master
tcp6       0      0 :::3306                 :::*                    LISTEN      6185/mysqld
tcp6       0      0 :::22                   :::*                    LISTEN      5988/sshd
tcp6       0      0 ::1:25                  :::*                    LISTEN      6229/master
- 建立实验目录,并给于 777 权限
[root@test01 ~]# mkdir /tmp/rsync
[root@test01 ~]# chmod 777 /tmp/rsync/
[root@test01 ~]# ls -ld /tmp/rsync/
drwxrwxrwx. 2 root root 6 8月   3 14:48 /tmp/rsync/
- telnet命令检测端口是否畅通(显示不畅通)
[root@test01 ~]# telnet 192.168.85.130:873
telnet: 192.168.85.130:873: Name or service not known
192.168.85.130:873: Unknown host
- 关闭 服务端 和 客户端 的防火墙
[root@test02 ~]# systemctl stop firewalld
[root@test02 ~]# iptables -nvL
Chain INPUT (policy ACCEPT 0 packets, 0 bytes)
 pkts bytes target     prot opt in     out     source               destination

Chain FORWARD (policy ACCEPT 0 packets, 0 bytes)
 pkts bytes target     prot opt in     out     source               destination

Chain OUTPUT (policy ACCEPT 0 packets, 0 bytes)
 pkts bytes target     prot opt in     out     source               destination
[root@test02 ~]# clear
- 再次检查端口
[root@test01 ~]# telnet 192.168.85.130 873
Trying 192.168.85.130...
Connected to 192.168.85.130.
Escape character is '^]'.
^]
telnet> quit                           #Ctrl + ]再输入quit退出端口
Connection closed.
- 在 客户端 给 服务端 传输文件(遇到问题)
[root@test02 ~]# rsync -avP /tmp/777.txt 192.168.85.130::test/tmp/888.txt
Password:
@ERROR: auth failed on module test  #服务端配置文件 auth  错误
rsync error: error starting client-server protocol (code 5) at main.c(1648) [sender=3.1.2]
- 修改 服务端 的配置文件
port=873
log file=/var/log/rsync.log
pid file=/var/run/rsyncd.pid
address=192.168.85.130
[test]
path=/tmp/rsync
use chroot=true
max connections=4
read only=no
list=true
uid=root
gid=root
#auth users=test                  #用户名不生效
#secrets file=/etc/rsyncd.passwd  #密码不生效
hosts allow=192.168.85.131 1.1.1.1 2.2.2.2  192.168.133.0/24

[root@test01 rsync]# rsync --daemon
- 再次 客户端 给 服务端 传输文件(成功),同样 服务端 也可以给 客户端 传输文件
[root@test02 ~]# rsync -avP /tmp/777.txt 192.168.85.130::test/888.txt
sending incremental file list
777.txt
          1,138 100%    0.00kB/s    0:00:00 (xfr#1, to-chk=0/1)

sent 1,231 bytes  received 35 bytes  120.57 bytes/sec
total size is 1,138  speedup is 0.90


#在 服务端 /tmp/rsync/ 这个目录里可以看到刚传输的 888.txt 文件

[root@test01 rsync]# cd /tmp/rsync/
[root@test01 rsync]# ls
888.txt
来源:https://blog.csdn.net/weixin_44816331/article/details/89395225