【威哥说】当大家都在谈论Android性能的时候,总是会习惯性的说怎么才能写出简洁高效的代码呢。往往总是忽略layout布局文件,布局缓慢的渲染速度对一个app的性能影响也是很大。充满不必要的views和可读性差的layout文件会让你的app运行缓慢。一起来看下写出高效搞笑布局有哪些技巧吧!
【正文】 1.用TextView本身的属性同时显示图片和文字。
通常需要在文本旁边添加一张图片,假设需要添加图片在文字的上边,如图:

想必不少童鞋看到之后,首先想到的就是用一个LinerLayout或RelativeLayout来包含一个TextView和ImageView,最后需要用3个UI元素和大量的代码。但是有一个更好更清晰的解决方案,那就是TextView的compound drawable。你只需要一个属性就可以搞定。

<TextView
    android:layout_width="“wrap_content”"
    android:layout_height="“wrap_content”"
    android:drawablePadding="“5dp”"
    android:drawableTop="“@drawable/cat”"
    android:gravity="“center_horizontal”"
    android:text="“@string/cat”" >
</TextView>

用到的主要属性:
drawableTop : 指定drawable放在文本的顶部; DrawablePadding : 指定文本和drawable直接padding;
2.用LinearLayout自带的分割线

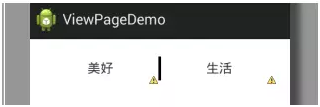
分割线在app中经常会用到,LinearLayout有一个属性可以帮你添加分割线。如下图:LinearLayout包含2个TextView和基于它们中间的分割线。
 (1) Create divider shape(创建shape)
下面是一个简单的shape divider.xml用来当作分割线
<?xml version="1.0" encoding="utf-8"?>
<shape xmlns:android="http://schemas.android.com/apk/res/android" > <size android:width="3dp" /> <solid android:color="#000" /> </shape>
(2) Add shape to LinearLayout
<LinearLayout android:layout_width="match_parent" android:layout_height="40dp" android:divider="@drawable/divider" android:dividerPadding="5dp" android:orientation="horizontal" android:showDividers="middle" >
    <TextView
        android:layout_width="0dp"
        android:layout_height="match_parent"
        android:layout_weight="0.5"
        android:gravity="center"
        android:text="美好"
        android:textSize="16sp" />

    <TextView
        android:layout_width="0dp"
        android:layout_height="match_parent"
        android:layout_weight="0.5"
        android:gravity="center"
        android:text="生活"
        android:textSize="16sp" />
</LinearLayout>
上面用到了3个xml属性:

Divider:用来定义一个drawable或color作为分割线。

showDividers:指定分割线在哪里显示,它们可以显示在开始位置,中间,末尾或者选择不显示。

Divider_Padding:给divider添加padding。

3.使用<include/>和<merge/>标签

重用布局是一个保持app一致的好方法,这样以后有改变的话只要改一个文件就可以了,Android提供了include标签帮你重用布局。

例如你现在决定创建一个有一个图片居中的Toolbar工具栏,然后你想要添加到每个页面中,下面是Toolbar效果:

下面是toolbar.xml代码:
<LinearLayout xmlns:android="http://schemas.android.com/apk/res/android" xmlns:tools="http://schemas.android.com/tools" android:layout_width="match_parent" android:layout_height="50dp" android:background="#e5e5e5" android:orientation="horizontal" tools:context=".MainActivity" >
<TextView
    android:layout_width="0dp"
    android:layout_height="match_parent"
    android:layout_weight="1"
    android:gravity="center"
    android:text="back"
    android:textSize="16sp" />

<ImageView
    android:layout_width="0dp"
    android:layout_height="match_parent"
    android:layout_weight="4"
    android:gravity="center"
    android:src="@drawable/b" />

<TextView
    android:layout_width="0dp"
    android:layout_height="match_parent"
    android:layout_weight="1"
    android:gravity="center"
    android:text="next"
    android:textSize="16sp" />
</LinearLayout>
你可以复制粘贴这些代码到每个Activity,但是不要这么做,在编程中有一个重要的规则:当你复制粘贴,那你就是在做错误的事。在这种情况下你可以用include标签在多个界面重用这个布局。
<?xml version="1.0" encoding="utf-8"?>
<RelativeLayout xmlns:android="http://schemas.android.com/apk/res/android" android:layout_width="match_parent" android:layout_height="match_parent" android:orientation="vertical" >
<include layout="@layout/toolbar"/>
</RelativeLayout>
用include标签你可以只用一行代码在app的每个页面添加你的toolbar,任何改变都会自动更新到所有页面。

同时使用ImageView和background属性实现点击效果

你应该同时使用它们,在很多情况下你会想要给ImageView添加点击效果,然后我看到很多人用LinearLayout来包裹一个ImageView来实现。添加另一个view是没必要的。下面的代码可以让你做的更好:
<ImageView android:id="@+id/image" android:layout_width="wrap_content" android:layout_height="wrap_content" android:clickable="true" android:background="?android:attr/selectableItemBackground" android:src="@drawable/a"/>
显示图片用”src”属性,drawable selector 图片点击效果用”background”属性实现,上面用的是android默认提供的selector,当然你也可以换成你自己实现的。
【总结】
希望这些技巧可以帮你写出更好更简单的布局layout,但是不要把这些技巧当成是规则。总有一些比较复杂的布局,是没法用这些布局,那时候就需要通过增加不加的复杂性来解决问题。在这种情况下在添加更多的view之前,可以考虑自定义view试着找到更简单的解决方法。要牢记在视图层次添加一个view的代价是不可小嘘滴,它会影响app的加载速度。

来源:oschina
链接:https://my.oschina.net/u/2844951/blog/747850