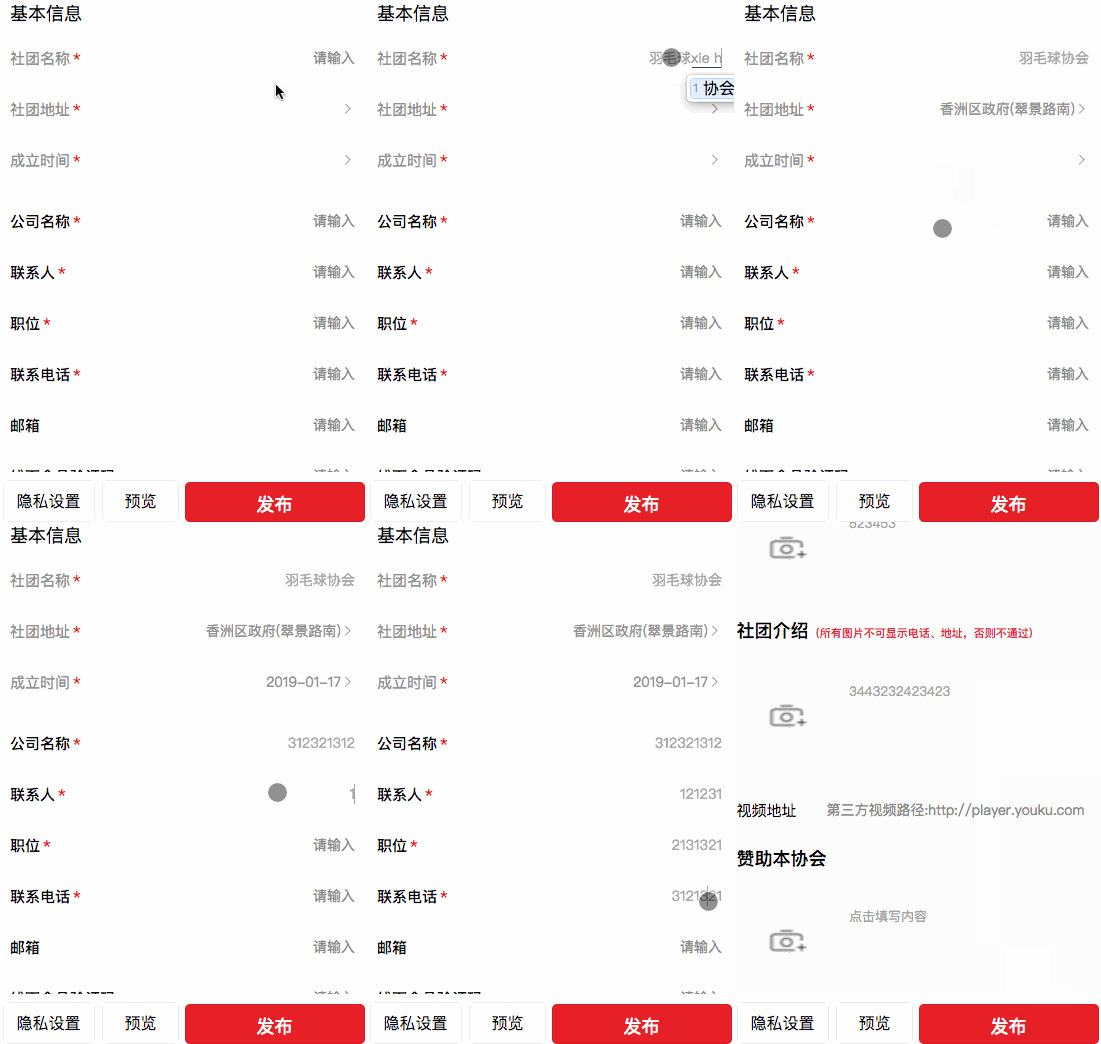
演示:

插件介绍
该插件是参考 jQuery Validate 封装的,为小程序表单提供了一套常用的验证规则,包括手机号码、电子邮件验证等等,同时提供了添加自定义校验方法,让表单验证变得更简单。
插件下载
GitHub地址:https://github.com/skyvow/wx-extend/blob/master/docs/components/validate.md
在下载的文件中找到WxValidate.js,其文件的位置在wx-extend/src/assets/plugins/wx-validate/WxValidate.js,将它拷贝到你所需要的文件目录下,这边我就放在utils文件下。
插件使用
1)在需要页面的js中引入WxValidate.js:
import WxValidate from '../../utils/WxValidate.js'
2)页面中对表单组件的绑定:
主要就是对input框加入value值的绑定
  <form bindsubmit="formSubmit">
    <view class="wide-info">
      <view class="wide-info-title">
        <text>基本信息</text>
      </view>
      <view class="wide-info-list">
        <!--社团名称-->
        <view class="info-list">
          <view class="info-list-1eft">
            <text>社团名称</text>
            <text class="left-star">*</text>
          </view>
          <view class="info-list-right">
            <input name='name' placeholder='请输入' value='{{form.name}}' class="inputName" />
          </view>
        </view>
        <!--社团地址--->
        <view class="info-list">
          <view class="info-list-1eft">
            <text>社团地址</text>
            <text class="left-star">*</text>
          </view>
          <view class="info-list-right" catchtap='chooseLocation'>
            <text>{{osscation_address}}</text>
            <text class="iconfont icon-arrow-right-copy-copy"></text>
          </view>
        </view>
        <!--成立时间--->
        <view class="info-list">
          <view class="info-list-1eft">
            <text>成立时间</text>
            <text class="left-star">*</text>
          </view>
          <view class="info-list-right">
            <view class="section">
              <picker mode="date" value="{{date}}" start="1901-01-01" end="2099-12-31" bindchange="bindDateChange">
                <text class="picker">{{date}}</text>
                <text class="iconfont icon-arrow-right-copy-copy" id="phoneIcon"></text>
              </picker>
            </view>
          </view>
        </view>
      </view>
      <view class="line"></view>
      <view class="wide-info-list ">
        <!--公司名称-->
        <view class="info-list">
          <view class="info-list-1eft dark">
            <text>公司名称</text>
            <text class="left-star">*</text>
          </view>
          <view class="info-list-right">
            <input type="text" name="companyName" placeholder='请输入' value='{{form.companyName}}' class="inputName" />
          </view>
        </view>
        <!--联系人--->
        <view class="info-list">
          <view class="info-list-1eft dark">
            <text>联系人</text>
            <text class="left-star">*</text>
          </view>
          <view class="info-list-right">
            <text>{{ossicationName}}</text>
            <input type="text" name="linkman" placeholder='请输入' value='{{form.linkman}}' class="inputName" />
          </view>
        </view>
        <!--职位-->
        <view class="info-list">
          <view class="info-list-1eft dark">
            <text>职位</text>
            <text class="left-star">*</text>
          </view>
          <view class="info-list-right">
            <text>{{ossicationCreateTime}}</text>
            <input type="text" name="position"  placeholder='请输入' value='{{form.position}}' class="inputName" />
          </view>
        </view>
        <!--联系电话-->
        <view class="info-list">
          <view class="info-list-1eft dark">
            <text>联系电话</text>
            <text class="left-star">*</text>
          </view>
          <view class="info-list-right">
            <text>{{ossicationCreateTime}}</text>
            <input name='phone' type='number' placeholder='请输入' value='{{form.phone}}' class="inputName" />
          </view>
        </view>
        <!--邮箱-->
        <view class="info-list">
          <view class="info-list-1eft dark">
            <text>邮箱</text>
          </view>
          <view class="info-list-right">
            <text>{{ossicationCreateTime}}</text>
            <input type="text" name="email" placeholder='请输入' value='{{form.email}}' class="inputName" />
          </view>
        </view>
      </view>

    </view>
      <!--按钮--->
    <view class="buttons-kind">
       <button  class="fabu" form-type="submit">发布</button>
     </view>
  </form>
3)在js中加入加入form表单的绑定
data{
    form: {
      name: '',
      osscation_address: '',
      date:'',
      companyName: '',
      linkman: '',
      position: '',
      phone: '',
      email: '',
      license:'',
      dentityCard: '',
      videoUrl:'',
    }
}
4)验证方法
注意的是一定要在js文件中onLoad验证规则,否则编译会报checkform is not a function
注意 WxValidate(rules, messages)中实例化的参数:
参数说明
| 参数 | 类型 | 描述 |
|---|---|---|
| rules | object |
验证字段的规则 |
| messages | object |
验证字段的提示信息 |
onLoad: function (options) {
   //验证方法
    this.initValidate();
  },
  /***验证表单字段 */
  initValidate:function(){
    const rules = {
      name: {
        required: true,
        maxlength: 10,
      },
      osscation_address: {
        required: true,
      },
      date: {
        required: true,
      },
      companyName: {
        required: true,
      },
      linkman:{
        required: true,
      },
      position: {
        required: true,
      },
      phone: {
        required: true,
        tel: true
      },
      email: {
        email: true
      },
      license: {
        required: true,
      },
      dentityCard: {
        required: true,
        idcard: true
      },
      videoUrl:{
        url: true
      },


    }
    const messages = {
      name: {
        required: '请填写社团名称',
        maxlength: '社团名称长度不超过10个字!'
      },
      osscation_address: {
        required: '请选择社团地址',
      },
      date: {
        required: '请选择成立时间',
      },
      companyName: {
        required: '请填写公司名称',
      },
      linkman: {
        required: '请填写联系人',
      },
      position: {
        required: '请填写职位',
      },
      phone: {
        required: '请填写联系电话',
        tel: '请填写正确的联系电话'
      },
      email: {
        email: '请填写正确的邮箱地址'
      },
      license: {
        required: '请填写营业执照',
      },
      dentityCard: {
        required: '请填写身份证号码',
        idcard: '请输入正确的身份证号码'
      },
      videoUrl: {
        url: '请填写正确的视频地址'
      },

    }
    this.WxValidate = new WxValidate(rules, messages)
  },

  /***调用验证函数***/
 formSubmit: function (e) {
    console.log('form发生了submit事件,携带的数据为:', e.detail.value)
    const params = e.detail.value
     e.detail.value.osscation_address = this.data.osscation_address
     e.detail.value.date = this.data.date
     console.log(e.detail.value)
    //校验表单
    if (!this.WxValidate.checkForm(params)) {
      const error = this.WxValidate.errorList[0]
      this.showModal(error)
      return false
    }
    //向后台发送时数据 wx.request...

    // this.showModal({
    //   msg: '提交成功'
    // })
 },

  /***报错 **/
  showModal(error) {
     wx.showModal({
       content: error.msg
     })
  },
内置校验规则说明:
| 序号 | 规则 | 描述 |
|---|---|---|
| 1 | required: true |
这是必填字段。 |
| 2 | email: true |
请输入有效的电子邮件地址。 |
| 3 | tel: true |
请输入11位的手机号码。 |
| 4 | url: true |
请输入有效的网址。 |
| 5 | date: true |
请输入有效的日期。 |
| 6 | dateISO: true |
请输入有效的日期(ISO),例如:2009-06-23,1998/01/22。 |
| 7 | number: true |
请输入有效的数字。 |
| 8 | digits: true |
只能输入数字。 |
| 9 | idcard: true |
请输入18位的有效身份证。 |
| 10 | equalTo: 'field' |
输入值必须和 field 相同。 |
| 11 | contains: 'ABC' |
输入值必须包含 ABC。 |
| 12 | minlength: 5 |
最少要输入 5 个字符。 |
| 13 | maxlength: 10 |
最多可以输入 10 个字符。 |
| 14 | rangelength: [5, 10] |
请输入长度在 5 到 10 之间的字符。 |
| 15 | min: 5 |
请输入不小于 5 的数值。 |
| 16 | max: 10 |
请输入不大于 10 的数值。 |
| 17 | range: [5, 10] |
请输入范围在 5 到 10 之间的数值。 |
来源:CSDN
作者:chibimarukochan
链接:https://blog.csdn.net/ChibiMarukoChan/article/details/86496769