前置
必须得搞搞odl了
安装
环境
root@vpp-test:~# java --version
openjdk 11.0.8 2020-07-14
OpenJDK Runtime Environment (build 11.0.8+10-post-Ubuntu-0ubuntu118.04.1)
OpenJDK 64-Bit Server VM (build 11.0.8+10-post-Ubuntu-0ubuntu118.04.1, mixed mode, sharing)
root@vpp-test:~# cat /etc/issue
Ubuntu 18.04.4 LTS \n \l
#odl
Magnesium-SR2
下载 https://docs.opendaylight.org/en/latest/downloads.html
安装java
apt install openjdk-11-jre-headless
设置JAVA_HOME
编辑/etc/profile
export JAVA_HOME="/usr/lib/jvm/java-11-openjdk-amd64/"
加载
root@vpp-test:~# source /etc/profile
root@vpp-test:~# echo $JAVA_HOME
/usr/lib/jvm/java-11-openjdk-amd64/
启动
root@vpp-test:~/odl# tar zxvf opendaylight-0.12.2.tar.gz
root@vpp-test:~/odl# cd opendaylight-0.12.2/
root@vpp-test:~/odl/opendaylight-0.12.2# ./bin/karaf
Apache Karaf starting up. Press Enter to open the shell now...
100% [========================================================================]

Karaf started in 0s. Bundle stats: 13 active, 13 total

    ________                       ________                .__  .__       .__     __
    \_____  \ ______   ____   ____ \______ \ _____  ___.__.|  | |__| ____ |  |___/  |_
     /   |   \\____ \_/ __ \ /    \ |    |  \\__  \<   |  ||  | |  |/ ___\|  |  \   __\
    /    |    \  |_> >  ___/|   |  \|    `   \/ __ \\___  ||  |_|  / /_/  >   Y  \  |
    \_______  /   __/ \___  >___|  /_______  (____  / ____||____/__\___  /|___|  /__|
            \/|__|        \/     \/        \/     \/\/            /_____/      \/


Hit '<tab>' for a list of available commands
and '[cmd] --help' for help on a specific command.
Hit '<ctrl-d>' or type 'system:shutdown' or 'logout' to shutdown OpenDaylight.

opendaylight-user@root>
后台启动
./bin/start
控制台
后台启动时怎么登录控制台?
./bin/client
NETCONF设备
分两种
模拟设备
模拟netconf设备有多种方式,这里采用的是odl提供的netconf-testtool,文档见这里
下载testtool,我下载的是最新版,老版本的ODL需要注意下
https://nexus.opendaylight.org/content/repositories/public/org/opendaylight/netconf/netconf-testtool
启动
java -jar netconf-testtool-1.8.2-executable.jar

# 启动情况如下
root@localhost:~/odljava -jar netconf-testtool-1.8.2-executable.jar
10:42:59.373 [main] INFO  o.o.n.t.tool.NetconfDeviceSimulator - Starting 1, SSH simulated devices starting on port 17830
10:42:59.398 [main] INFO  o.o.n.t.tool.NetconfDeviceSimulator - Custom module loading skipped.
10:42:59.880 [main] INFO  o.o.n.t.tool.NetconfDeviceSimulator - using OperationsProvider.
10:42:59.978 [main] INFO  o.o.n.s.s.c.u.s.b.BouncyCastleSecurityProviderRegistrar - getOrCreateProvider(BC) created instance of org.bouncycastle.jce.provider.BouncyCastleProvider
10:42:59.980 [main] INFO  o.o.n.s.s.c.u.s.e.EdDSASecurityProviderRegistrar - getOrCreateProvider(EdDSA) created instance of org.opendaylight.netconf.shaded.eddsa.EdDSASecurityProvider
10:43:00.063 [main] WARN  io.netty.bootstrap.ServerBootstrap - Unknown channel option 'SO_BACKLOG' for channel '[id: 0x2c47b0bf]'
10:43:00.143 [main] INFO  o.o.n.t.tool.NetconfDeviceSimulator - All simulated devices started successfully from port 17830 to 17830
启动后默认启动了一个支持netconf的设备,默认端口17830
测试
ssh admin@localhost -p 17830 -s netconf

# 测试如下
root@localhost:~/odl/opendaylight-0.12.2/cache/schema# ssh root@localhost -p 17830 -s netconf
The authenticity of host '[localhost]:17830 ([127.0.0.1]:17830)' can't be established.
RSA key fingerprint is SHA256:+sqmaHkirjlLQdYJfKcYB677cMK2Hgdkq+9ZarwL/oY.
Are you sure you want to continue connecting (yes/no)?
显示以上信息,即netconf设备启动成功。
具体绑定设备见下面
另外官网文档说指定--distribution-folder就可自动绑定,但我测试未生效
java -jar netconf-testtool-1.8.2-executable.jar --device-count 2 --distribution-folder ~/odl/opendaylight-0.12.2/ --md-sal MD-SAL --debug DEBUG
实体设备
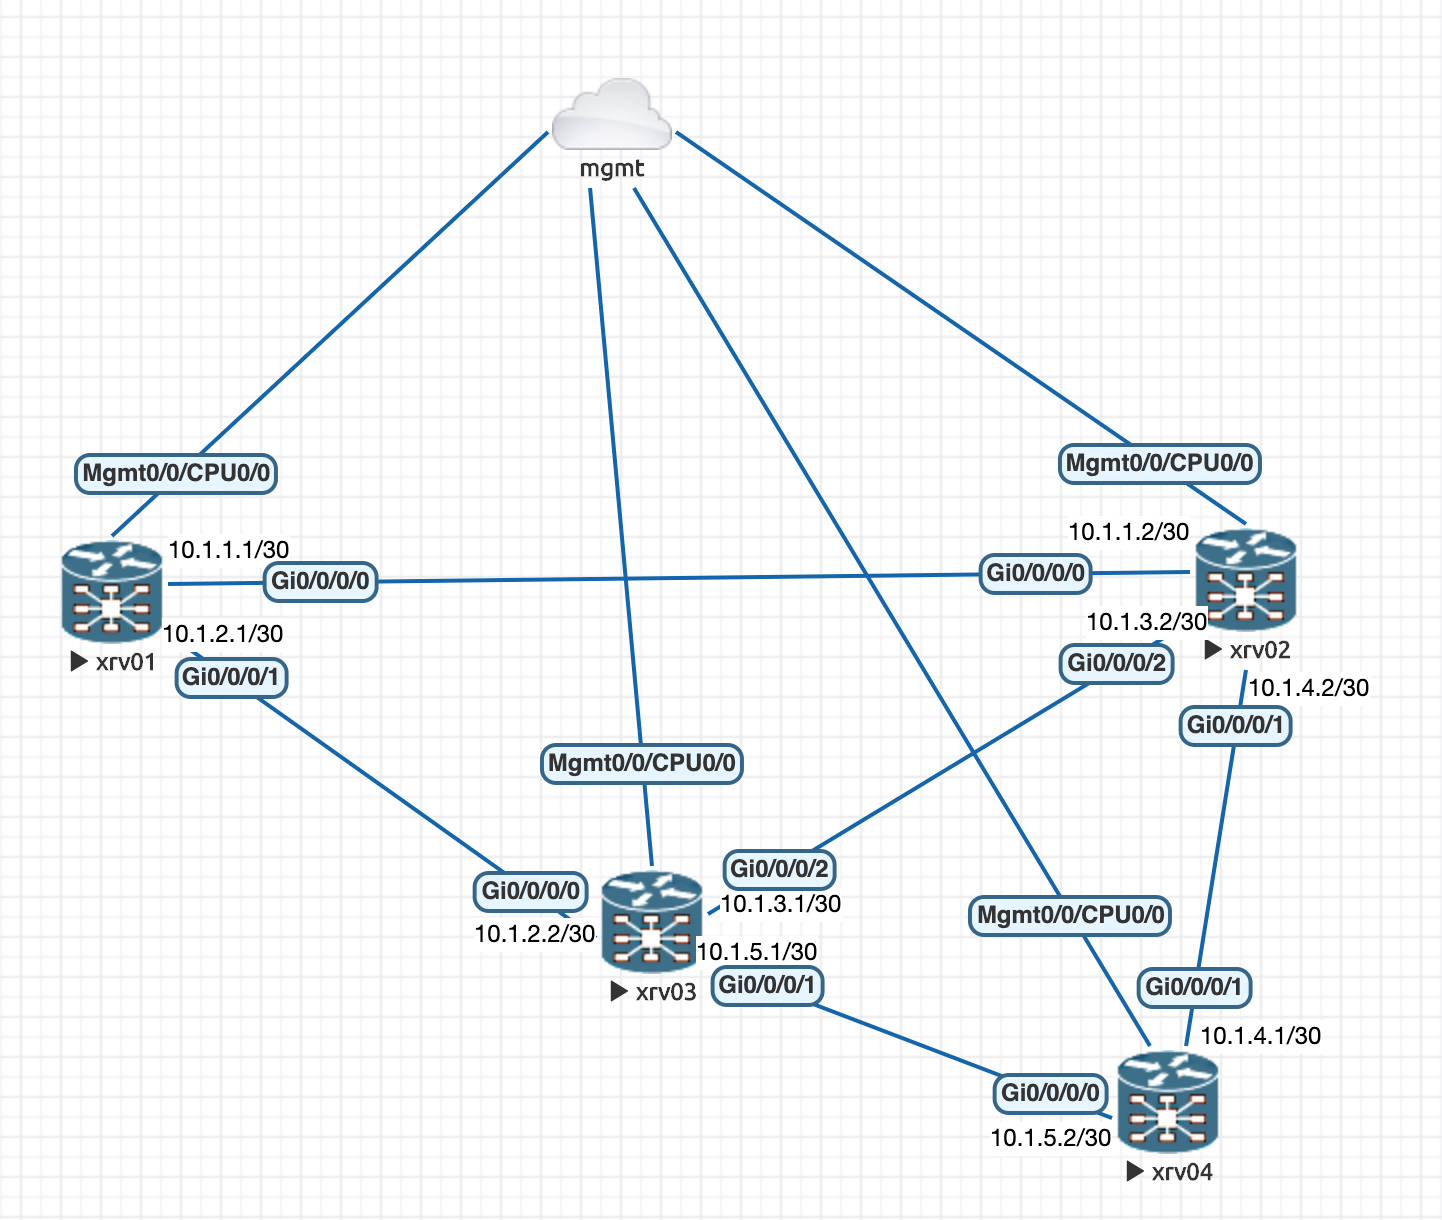
这里叫实体设备,不太合适,也是由eve-ng模拟的。但其具备和实体设备一样的功能,一样的配置。
采用的是ios xr,具体安装见这里
安装完后的拓扑见
绑定NETCONF设备
由于是开源的软件,文档更新速度,千百个草泥马。按官网文档从上到下是配置不成功的,新的架构已经改为MD-SAL模式,故直接跳到这个地方
这里很简单,我觉得分2步
odl安装feature
feature:install odl-restconf odl-netconf-connector-all odl-netconf-topology odl-netconf-console odl-mdsal-apidocs
其中
- odl-restconf: 支撑的是北向restful的接口
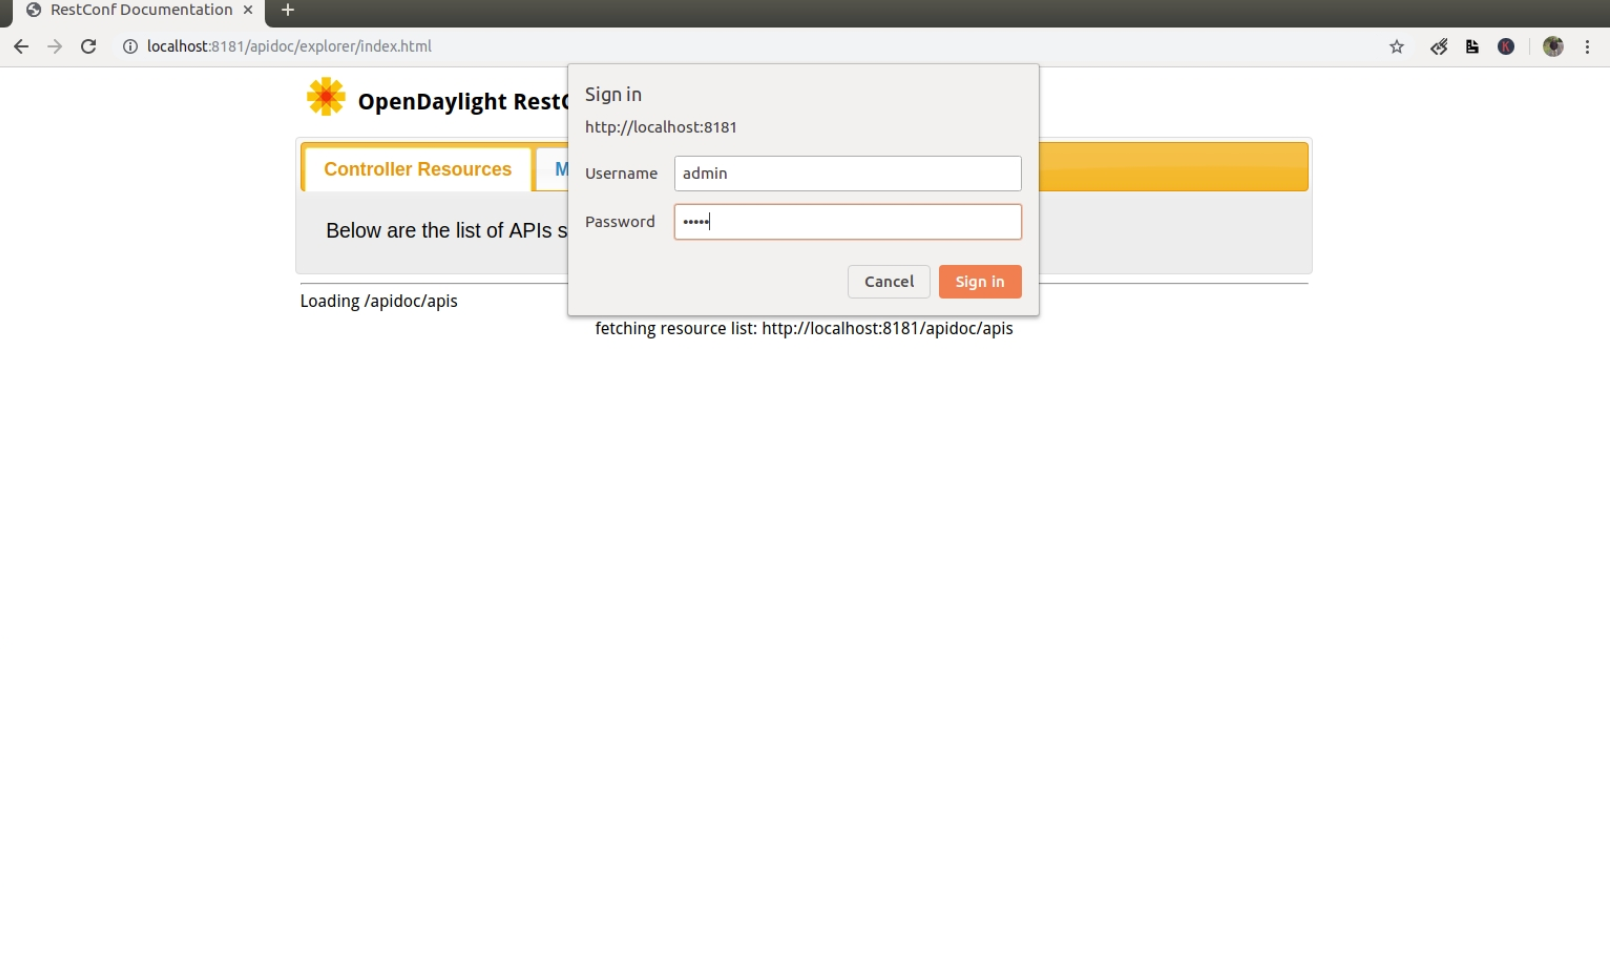
- odl-mdsal-apidocs: 提供API DOC, 通过web ui登录
- 地址:http://<odl-ip>:8181/apidoc/explorer/index.html
- username: admin password: admin

启用log
karaf shell界面执行
log:set TRACE org.opendaylight.controller.sal.connect.netconf
接入odl
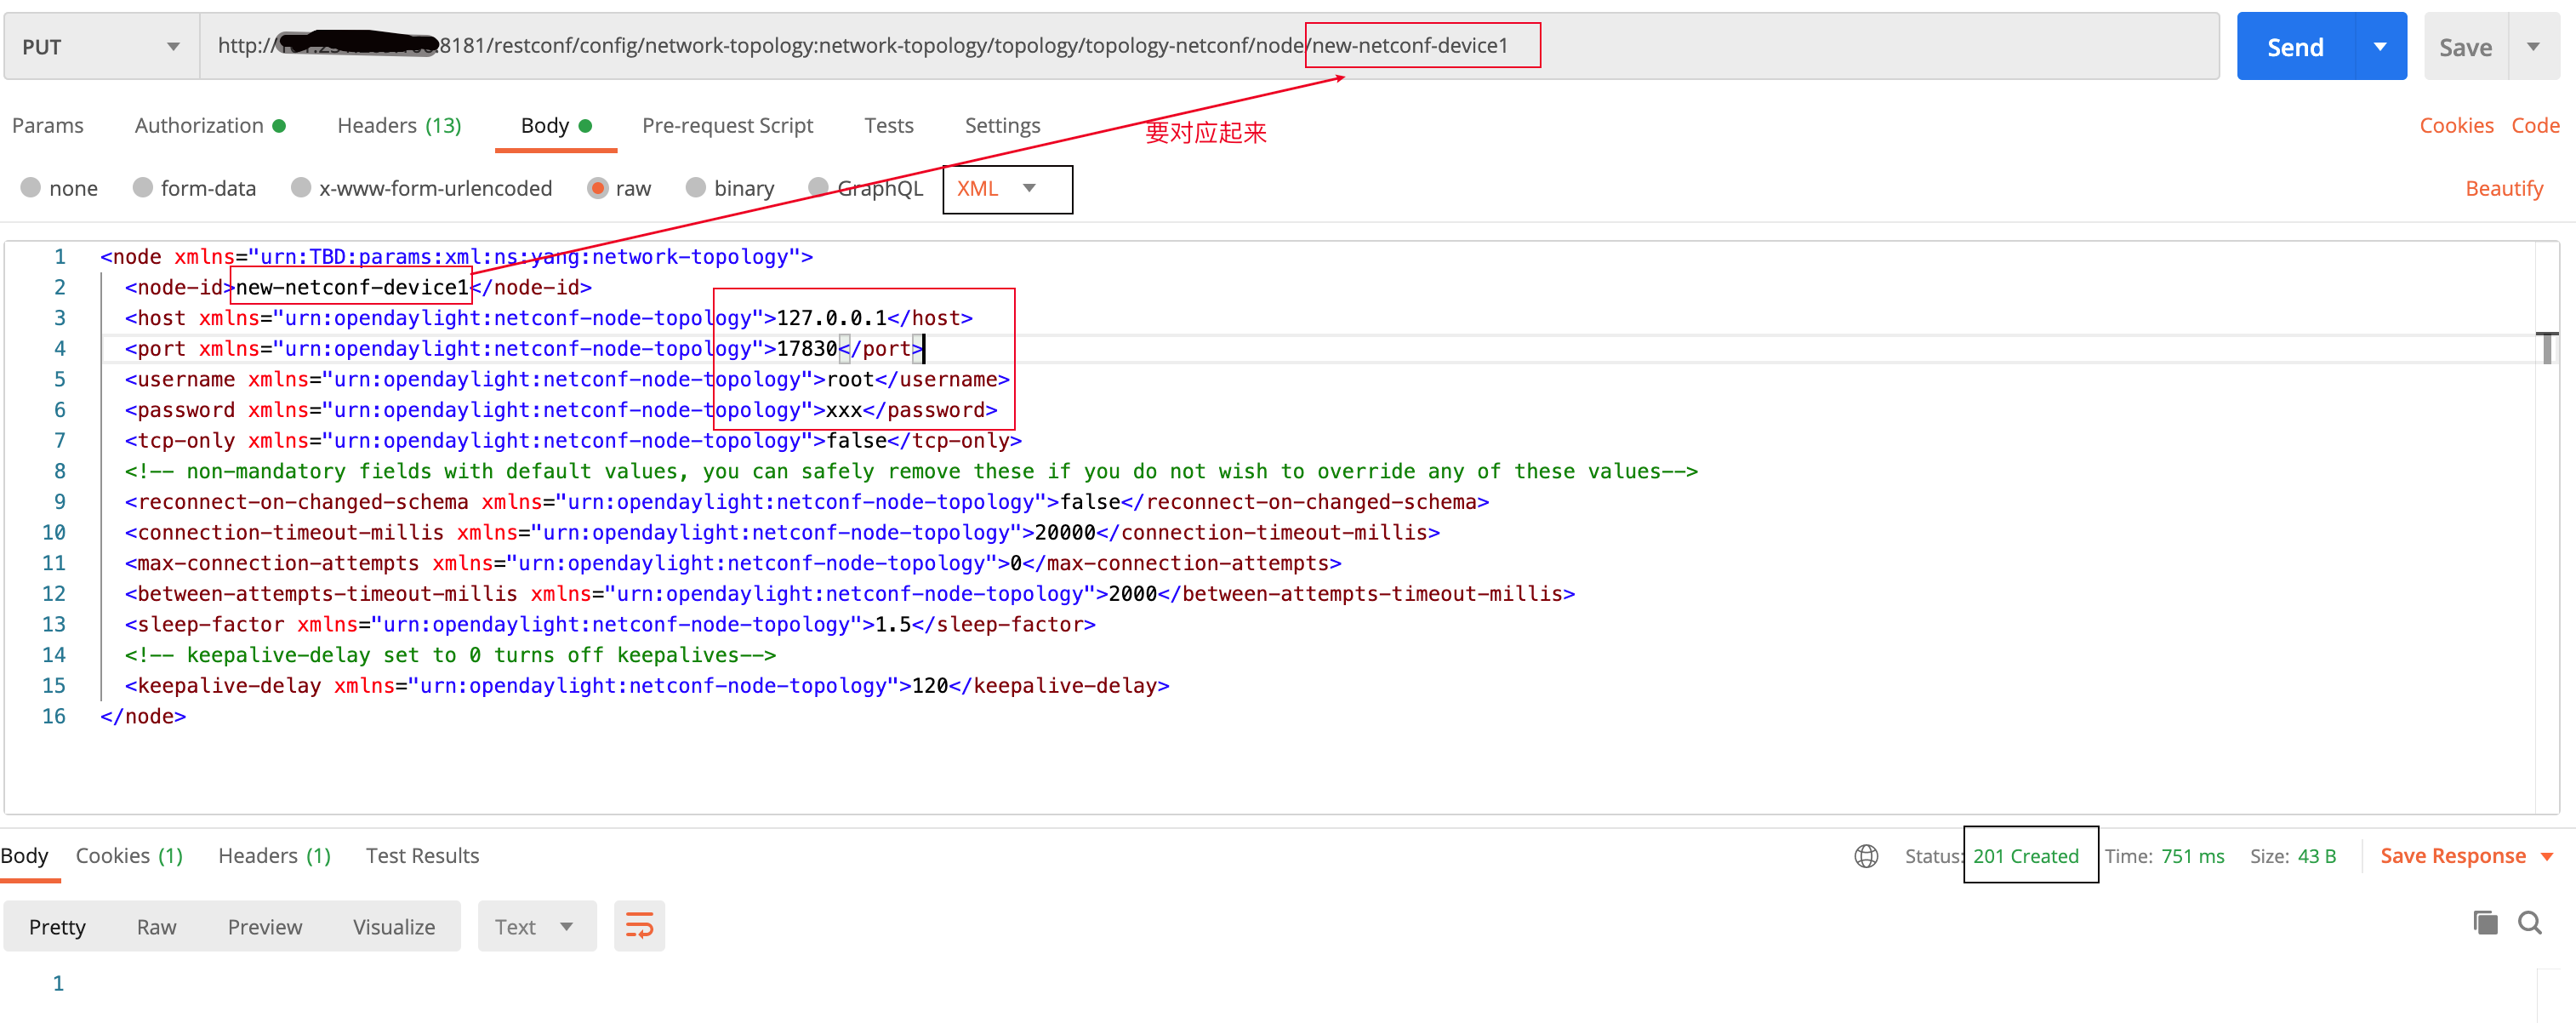
node文件
<node xmlns="urn:TBD:params:xml:ns:yang:network-topology">
  <node-id>new-netconf-device1</node-id>
  <host xmlns="urn:opendaylight:netconf-node-topology">127.0.0.1</host>
  <port xmlns="urn:opendaylight:netconf-node-topology">17830</port>
  <username xmlns="urn:opendaylight:netconf-node-topology">root</username>
  <password xmlns="urn:opendaylight:netconf-node-topology">xxx</password>
  <tcp-only xmlns="urn:opendaylight:netconf-node-topology">false</tcp-only>
  <!-- non-mandatory fields with default values, you can safely remove these if you do not wish to override any of these values-->
  <reconnect-on-changed-schema xmlns="urn:opendaylight:netconf-node-topology">false</reconnect-on-changed-schema>
  <connection-timeout-millis xmlns="urn:opendaylight:netconf-node-topology">20000</connection-timeout-millis>
  <max-connection-attempts xmlns="urn:opendaylight:netconf-node-topology">0</max-connection-attempts>
  <between-attempts-timeout-millis xmlns="urn:opendaylight:netconf-node-topology">2000</between-attempts-timeout-millis>
  <sleep-factor xmlns="urn:opendaylight:netconf-node-topology">1.5</sleep-factor>
  <!-- keepalive-delay set to 0 turns off keepalives-->
  <keepalive-delay xmlns="urn:opendaylight:netconf-node-topology">120</keepalive-delay>
</node>
以下接口调用的header指定如下,
Accept application/xml
Content-Type application/xml
添加node
这里是put方法,多次提交是修改之前的,没有node的话则新建,这里注意
获取看看
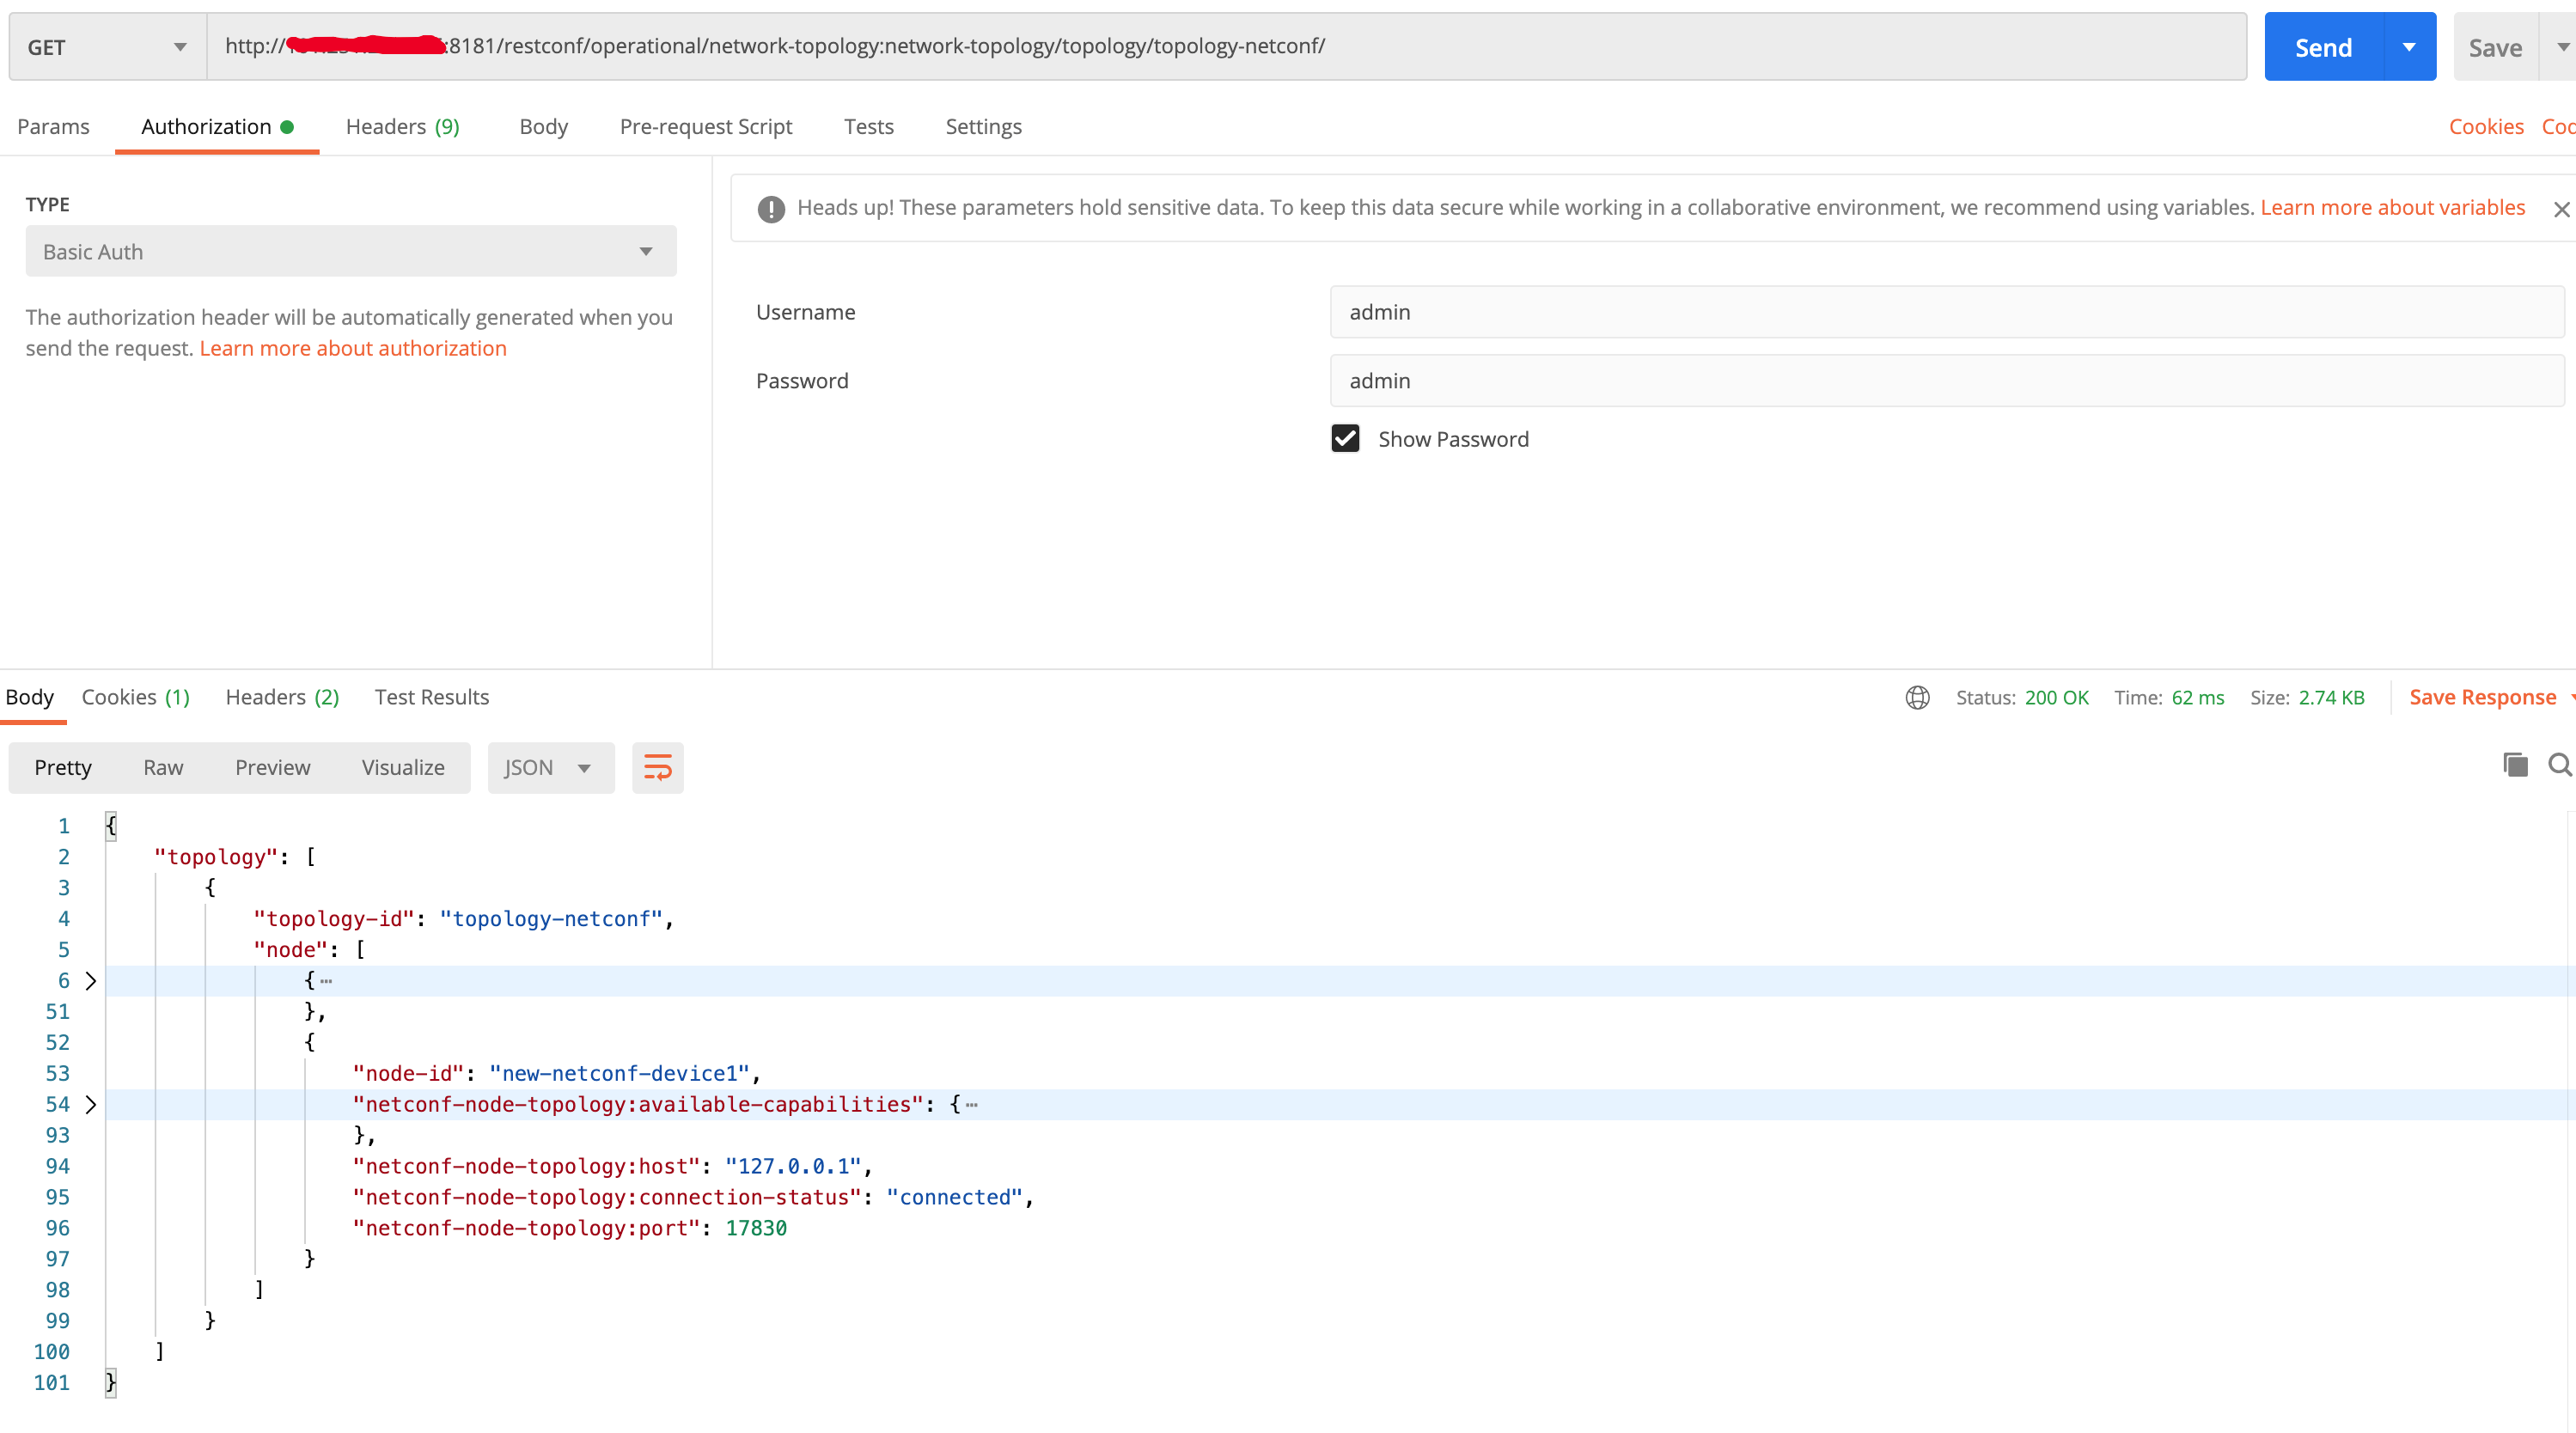
成功了!且我们能看到设备提供的netconf能力,这里我折叠了。
现在,mount点 yang-ext:mount 将可用于 CONFIG 和 Operational data store. URI这样:/topology-netconf/node/{node name}/yang-ext:mount/
至此,设备绑定上了,亦或被ODL接管了。
删除node
指定对应的node name,delete方法即可删除

南向接口调用
创建YANG文件
进入odl的scheme目录
cd ~/odl/opendaylight-0.12.2/cache/schema
创建yang model,这里起了个简单的
vim test@2014-10-17.yang
输入下面内容
module test {
    yang-version 1;
    namespace "urn:opendaylight:test";
    prefix "tt";

    revision "2014-10-17";


   container cont {

        leaf l {
            type string;
        }
   }
}
重启ODL
system:shutdown
测试
注意这里是POST方法
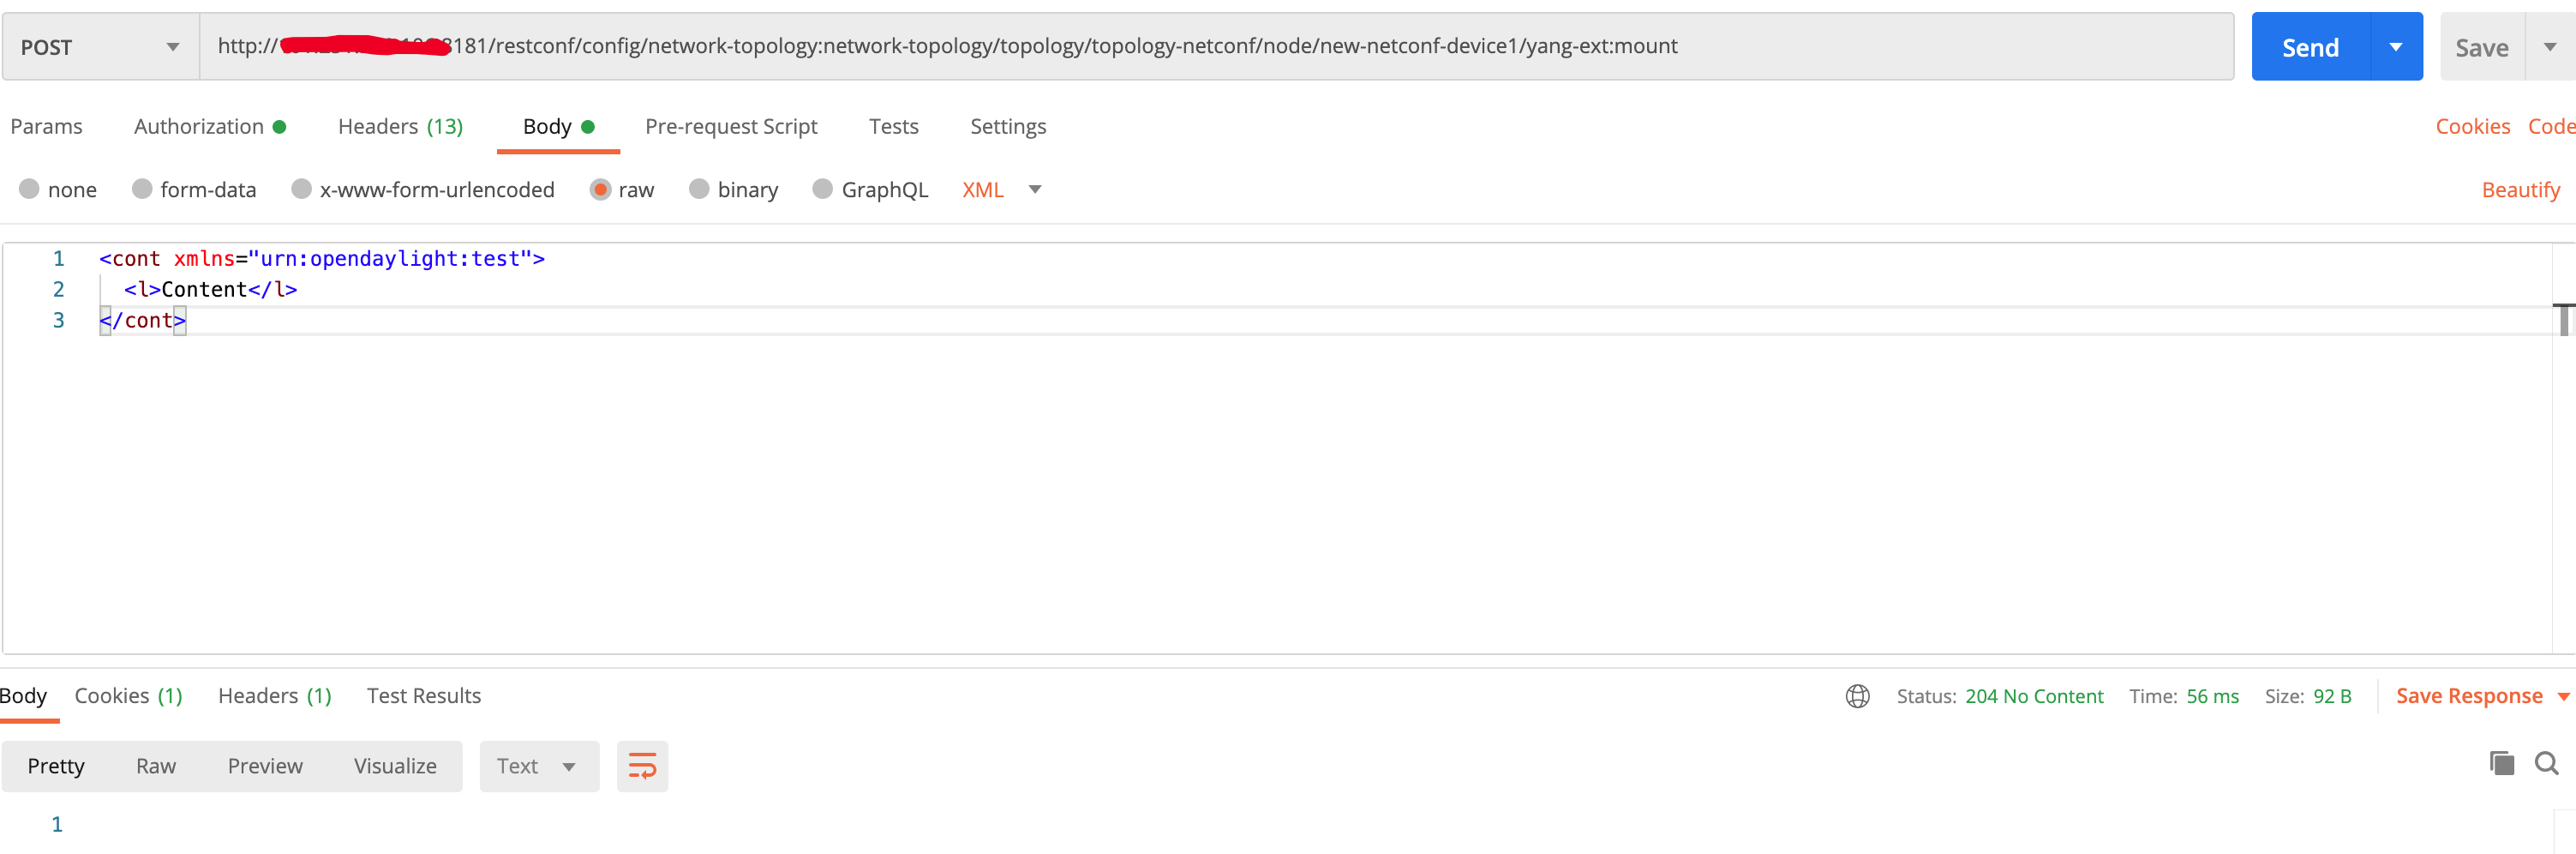
验证,看下面已经推进去了

来源:oschina
链接:https://my.oschina.net/u/914655/blog/4544015