https://docs.opencv.org/4.3.0/dd/dd7/tutorial_morph_lines_detection.html
目录
Goal
In this tutorial you will learn how to:
-
Apply two very common morphology operators (i.e. Dilation and Erosion), with the creation of custom kernels, in order to extract straight lines on the horizontal and vertical axes. For this purpose, you will use the following OpenCV functions:
in an example where your goal will be to extract the music notes from a music sheet.
Theory
Morphology Operations
Two of the most basic morphological operations are dilation and erosion. Dilation adds pixels to the boundaries of the object in an image, while erosion does exactly the opposite. The amount of pixels added or removed, respectively depends on the size and shape of the structuring element used to process the image. In general the rules followed from these two operations have as follows:
-
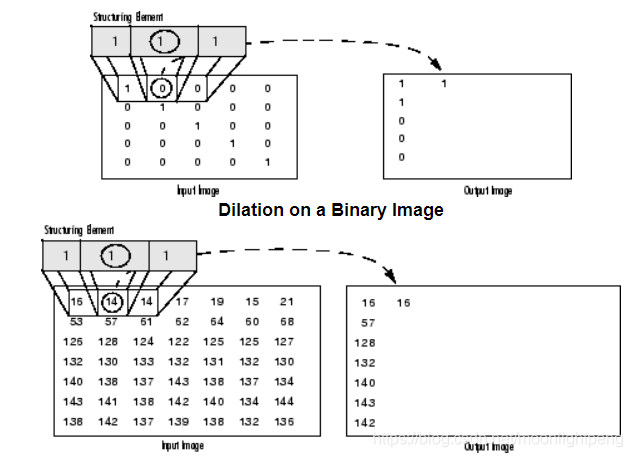
Dilation: The value of the output pixel is the maximum value of all the pixels that fall within the structuring element's size and shape. For example in a binary image, if any of the pixels of the input image falling within the range of the kernel is set to the value 1, the corresponding pixel of the output image will be set to 1 as well. The latter applies to any type of image (e.g. grayscale, bgr, etc).

Erosion: The vice versa applies for the erosion operation. The value of the output pixel is the minimum value of all the pixels that fall within the structuring element's size and shape. Look the at the example figures below:

Structuring Elements
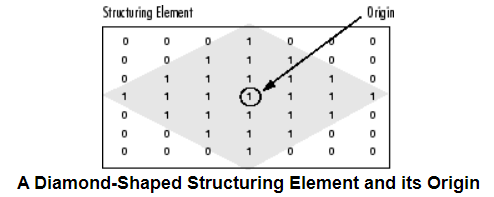
A structuring element is a matrix consisting of only 0's and 1's that can have any arbitrary shape and size. Typically are much smaller than the image being processed, while the pixels with values of 1 define the neighborhood. The center pixel of the structuring element, called the origin, identifies the pixel of interest – the pixel being processed. 只有零和一
For example, the following illustrates a diamond-shaped structuring element of 7x7 size.

A structuring element can have many common shapes, such as lines, diamonds, disks, periodic lines, and circles and sizes. You typically choose a structuring element the same size and shape as the objects you want to process/extract in the input image. For example, to find lines in an image, create a linear structuring element as you will see later.
#include <iostream>
#include <opencv2/imgproc/imgproc.hpp>
#include <opencv2/highgui/highgui.hpp>

using namespace cv;


int main(int argc, char** argv)
{
	Mat musicImage = imread("music.png", 0);
	if (musicImage.data == NULL)
	{
		printf("No Image\n");
	}
	imshow("image", musicImage);

	Mat blurImage = musicImage.clone();
	GaussianBlur(musicImage, blurImage, Size(3, 3), 1);
	Mat dilationImage;
	Size structSize = Size(musicImage.cols / 30, 1);
	dilate(blurImage, dilationImage, getStructuringElement(MORPH_RECT, structSize));
	imshow("lines", dilationImage);

	waitKey(0);
	return 0;
}

import numpy as np
import sys
import cv2 as cv

def show_wait_destroy(winname, img):
    cv.imshow(winname, img)
    cv.moveWindow(winname, 500, 0)
    cv.waitKey(0)
    cv.destroyWindow(winname)

def main(argv):
    # [load_image]
    # Check number of arguments
    if len(argv) < 1:
        print ('Not enough parameters')
        print ('Usage:\nmorph_lines_detection.py < path_to_image >')
        return -1
    # Load the image
    src = cv.imread(argv[0], cv.IMREAD_COLOR)
    # Check if image is loaded fine
    if src is None:
        print ('Error opening image: ' + argv[0])
        return -1
    # Show source image
    cv.imshow("src", src)
    # [load_image]
    # [gray]
    # Transform source image to gray if it is not already
    if len(src.shape) != 2:
        gray = cv.cvtColor(src, cv.COLOR_BGR2GRAY)
    else:
        gray = src
    # Show gray image
    show_wait_destroy("gray", gray)
    # [gray]
    # [bin]
    # Apply adaptiveThreshold at the bitwise_not of gray, notice the ~ symbol
    gray = cv.bitwise_not(gray)
    bw = cv.adaptiveThreshold(gray, 255, cv.ADAPTIVE_THRESH_MEAN_C, \
                                cv.THRESH_BINARY, 15, -2)
    # Show binary image
    show_wait_destroy("binary", bw)
    # [bin]
    # [init]
    # Create the images that will use to extract the horizontal and vertical lines
    horizontal = np.copy(bw)
    vertical = np.copy(bw)
    # [init]
    # [horiz]
    # Specify size on horizontal axis
    cols = horizontal.shape[1]
    horizontal_size = cols // 30
    # Create structure element for extracting horizontal lines through morphology operations
    horizontalStructure = cv.getStructuringElement(cv.MORPH_RECT, (horizontal_size, 1))
    # Apply morphology operations
    horizontal = cv.erode(horizontal, horizontalStructure)
    horizontal = cv.dilate(horizontal, horizontalStructure)
    # Show extracted horizontal lines
    show_wait_destroy("horizontal", horizontal)
    # [horiz]
    # [vert]
    # Specify size on vertical axis
    rows = vertical.shape[0]
    verticalsize = rows // 30 #取整
    # Create structure element for extracting vertical lines through morphology operations
    verticalStructure = cv.getStructuringElement(cv.MORPH_RECT, (1, verticalsize))
    # Apply morphology operations
    vertical = cv.erode(vertical, verticalStructure)
    vertical = cv.dilate(vertical, verticalStructure)
    # Show extracted vertical lines
    show_wait_destroy("vertical", vertical)
    # [vert]
    # [smooth]
    # Inverse vertical image
    # bitwise_not是对二进制数据进行“非”操作,即对图像(灰度图像或彩色图像均可)
    # 每个像素值进行二进制“非”操作,~1 = 0,~0 = 1
    vertical = cv.bitwise_not(vertical)
    show_wait_destroy("vertical_bit", vertical)
    '''
    Extract edges and smooth image according to the logic
    1. extract edges
    2. dilate(edges)
    3. src.copyTo(smooth)
    4. blur smooth img
    5. smooth.copyTo(src, edges)
    '''
    # Step 1
    edges = cv.adaptiveThreshold(vertical, 255, cv.ADAPTIVE_THRESH_MEAN_C, \
                                cv.THRESH_BINARY, 3, -2)
    show_wait_destroy("edges", edges)
    # Step 2
    kernel = np.ones((2, 2), np.uint8)
    edges = cv.dilate(edges, kernel)
    show_wait_destroy("dilate", edges)
    # Step 3
    smooth = np.copy(vertical)
    # Step 4
    smooth = cv.blur(smooth, (2, 2))
    # Step 5
    (rows, cols) = np.where(edges != 0)
    vertical[rows, cols] = smooth[rows, cols]
    # Show final result
    show_wait_destroy("smooth - final", vertical)
    # [smooth]
    return 0
if __name__ == "__main__":
    main(sys.argv[1:])
来源:oschina
链接:https://my.oschina.net/u/4312062/blog/4794509