一天干掉一只Monkey计划(四)--卡通着色,描边
--Zephyroal
楔子:
实在无奈,Unreal的世界浩如烟海,在里面一点一点地爬动,很充实,但也很无奈,加之最近加入自行车驴行俱乐部,几乎都没有什么时间出来搞些自己的小小兴趣爱好了,老大说的好“每一个年轻程序员都有一颗渲染的心”,正好有相关方面的应用,写下此篇,总结一下卡通渲染方面的知识,摘录不少,这里不一一谢过了,最后用RM做了相关的实现,工程文件就懒地放了,最怕害了一样手懒的童鞋,下个东西就当学习结束了,以我自己的深刻教训,理论与实际永远隔着一条银河,牢记,自勉:
实践是检验真理的唯一标准!
一、 技术背景
非真实感绘制(Non-photorealistic rendering)
(NPR)是计算机图形学的一类,主要模拟艺术式的绘制风格,也用于发展新绘制风格。和传统的追求真实感的计算机图形学不同,NPR受到油画,素描,技术图纸,和动画卡通的影响。NPR已经以"卡通造影"的形式出现在电影和电子游戏中,它也已出现在设计图纸和试验动画中
卡通渲染便是一种典型的常用非真实感绘制技术,它要求帖图由不明显的渐变色块夹杂一些不复杂的纹理组成。它强调粗细线条(Silhouette,轮廓勾边)和简单色块(ToonShading,块状色调着色),忽略细节。利用这些很简单很纯粹的线条和色块,就能渲染出设计师所要求的质感很强的卡通效果,从而营造出互动的二维动画世界。
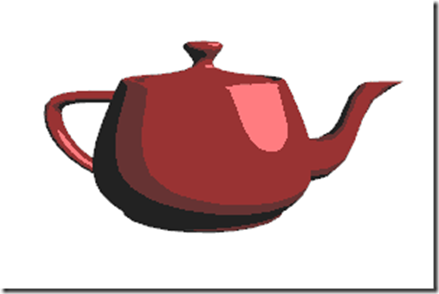
典型的卡通渲染
如上示例,茶壶上的色调是通过角度的余弦值选择的,这个角度是指光线和面的法线之间的夹角角度。如果法线和光的夹角比较小,我们使用较亮的色调,随着夹角变大,逐步使用更暗的色调。换句话说,角度余弦值将决定色调的强度。
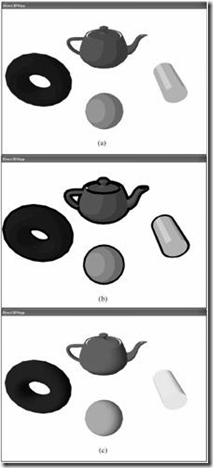
图17.2:(a)使用卡通着色法着色的对象(注意着色间的尖锐过渡)。(b)增强卡通效果,轮廓边(silhouette edge)被勾出。(c)使用标准散射光照着色的对象--摘自《龙书》
勾边效果采用的是比较通行的做法,将模型的顶点沿法线方向外移一定距离得到一个比原模型稍大的模型,绘制时采用剔除正面绘制背面的方式,将模型绘制为黑色,再按正常方式绘制原来的模型,结果就产生了一定宽度的黑边,黑边的宽度可以通过将顶点沿法线外移的距离来控制。
色阶效果采用了Diffuse Cubemap的方法实现。将模型法线作为第二套UV,根据光源方向设置适当的UV坐标变换矩阵,通过这套UV来索引一个保存了光照环境Diffuse光照信息的Cubemap贴图。普通的Diffuse Cubemap贴图上的光照信息是平滑过渡的,为了实现色阶效果,将普通的Diffuse Cubemap贴图在PhotoShop中进行色调分离,将连续的灰度变化变成4级灰度。
当然实际的最终效果,不仅需要程序渲染的支持,美工的技术功底和经验也是非常重要。
著名的SF4
PS:OpenGPU有Trace大大翻译的几篇使用卡通渲染的典型日游,这里顺便膜拜下,可以看看商业中是如何使用的~
二、 实现原理
前面提到了,卡通渲染的主要技术就是“Outlining”和“ToonShading”两个技术,首先色阶渲染,可以用一张1D纹理读取实现,其次是描边,做法很多,龙书上有取边列表的方法(比较耗),还可以通过边缘检测,或者法线方向放大实现。
1,描边,边缘检测
实现原理:
1. 把模型渲染到一张纹理图上;
2. 对这张图进行Sobel边缘检测,找出边界并把渲染到屏幕空间中。
边缘检测参照如下,如看着怕怕,首先翻出你尘封已久的数字图像处理吧.
索贝尔算子(Sobel operator)主要用作边缘检测,在技术上,它是一离散性差分算子,用来运算图像亮度函数的灰度之近似值。在图像的任何一点使用此算子,将会产生对应的灰度矢量或是其法矢量
Sobel卷积因子为:
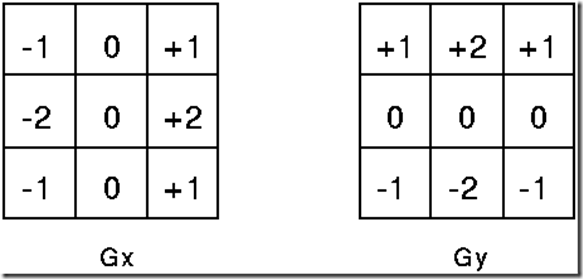
该算子包含两组3x3的矩阵,分别为横向及纵向,将之与图像作平面卷积,即可分别得出横向及纵向的亮度差分近似值。如果以A代表原始图像,Gx及Gy分别代表经横向及纵向边缘检测的图像灰度值,其公式如下:
具体计算如下:
Gx = (-1)*f(x-1, y-1) + 0*f(x,y-1) + 1*f(x+1,y-1)
+(-2)*f(x-1,y) + 0*f(x,y)+2*f(x+1,y)
+(-1)*f(x-1,y+1) + 0*f(x,y+1) + 1*f(x+1,y+1)
=[f(x+1,y-1)+2*f(x+1,y)+f(x+1,y+1)]-[f(x-1,y-1)+2*f(x-1,y)+f(x-1,y+1)]
Gy =1* f(x-1, y-1) + 2*f(x,y-1)+ 1*f(x+1,y-1)
+0*f(x-1,y) 0*f(x,y) + 0*f(x+1,y)
+(-1)*f(x-1,y+1) + (-2)*f(x,y+1) + (-1)*f(x+1, y+1)
=[f(x-1,y-1)+2f(x,y-1)+f(x+1,y-1)]-[f(x-1,y+1)+2*f(x,y+1)+f(x+1,y+1)]
其中f(a,b), 表示图像(a,b)点的灰度值;
图像的每一个像素的横向及纵向灰度值通过以下公式结合,来计算该点灰度的大小:
通常,为了提高效率 使用不开平方的近似值:
如果梯度G大于某一阀值 则认为该点(x,y)为边缘点。
然后可用以下公式计算梯度方向:
Sobel算子根据像素点上下、左右邻点灰度加权差,在边缘处达到极值这一现象检测边缘。对噪声具有平滑作用,提供较为精确的边缘方向信息,边缘定位精度不够高。当对精度要求不是很高时,是一种较为常用的边缘检测方法。
用阈值化的方法勾勒卡通渲染需要的轮廓。该算子包含两组3x3的矩阵(一个水平的,一个是垂直的),每一个逼近一个偏导数,分别为横向及纵向,将之与图像作平面卷积,即可分别得出横向及纵向的亮度差分近似值。
计算出深度图中的像素梯度值G,我们预设一个阀值(Threshold)值T,G值大于T值时,认为该像素为深度变化较大的边缘,由此我们得到一张屏幕空间描边图(Edge Texture)。这种阈值化轮廓提取算法,已在数学上证明当像素点满足正态分布时所求解是最优的。
这种方法的Demo我就不贴了,需要的参见RenderMonkey自带例子中NPR例子。
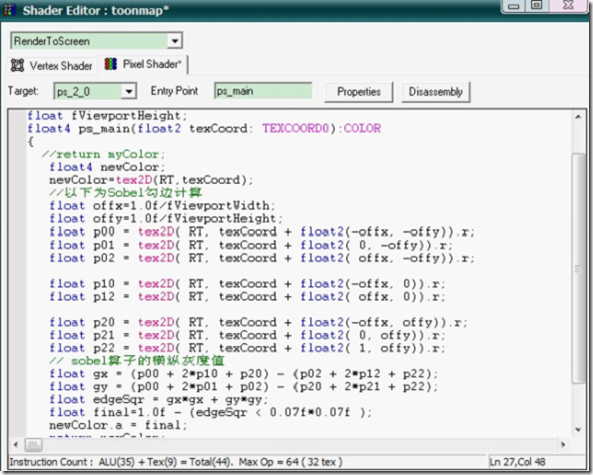
简而言之,Sobel算子就是如何使用一个算子重新计算一个像素,看代码说话:
Pixel Shader:
//RT尺寸 off值即为相邻像素(想像一下九宫格)的距离
sampler RT: register(s0);
float4 myColor;
float fViewportWidth;
float fViewportHeight;
float4 ps_main(float2 texCoord: TEXCOORD0):COLOR
{
float4 newColor;
newColor=tex2D(RT,texCoord);
float offx=1.0f/fViewportWidth;
float offy=1.0f/fViewportHeight;
float p00 = tex2D( RT, texCoord + float2(-offx, -offy)).r;
float p01 = tex2D( RT, texCoord + float2( 0, -offy)).r;
float p02 = tex2D( RT, texCoord + float2( offx, -offy)).r;
float p10 = tex2D( RT, texCoord + float2(-offx, 0)).r;
float p12 = tex2D( RT, texCoord + float2( offx, 0)).r;
float p20 = tex2D( RT, texCoord + float2(-offx, offy)).r;
float p21 = tex2D( RT, texCoord + float2( 0, offy)).r;
float p22 = tex2D( RT, texCoord + float2( 1, offy)).r;
// sobel算子的横纵灰度值
float gx = (p00 + 2*p10 + p20) - (p02 + 2*p12 + p22);
float gy = (p00 + 2*p01 + p02) - (p20 + 2*p21 + p22);
float edgeSqr = gx*gx + gy*gy;
float final=1.0f - (edgeSqr < 0.07f*0.07f );
newColor.a = final;
return newColor;
}
2,描边,法线放大
可以从一遍又一遍的采样看出,Sobel算法在PixelShader中进行逐像素的效率并不高,而且也并不完全准确。
另一种描边方法既是传说中的法线放大,渲染两次,先关闭Z-Write,对模型按法线方向微微进行一次放大,并在PS中将其处理为需要的描边颜色,然后在第二遍渲染中,正常渲染出模型(当然了,这只是demo演示时的做法,真正应用中,比如点选人物效果,还需要对描边进行一定的高斯模糊,具体方法后面再提)。
VSShader:
float4x4 matViewProjection;
struct VS_INPUT
{
float4 Position : POSITION0;
float3 Normal : NORMAL0;
};
struct VS_OUTPUT
{
float4 Position : POSITION0;
};
VS_OUTPUT vs_main( VS_INPUT Input )
{
VS_OUTPUT Output;
Output.Position = float4(Input.Position.xyz + Input.Normal*f1BiggerFactor1);
Output.Position = mul( Output.Position, matViewProjection );
return( Output );
}
PSShader:
sampler2D BaseMap;
float4 ps_main() : COLOR0
{
return float4(0, 1, 0, 1);
}
3,边列表方法
首先需要做的是找出模型中的边来,其方法是首先在载入模型的时候,生成边列表,保存每条边连接的两个顶点,每条边相邻的两个面的编号。然后每一帧遍利所有边,找出边的两个面的法线和摄像机镜头夹角的乘积为负的边(大于90度为正,小于90度为负),找到这些边之后,然后把每条边的顶点复制一个,往法线方向位移一定的距离,获得一个顶点,然后据此来生成mesh的顶点索引。
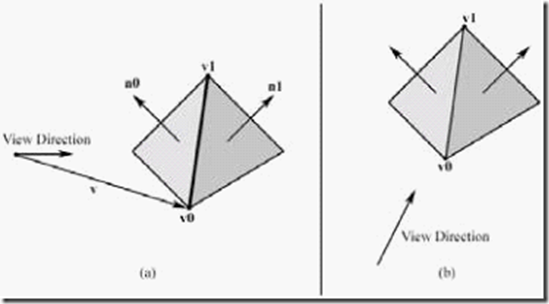
若两个三角面face0和face1在视图方向上与两个不同方向的面共享同一条边,则该边为轮廓边。也就是说,如果一个面是前面(front facing)而另一个面是后面(back facing),那么这条边就是一条轮廓边。图17.8给出了一个轮廓边和一个非轮廓边的例子。
图17.8:在(a)中,由v0 和v1定义的共享边的一个面是前面,而共享边另一个面是背面,因此该边是轮廓边。在(b)中,由v0 和v1定义的这两个共享边面都是前面,因此该边不是轮廓边。
具体可以参照龙书17章,这里不采用,就不再赘述。
4,卡通着色(摘自龙书)
要实现卡通着色,我们采用Lander在2000年3月发表在Game Developer Magazine的文章“Shades of Disney: Opaquing a 3D World”中所描述的方法。它像这样工作:我们创建一个带强度级别的灰度纹理,它包含我们需要的不同的着色强度。图17.3显示了我们在样例程序中使用的这个纹理。
图 17.3:用来保存着色强度的着色纹理。注意观察不连续的着色间过渡和纹理着色强度必须从左到右增加。
然后在顶点着色器中,我们执行标准散射点积运算(standard diffuse calculation dot product)来确定顶点法线N和光线向量L之间角度的余弦,用以确定顶点接收到多少光线:s=L·N
如果s<0,就表示光线向量和顶点法线之间的角度大于90度,也就表示该表面接收不到光线。因此,如果s<0,我们就让s=0。所以s ∈ [0, 1]。
现在,在通常的散射光照模型中,我们使用s来标记颜色向量。这样,顶点颜色的明暗取决于接收到的光照的数量:diffuseColor = s(r, g, b, a)
但是,这将会导致从亮到暗之间平滑的着色。这是与我们期望的卡通着色相反的。我们想要一种在几个不同着色器间突然转换颜色的效果(对卡通渲染来说,在2至4种着色器工作起来还是挺不错的)。
不使用s来标记颜色向量,我们将使用s作为早先提到的强度纹理的u纹理坐标——如图17.3。
注意:标量(scalar)s必定是一个有效的纹理坐标,因为s ∈ [0, 1],这是通常的纹理坐标区间。
按这种方式,顶点不会被平滑着色,而是间断的。例如,强度纹理可能被分成3种着色,如图17.4所示:
图17.4:那么,s ∈ [0, 0.33]的值使用shader0着色,s ∈ [ 0.33,0.66]的值使用shader1着色,s ∈ [0.66,1]的值使用shader2着色。当然,从这些着色的一种到另一种的过渡是不平滑的,这就赋予了我们期望的效果。
注意:我们还为卡通着色关闭了纹理过滤,因为这种过滤会试图使着色过渡变平滑。这对于我们要求的不连续过渡是多余的。
为了实现卡通着色, 我们需要创建一个带强度级别的灰度纹理, 来达到卡通绘画中的阴影过度效果。
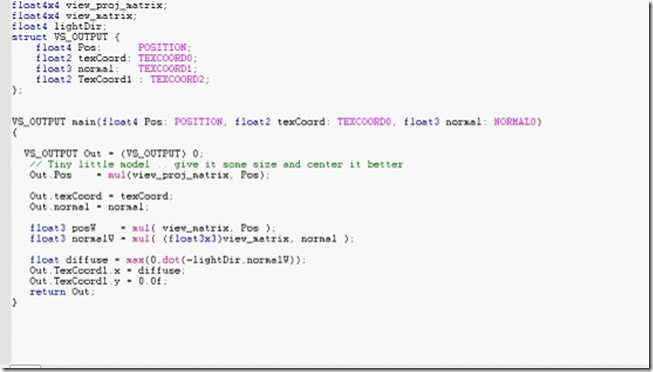
然后在顶点着色器中,我们执行基本的散射运算,通过 光向量L与法向量N的点积,以确定顶点接受到了多少光线:
S= L.N
如果s<0;表明光线和顶点法线间的夹角大于90度,顶点接受不到任何光线,所以如果s<0,则让s=0; 以便让s位于[0,1]之间,方便在纹理坐标空间取值。
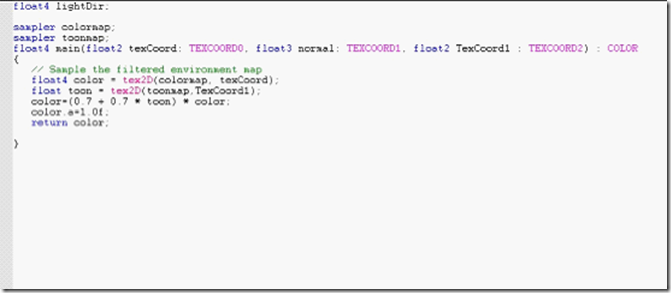
像素处理器中,我们从亮度纹理中取值, 由于亮度纹理只有3中颜色,所以着色的结果是一种颜色到另一种颜色的生硬过度,这正是我们所期望的。
VS代码片段:
VS_OUTPUT vs_main( VS_INPUT Input )
{
VS_OUTPUT Output;
Output.Position = mul( Input.Position, matViewProjection );
float3 posW = mul( matView, Input.Position );
float3 normalW = mul( Input.Normal, matView);
float diffuse = max(0, dot(vecLightDir, normalW));
Output.Texcoord.x = diffuse;
Output.Texcoord.y = 0.0f;
return( Output );
}
PS代码:
sampler cartoonMap;
float4 ps_main( float2 tex:TEXCOORD0) : COLOR0
{
return tex2D( cartoonMap, tex);
}
三、 RenderMonkey实践
Now.It's action time:
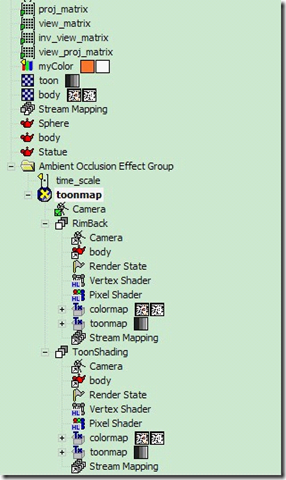
首先建立RM工程,初步,我们只需要两步:
1,法线放大背景(背景);
2,渲染原始模型(前景);
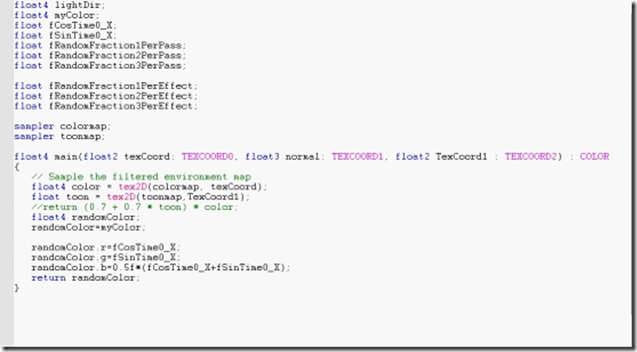
话不多说,直接看图:
RM工程
RimBack-VS
RimBack-PS
ToonShading-VS
ToonShading-PS
额,结果,还行
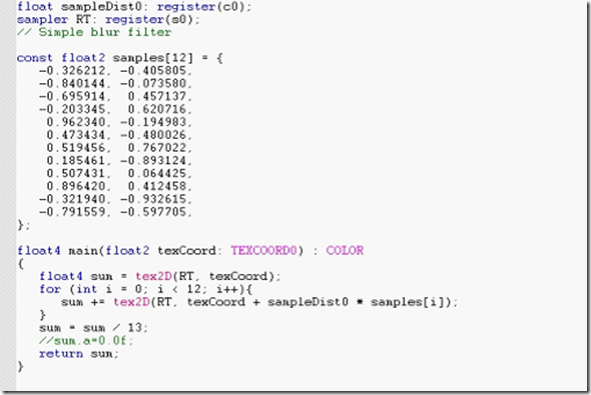
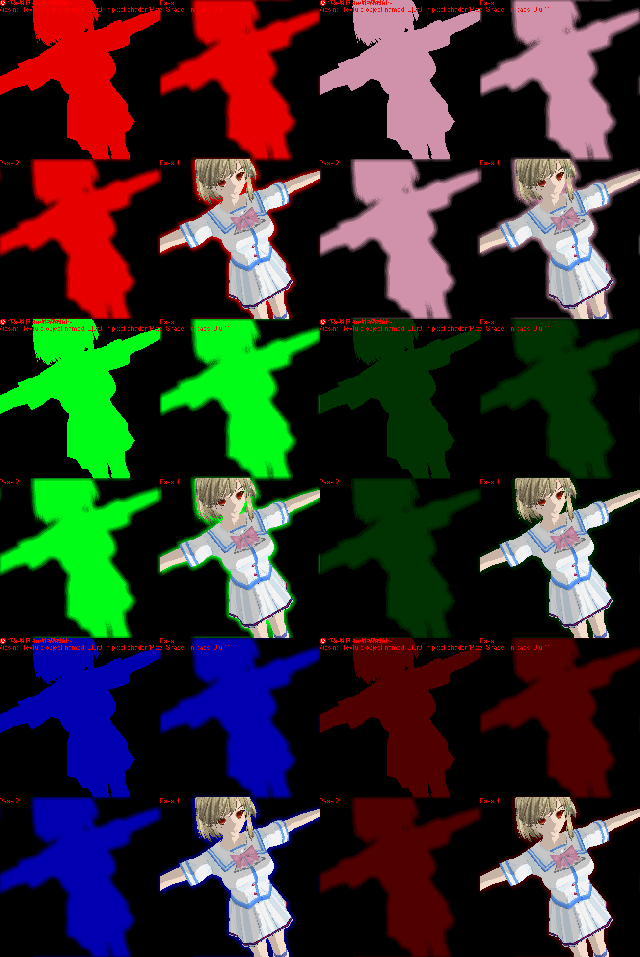
四、 高斯模糊,随机颜色
一开的效果,明显过于单调,让我们进入彩色的世界吧:
其中报了个错,error X3025: global variables are implicitly constant, enable compatibility mode to allow modification,需要注意下这是因为当前编译的shader基于一个较老的shader版本,必须指定兼容模式D3DXSHADER_ENABLE_BACKWARDS_COMPATIBILITY才能 编译通过也就是在调用D3DXCompileShaderFromFile编译shader时,第6个参数必须包含此值。在RM中所以不要动态地改变全局变量值,直接中间赋值给一个局部变量吧~
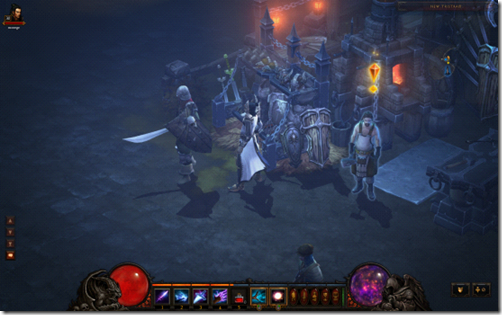
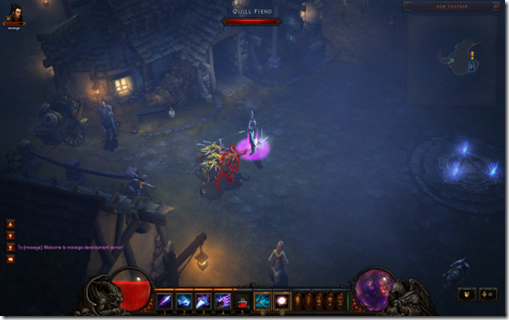
其次是高斯模糊问题,典型如最近的暗黑3中,鼠标移过人物背后会显示“毛边”,虽然没有去分析过渲染,但大体可以猜测出原理应该是一样的,渲染出人物背景后再进行高斯模糊(预存边列表太费,且会在人物身上描出线条,大多见于日式卡通游戏)。
坑爹呐,找不到图,只好自己截了个
再放一张,期待国内快点出
偷偷地告诉你一句,其实RM里有,自己拖个过来吧,可别小瞧了RM的节点功能
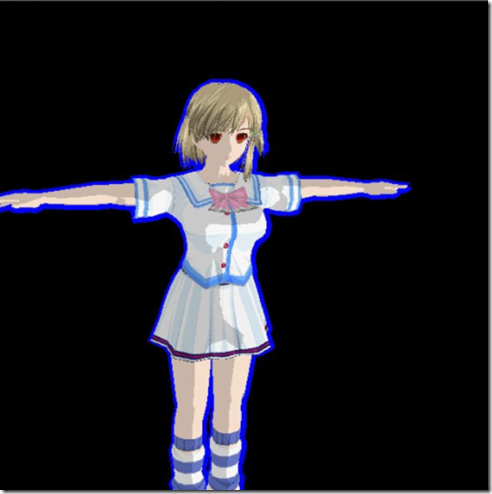
结果可以看到,这凶妹子是个精英怪哇,怕怕
五、 实际应用,RT处理
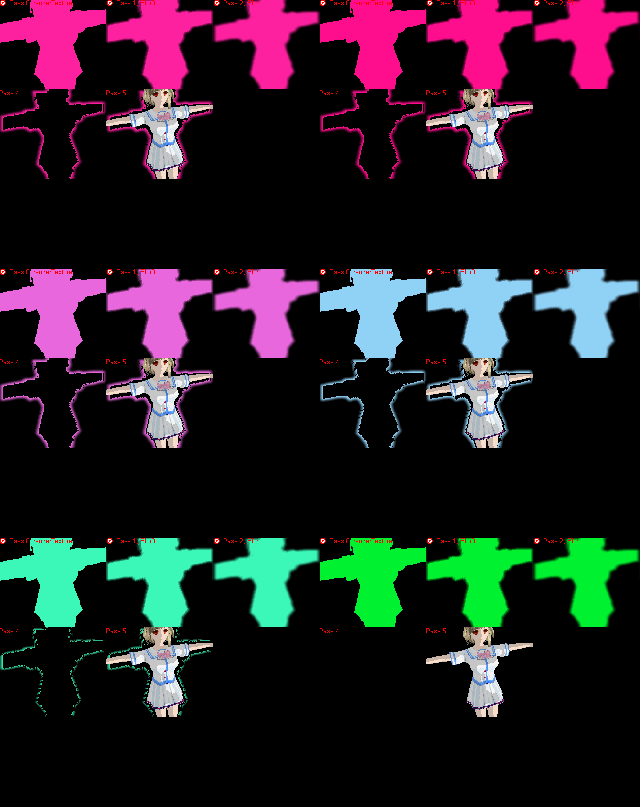
1,Sobel二次勾边
无心试了下Sobel算子,特别提下,发现网上有的代码使用Sobel的最终计算是错误的,如float final=1.0f - (edgeSqr > 0.07f*0.07f ); ,实际应为颜色值变化大的情况下,为false,返回1.0f,如下float final=1.0f - (edgeSqr < 0.07f*0.07f );
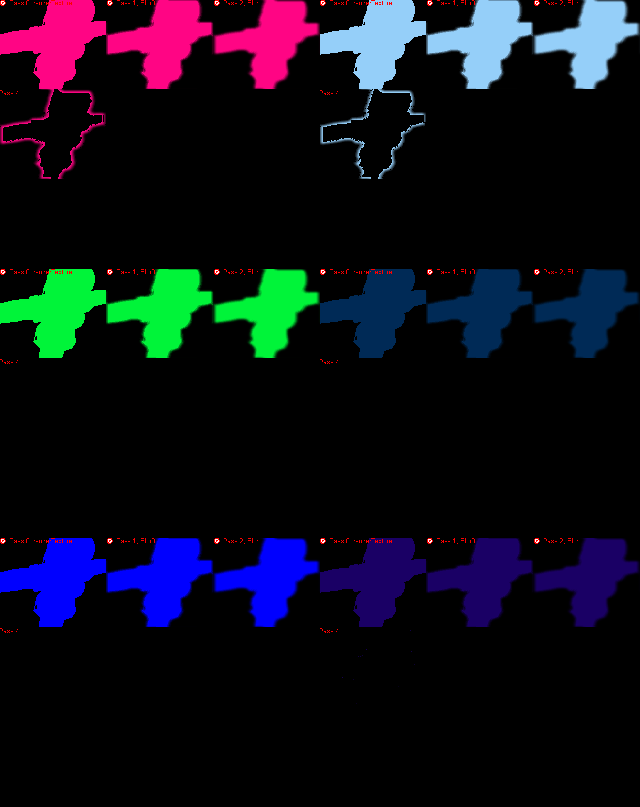
特殊效果,加大Bigger法线参数,可以做出人物周围电圈效果;,
Gif图,同上
2,与场景结合
RT渲染的实际应用,如何贴上?你很快会发现这个问题;
首先是Clear相关RT的时候,记得设Alpha为0;
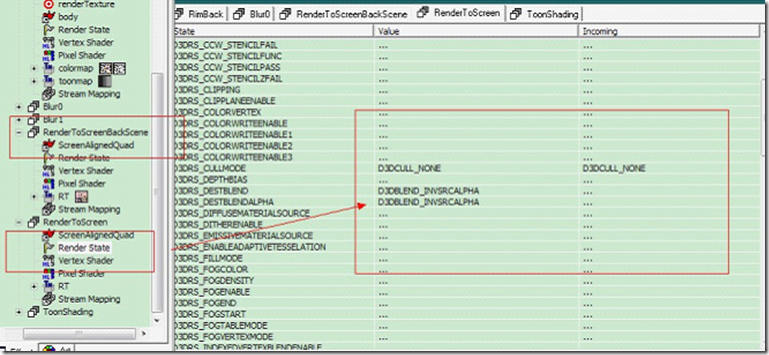
其次,将RT贴到MainBackBuffer上时,RM的半透明混合ms是没设置的,需要建立RenderState节点,手动设置Alpha混合参数;
最后,大功告成,结果如下:
最终效果,用了3张RT,模糊后背景变瘦,都还有待改进
六、 其它相关内容
PS:
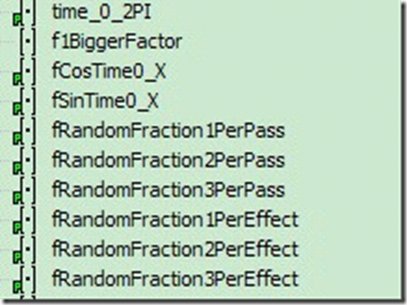
附录《RenderMonkey Predefined Variables》,省的总是把参数忘了~
--摘自RenderMonkey Documentation.pdf
http://www.cppblog.com/lai3d/archive/2008/12/09/68975.html
Predefined Variables
RenderMonkey provides a set of predefined variables for added shader development
convenience. Such variables will display an appropriate tool tip (Predefined Variable) if
the mouse hovers over them. Predefined variables are shader constants whose values get
filled in at run-time by the viewer module directly at every frame. You cannot modify the
values directly through the same user interface that you can use to edit other variables of
similar types. A properly flagged predefined variable will be denoted in the workspace
tree view with a symbol over the nodes icon. For example: ![]()
RenderMonkey provides this set of predefined variables for your convenience:
Time
"Time0_X"
Provides a floating point time value (in seconds) which repeats itself based on the
“Cycle time” set in the RenderMonkey Preferences dialog. By default this “Cycle
time” is set to 120 seconds. This means that the value of this variable cycles from
0 to 120 in 120 seconds and then goes back to 0 again.
"CosTime0_X"
This variable will provide the cosine of Time0_X.
"SinTime0_X"
This variable will provide the sine of Time0_X.
"TanTime0_X"
This variable will provide the tangent of Time0_X.
"Time0_X_Packed"
This variable will pack the above xxxTime0_X variables into a 4 component
floating point vector.
Example: float4(Time0_X,CosTime0_X,SinTime0_X,TanTime0_X).
"Time0_1"
This variable provides a scaled floating point time value [0..1] which repeats itself
based on the “Cycle time” set in the RenderMonkey Preferences dialog. By
default this “Cycle time” is set to 120 seconds. This means that the value of this
variable cycles from 0 to 1 in 120 seconds and then goes back to 0 again.
"CosTime0_1"
This variable will provide the cosine of Time0_1.
"SinTime0_1"
This variable will provide the sine of Time0_1.
"TanTime0_1"
This variable will provide the tangent of Time0_1.
"Time0_1_Packed"
This variable will pack the above xxxTime0_1 variables into a 4 component
floating point vector.
Example: float4(Time0_1,CosTime0_1,SinTime0_1,TanTime0_1).
"Time0_2PI"
This variable provides a scaled floating point time value [0..2PI] which repeats
itself based on the “Cycle time” set in the RenderMonkey Preferences dialog. By
default this “Cycle time” is set to 120 seconds. This means that the value of this
variable cycles from 0 to 2PI in 120 seconds and then goes back to 0 again.
"CosTime0_2PI"
This variable will provide the cosine of Time0_2PI.
"SinTime0_2PI"
This variable will provide the sine of Time0_2PI.
"TanTime0_2PI"
This variable will provide the tangent of Time0_2PI .
"Time0_2PI_Packed"
This variable will pack the above xxxTime0_2PI variables into a 4 component
floating point vector.
Example: float4(Time0_2PI,CosTime0_2PI,SinTime0_2PI,TanTime0_2PI).
"TimeCyclePeriod"
This variable provides the “Cycle time” floating point value, as set in the
RenderMonkey Preferences dialog. By default this “Cycle time” is set to 120
seconds.
"FPS"
This variable provides the calculated frames per second, returned as a floating
point value.
"TimeElapsed"
This variable provides the elapsed time (in seconds) from the last frame to the
current frame, returned as a floating point value.
Viewport
"ViewportWidth"
This variable provides the preview window width (in pixels), returned as a
floating point value.
"ViewportHeight"
This variable provides the preview window height (in pixels), returned as a
floating point value.
"ViewportDimensions"
This variable provides the preview window width and height (in pixels), returned
as a float2 value.
"ViewportWidthInverse"
This variable will return 1.0 / ViewportWidth. 【重剑注:NND!就是倒数啊!--囧,估计这位仁兄在此栽过跟头】
"ViewportHeightInverse"
This variable will return 1.0 / ViewportHeight.
"InverseViewportDimensions"
This variable provides the inverse of the “ViewportDimensions”, returned as a
float2 value.
Random Values
"RandomFraction1PerPass"
"RandomFraction2PerPass"
"RandomFraction3PerPass"
"RandomFraction4PerPass"
Each of these variables provide a random floating point value in the range of
[0..1]. These values are updated each pass.
"RandomFraction1PerEffect"
"RandomFraction2PerEffect"
"RandomFraction3PerEffect"
"RandomFraction4PerEffect"
Each of these variables provide a random floating point value in the range of
[0..1]. These values are updated each effect.
Pass
"PassIndex"
This variable will provide the pass index, returned as a floating point value.
Mouse Parameters
"LeftMouseButton"
This variable will return a floating point value of 1.0 if the left mouse button is
currently pressed, or 0.0 if it is not currently pressed.
"MiddleMouseButton"
This variable will return a floating point value of 1.0 if the middle mouse button is
currently pressed, or 0.0 if it is not currently pressed.
"RightMouseButton"
This variable will return a floating point value of 1.0 if the right mouse button is
currently pressed, or 0.0 if it is not currently pressed.
"MouseButtonsPacked"
This variable will pack the above xxxMouseButton variables into a 4 component
floating point vector.
Example: float4(LeftMouseButton,MiddleMouseButton,RightMouseButton ,0.0).
"MouseCoordinateX"
This variable will return the horizontal mouse position (in pixels), relative to the
client area of the preview window, returned as a floating point value.
"MouseCoordinateY"
This variable will return the vertical mouse position (in pixels), relative to the
client area of the preview window, returned as a floating point value.
"MouseCoordinateXNDC"
This variable will return "MouseCoordinateX" / "ViewportWidth".
"MouseCoordinateYNDC"
This variable will return "MouseCoordinateY" / "ViewportHeight".
"MouseCoordsPacked"
This variable will pack the above MouseCoordinatexxx variables into a 4
component floating point vector.
Example: float4(MouseCoordinateX,MouseCoordinateY,XNDC,YNDC).
"MouseCoordinateXY"
This variable will return the "MouseCoordinateX" and "MouseCoordinateY"
coordinates into a 2 component floating point vector.
Example: float2(MouseCoordinateX,MouseCoordinateY).
"MouseCoordinateXYNDC"
This variable will return the "MouseCoordinateXNDC" and
"MouseCoordinateYNDC" coordinates into a 2 component floating point vector.
Example: float2(MouseCoordinateXNDC,MouseCoordinateYNDC).
Model Parameters
"ModelMoundingBoxTopLeftCorner"
This variable provides the top left coordinate of the model as a 3 component
floating point vector (world space).
"ModelMoundingBoxBottomRightCorner"
This variable provides the bottom right coordinate of the model as a 3 component
floating point vector (world space).
"ModelMoundingBoxCenter"
This variable provides the bounding box center of the model as a 3 component
floating point vector (world space).
"ModelCentroid"
This variable provides the centroid of the model as a 3 component floating point
vector (world space).
"ModelBoundingSphereCenter"
This variable provides the bounding sphere center of the model as a 3 component
floating point vector (world space).
"ModelBoundingSphereRadius"
This variable provides the bounding sphere radius of the model as a single
component floating point value (world space).
View Parameters
"ViewDirection"
This variable provides the view direction vector (world space).
"ViewPosition"
This variable provides the view position (world space).
"ViewSideVector"
This variable provides the view size vector (world space).
"ViewUpVector"
This variable provides the view up vector (world space).
"FOV"
This variable provides the field of view as a floating point value.
"NearClipPlane”
This variable provides the near clip distance as a floating point value.
"FarClipPlane”
This variable provides the far clip distance as a floating point value.
View Matrices
"View"
"ViewTranspose"
"ViewInverse"
"ViewInverseTranspose"
These 4x4 matrix variables provide the view matrix, its transpose, its inverse, and
the inverse transpose.
"Projection"
"ProjectionTranspose"
"ProjectionInverse"
"ProjectionInverseTranspose"
These 4x4 matrix variables provide the projection matrix, its transpose, its
inverse, and the inverse transpose.
"ViewProjection"
"ViewProjectionTranspose"
"ViewProjectionInverse"
"ViewProjectionInverseTranspose"
These 4x4 matrix variables provide the view * projection matrix, its transpose, its
inverse, and the inverse transpose.
"World"
"WorldTranspose"
"WorldInverse"
"WorldInverseTranspose"
These 4x4 matrix variables provide the world matrix, its transpose, its inverse,
and the inverse transpose. Note that since this version of RenderMonkey does not
support implementation of a scene graph, we have decided to keep the world
matrix as identity, but provide this predefined variable for your development
convenience. The user may apply this variable in their shader and when imported
into their engine, they may provide appropriate value of the world view projection
matrix through the engine’s calculations.
"WorldView"
"WorldViewTranspose"
"WorldViewInverse"
"WorldViewInverseTranspose"
These 4x4 matrix variables provide the world * view matrix, its transpose, its
inverse, and the inverse transpose.
"WorldViewProjection"
"WorldViewProjectionTranspose"
"WorldViewProjectionInverse"
"WorldViewProjectionInverseTranspose"
These 4x4 matrix variables provide the World * View * Projection matrix, its
transpose, its inverse, and the inverse transpose.
Customizing Predefined Variable Names
All predefined variable names are customizable through editing the
“.\UserData\RmPredefinedVariabled.txt” file. The data file is organized into four
columns. The first column contains the name that the variable will be created with by
default. This column is editable by the user. No other column data should be modified.
The second column specifies the variable type; the third column specifies the rendering
update frequency, and the fourth column species the predefined variable semantic. When
items in the first column have been modified, RenderMonkey should be restarted for the
changes to take effect.
来源:oschina
链接:https://my.oschina.net/u/4353713/blog/4281363
