主要类容:这一章记录Thymeleaf模板引擎技术,基本概念、属性和表达式语法并结合实际的代码页面功能开发的学习过程。
1、认识Thymeleaf模板引擎。
2、Springboot整合Thymeleaf 。
3、Thymeleaf模板语法及前世今生。
4、Thymeleaf模板标签属性。
5、Thymeleaf模板引擎使用注意事项。
1-认识Thymeleaf模板引擎:
(1)、Thymeleaf
应该是目前最廋欢迎的模板引擎技术了,Springboot官方也推荐Java web开发中使用该技术来代替jsp技术,主要是由于其“原型即页面”的理念与Springboot倡导的快速开发非常契合。同时Thymeleaf模板引擎也确实有其他技术不具备的优点。
(2)、Thymeleaf 3 的核心特性
Thymeleaf与2016年5月正式发布了Thymeleaf-3.0.0RELEASE版本,目前的大部分项目开发过程中也使用的3.0及以上版本,因此本次记录的也是3.0。
♬ 完整的HTML5标记支持,全新的解析器。
♬ 自带多种模板模式,也只可以扩展支持其他的模板格式。
♬ 在web和非web环境(离线)下也可以正常工作。
♬ 对Spring web开发的支持非常完善。
♬ 独立于Servlet API 。
♬ 其他特性:
Thymeleaf 3.0 引入了一种新型表达式作为一般 Thymeleaf 标准表达系统的一部分:片段表达式;。
Thymeleaf 3.0 中 Thymeleaf 标准表达式 的另一个新特性是 NO-OP(无操作)令牌,由下划线符号(_)表示。
Thymeleaf 3.0 允许在模板和模板模式下完全(和可选)将模板逻辑与模板本身解耦,从而实现 100%-Thymeleaf-free 无逻辑模板。
Thymeleaf 3.0 采用全新的方言系统。
Thymeleaf 3.0 完成了核心 API 的重构。
Thymeleaf 是高级语言的模板引擎,语法更简单,功能也更强大,接下来的内容将是 Thymeleaf 与 Spring Boot 的整合过程,以及 Thymeleaf 模板引擎的语法记录。
2-Springboot整合Thymeleaf :
2.1-引入Thymeleaf依赖:
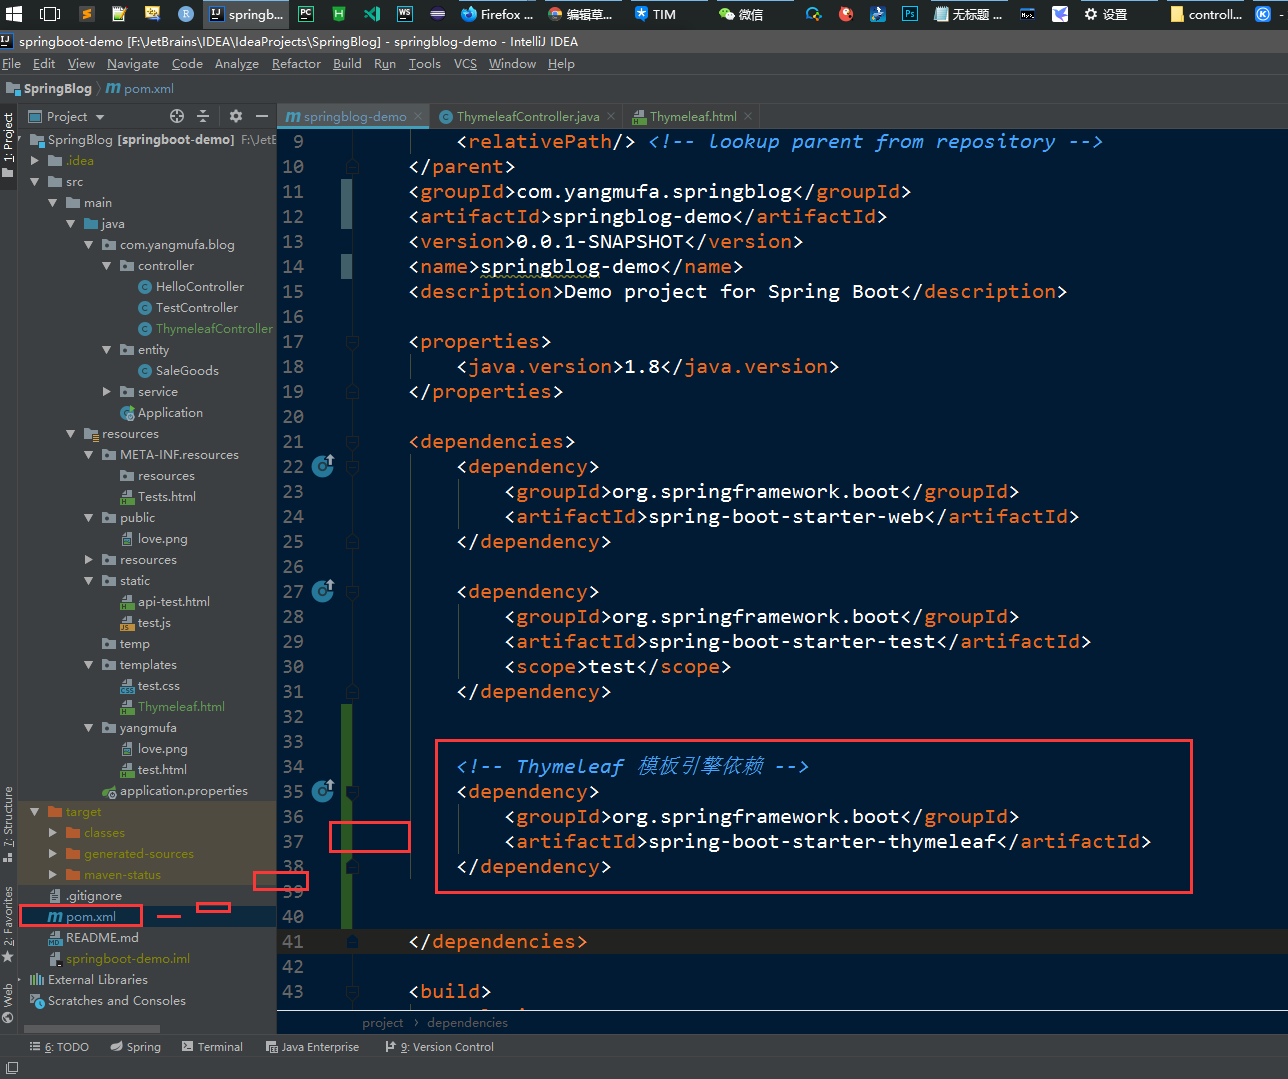
因为Springboot官方提供了Thymeleaf的场景启动器 spring-boot-start-thymeleaf ,因此可以直接在 pom.xml 文件中添加该启动场景器,代码如下:
<?xml version="1.0" encoding="UTF-8"?>
<project xmlns="http://maven.apache.org/POM/4.0.0" xmlns:xsi="http://www.w3.org/2001/XMLSchema-instance"
    xsi:schemaLocation="http://maven.apache.org/POM/4.0.0 http://maven.apache.org/xsd/maven-4.0.0.xsd">
    <modelVersion>4.0.0</modelVersion>
    <parent>
        <groupId>org.springframework.boot</groupId>
        <artifactId>spring-boot-starter-parent</artifactId>
        <version>2.1.0.RELEASE</version>
        <relativePath/> <!-- lookup parent from repository -->
    </parent>
    <groupId>com.yangmufa.SpringBlog</groupId>
    <artifactId>springboot-demo</artifactId>
    <version>0.0.1-SNAPSHOT</version>
    <name>SpringBlog-Demo</name>
    <description>Demo project for Spring Boot</description>
    <properties>
        <java.version>1.8</java.version>
    </properties>
    <dependencies>
        <dependency>
            <groupId>org.springframework.boot</groupId>
            <artifactId>spring-boot-starter-web</artifactId>
        </dependency>


        <!-- Thymeleaf 模板引擎依赖 -->
        <dependency>
            <groupId>org.springframework.boot</groupId>
            <artifactId>spring-boot-starter-thymeleaf</artifactId>
        </dependency>
        <dependency>


            <groupId>org.springframework.boot</groupId>
            <artifactId>spring-boot-starter-test</artifactId>
            <scope>test</scope>
        </dependency>
    </dependencies>
    <build>
        <plugins>
            <plugin>
                <groupId>org.springframework.boot</groupId>
                <artifactId>spring-boot-maven-plugin</artifactId>
            </plugin>
        </plugins>
    </build>
</project>
2.2-创建模板文件:
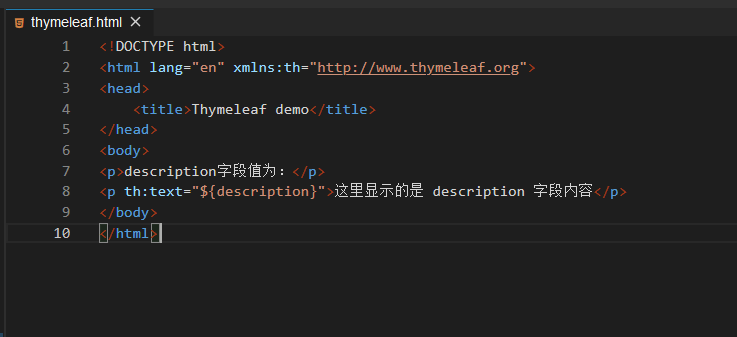
在resources/templates目录新建模板文件 thymeleaf.html,
Thymeleaf模板引擎默认后缀名为 html ,新增文件后,实现在模板文件的 <html> 标签中导入 Thymeleaf的名称空间:
<html lang="en" xmlns:th="http://www.thymeleaf.org">导入该名称空间主要是为了Thymeleaf的语法提示和Thymeleaf标签的使用,之后在模板中增加如前面JSP中相同的显示内容,最终的模板文件使用如下:
<!DOCTYPE html>
<html lang="en" xmlns:th="http://www.thymeleaf.org">
<head>
    <title>Thymeleaf demo</title>
</head>
<body>
<p>description字段值为:</p>
<p th:text="${description}">这里显示的是 description 字段内容</p>
</body>
</html>2.3-编辑Controller代码:
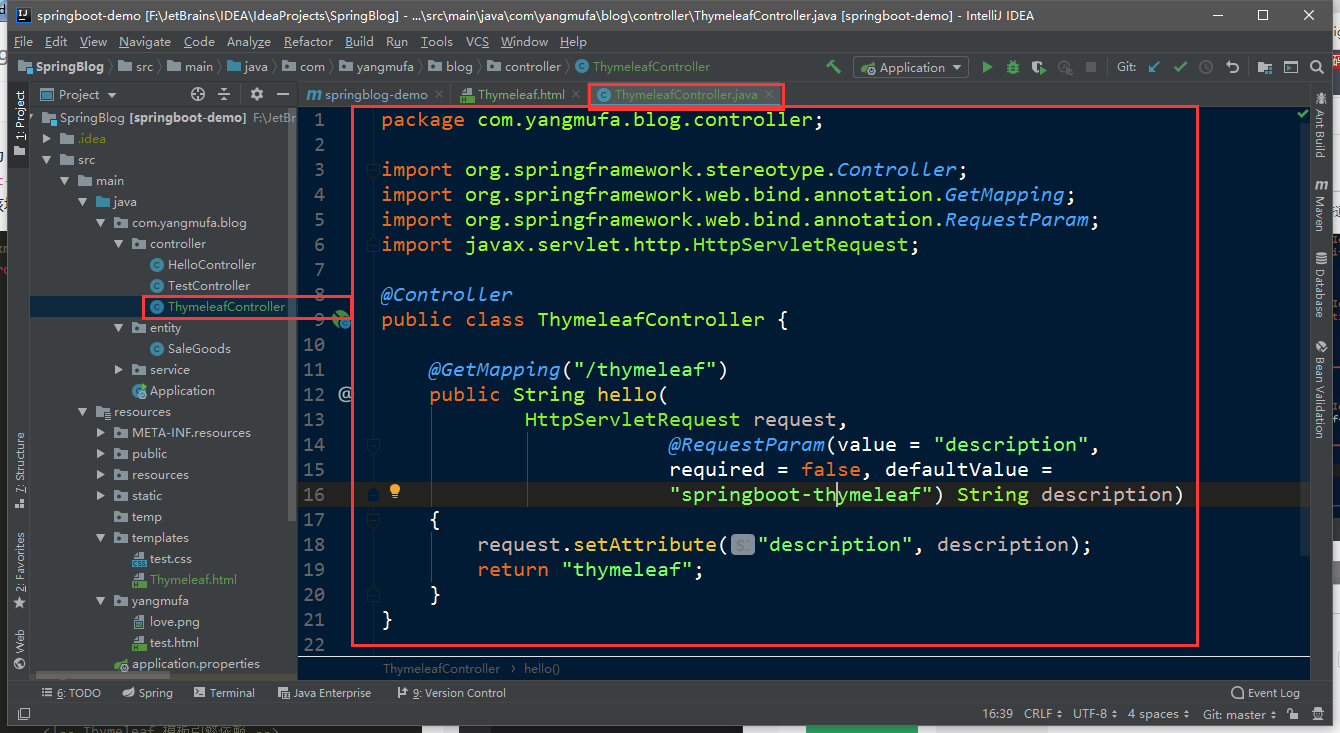
在controller包下新增 ThymeleafController.java 文件,将模板文件所需要的 description 字段赋值并转发值模板文件,编码如下;
package com.lou.springboot.controller;
import org.springframework.stereotype.Controller;
import org.springframework.web.bind.annotation.GetMapping;
import org.springframework.web.bind.annotation.RequestParam;
import javax.servlet.http.HttpServletRequest;

@Controller
public class ThymeleafController {

    @GetMapping("/thymeleaf")
    public String hello(HttpServletRequest request, @RequestParam(value = "description", required = false, defaultValue = "springboot-thymeleaf") String description) {
        request.setAttribute("description", description);
        return "thymeleaf";
    }
}
最终的代码目录结构如下:
2.4-启动并访问:
在编码完成后,就可以启动了,由于默认是在 SpringBlog目录下,因此命令行不在当前目录可先切换回来,之后可以通过Maven插件方式启动Springboot项目,命令为:mvn spring-boot:run 。
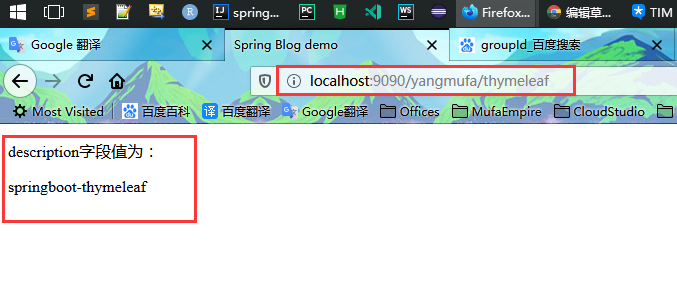
在项目启动成功后,可以在浏览器输入 http//localhost:9090/yangmufa/thymaleaf ,就可看到,源静态<p>标签的内容已经被替换为 “SpringBlog-Thymeleaf” 字符串,而再不是默认内容 “ www.yangmufa.com ” 了。

3-Thymeleaf模板语法及前世今生:
3.1-th:*属性:
th:text 对应的是HTML5 中的text属性,除 th:text 属性外,Thymeleaf也提供了其他的标签属性来替换原有的HTML5原生属性值,属性节选如下: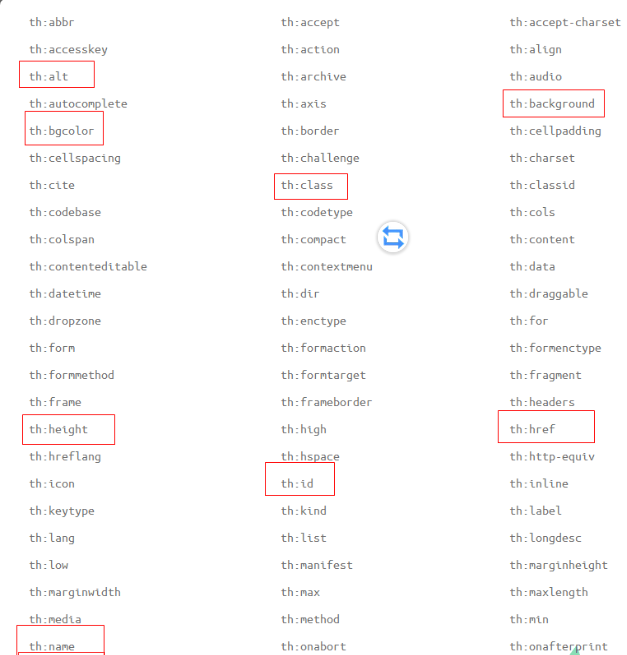
♬ th:background 对应HTML5中的背景属性。
♬ th:class 对应HTML5中的class属性。
♬ th:href 对应HTML5中的连接地址属性。
♬ th:id 和 th:name 对应HTML5中的 id 和 name 属性......
♬ th:block 比较特殊,它是Thymeleaf提供的唯一一个Thymeleaf块级元素,其特殊在于Thymeleaf模板引擎在处理 <th:block> 的时候回删除掉它本身。而保存其空内容。
完整属性内容可以查看Thymeleaf-attributes 。
3.1-修改属性值实践:
接下来通过有个完整的编码实践来理解以上内容,并重点关注 attributes ,切换工作空间到SpringBlog。
项目完整结构如下:
SpringBlog
└── src
    ├── main
    │   ├── java
    │   │   └── com
    │   │       └── lou
    │   │           └── springboot
    │   │               ├── Application.java
    │   │               └── controller
    │   │                   └── ThymeleafController.java
    │   └── resources
    │       ├── application.properties
    │       ├── static
    │       └── templates
    │           ├── attributes.html
    │           ├── simple.html
    │           ├── test.html
    │           └── thymeleaf.html
    └── test
        └── java
            └── com
                └── lou
                    └── springboot
attributes.html 代码如下:
<!DOCTYPE html>
<html lang="en" xmlns:th="http://www.thymeleaf.org">
<head>
    <title>Thymeleaf setting-value-to-specific-attributes</title>
    <meta charset="UTF-8">
</head>
<!-- background 标签-->
<body th:background="${th_background}" background="#D0D0D0">
<!-- text 标签-->
<h1 th:text="${title}">html标签演示</h1>
<div>
    <h5>id、name、value标签:</h5>
    <!-- id、name、value标签-->
    <input id="input1" name="input1" value="1" th:id="${th_id}" th:name="${th_name}" th:value="${th_value}"/>
</div>
<br/>
<div class="div1" th:class="${th_class}">
    <h5>class、href标签:</h5>
    <!-- class、href标签-->
    <a th:href="${th_href}" href="##/">链接地址</a>
</div>
</body>
</html>
其中包含 background、id、name、class 等HTML标签,设置默认值,并在每个标签中添加对应 th 标签读取动态数据,直接选择 open with ->Preview 或 Mini Browser 可查看页面效果如下:
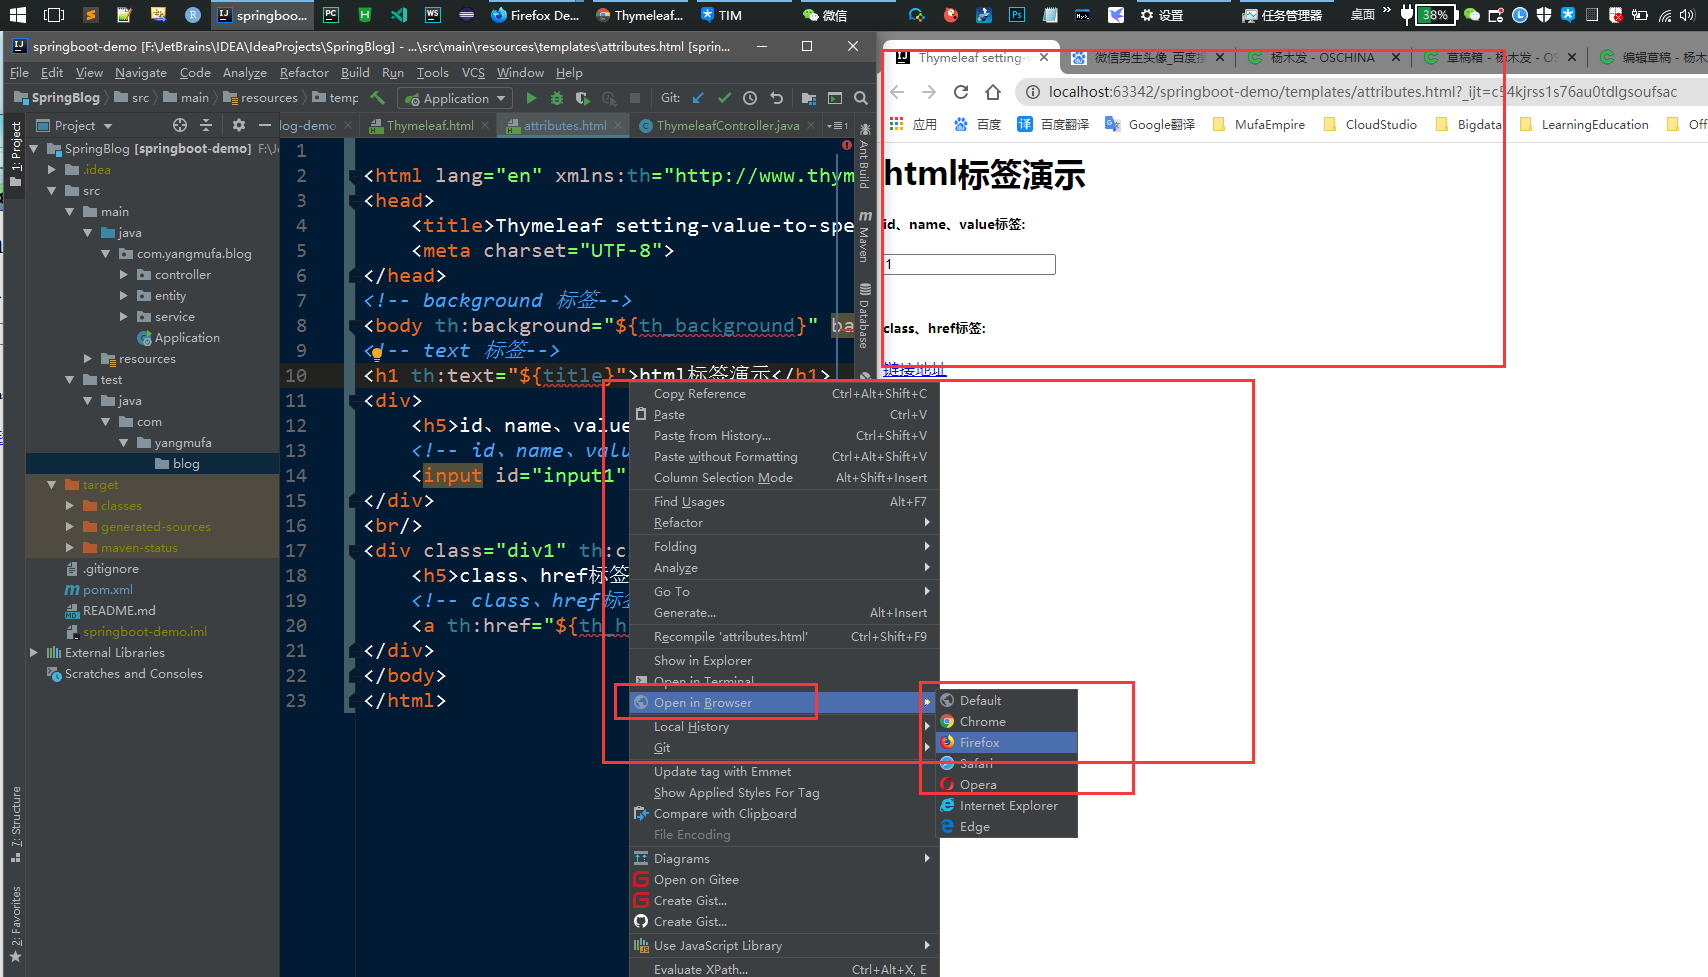
需要注意的是,如果是直接打开 html 文件而并没有通过 web 服务器,此时的页面虽然能够组成访问其内容和元素属性,但是都是默认的;之后,可以在 Controller 包下新增对应的 Controller 方法并将请求转发至该模板页面,代码如下:
// ThymeleafController2.java
package com.yangmufa.blog.controller;

import org.springframework.stereotype.Controller;
import org.springframework.ui.ModelMap;
import org.springframework.web.bind.annotation.GetMapping;

@Controller
public class ThymeleafConeroller2 {

    @GetMapping("/attributes")
    public String attributes(ModelMap map) {
        // 更改 h1 内容
        map.put("title", "Thymeleaf 标签演示");
        // 更改 id、name、value
        map.put("th_id", "thymeleaf-input");
        map.put("th_name", "thymeleaf-input");
        map.put("th_value", "13");
        // 更改 class、href
        map.put("th_class", "thymeleaf-class");
        map.put("th_href", "http://13blog.site");
        return "attributes";
    }
}
或者:
// ThymeleafController.java
package com.yangmufa.blog.controller;

import org.springframework.stereotype.Controller;
import org.springframework.ui.ModelMap;
import org.springframework.web.bind.annotation.GetMapping;
import org.springframework.web.bind.annotation.RequestParam;
import javax.servlet.http.HttpServletRequest;

@Controller
public class ThymeleafController {

    @GetMapping("/thymeleaf")
    public String hello(
            HttpServletRequest request,
                        @RequestParam(value = "description",
                        required = false, defaultValue =
                        "springboot-thymeleaf") String description)
    {
        request.setAttribute("description", description);
        return "thymeleaf";
    }


    @GetMapping("/attributes")
    public String attributes(ModelMap map) {
        // 更改 h1 内容
        map.put("title", "Thymeleaf 标签演示");
        // 更改 id、name、value
        map.put("th_id", "thymeleaf-input");
        map.put("th_name", "thymeleaf-input");
        map.put("th_value", "杨木发");
        // 更改 class、href
        map.put("th_class", "thymeleaf-class");
        map.put("th_href", "http://www.yangmufa.com");
        return "attributes";
    }
}
在编码完成后启动项目,切换到 SpringBlog 目录下通过 Maven 插件的方式启动 Spring Boot 项目,命令为 mvn spring-boot:run ,之后就可以等待项目启动。
在项目启动成功后,可以在浏览器输入显示查看网站效果,
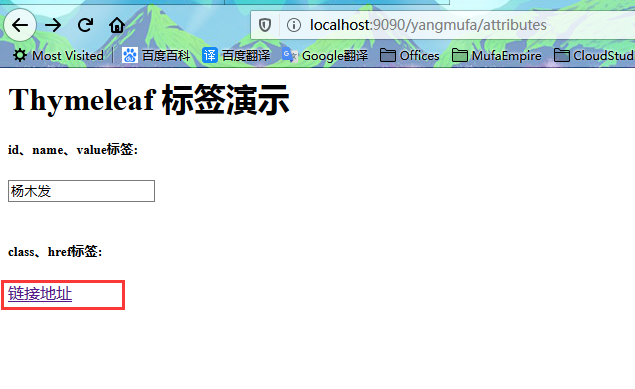

由于 th 标签的存在,页面通过 Thymeleaf 渲染后,与静态页面相比较,内容和元素属性已经动态的切换了,这部分内容可以结合其他资源进行理解,并多尝试几个其他的常用标签。
4-Thymeleaf模板标签属性:
4.1-Thymeleaf 设置属性值:
首先,来看看 Thymeleaf 官方对于标准表达式特性的总结:
♬ 表达式语法:
变量表达式: ${...}
选择变量表达式: *{...}
信息表达式: #{...}
链接 URL 表达式: @{...}
分段表达式: ~{...}
♬ 字面量:
字符串: 'one text', 'Another one!' ...
数字: 0, 34, 3.0, 12.3 ...
布尔值: true, false
Null 值: null
字面量标记:one, sometext, main ...
♬ 文本运算:
字符串拼接: +
字面量置换:|The name is ${name}|
♬ 算术运算:
二元运算符: +, -, *, /, %
负号(一元运算符): (unary operator): -
♬ 布尔运算:
二元运算符: and, or
布尔非(一元运算符): !, not
♬ 比较运算:
比较: >, <, >=, <= (gt, lt, ge, le)
相等运算符: ==, != (eq, ne)
比较运算符也可以使用转义字符,比如大于号,可以使用 Thymeleaf 语法 gt 也可以使用转义字符>
♬ 条件运算符:
If-then: (if) ? (then)
If-then-else: (if) ? (then) : (else)
Default: (value) ?: (defaultvalue)
♬ 特殊语法:
无操作: _
4.2-简单语法:
接下来将通过编码的方式将这些知识点进行实践,并将知识点进行串联以更接近实际开发而不是简单的 demo 介绍。
新建 simple.html 模板页面,该案例主要记录字面量即简单的运算操作,包括字符串、数字、布尔值等常用的字面量及常用的运算符和拼接操作,代码如下:
<!DOCTYPE html>
<html lang="en" xmlns:th="http://www.thymeleaf.org">
<head>
<title>Thymeleaf simple syntax</title>
<meta charset="UTF-8">
</head>
<body>
<h1>Thymeleaf简单语法</h1>
<div>
<h5>基本类型操作(字符串):</h5>
<p>一个简单的字符串:<span th:text="'thymeleaf text'">default text</span>.</p>
<p>字符串连接:<span th:text="'thymeleaf text concat,'+${thymeleafText}">default text</span>.</p>
<p>字符串连接:<span th:text="|thymeleaf text concat,${thymeleafText}|">default text</span>.</p>
</div>
<div>
<h5>基本类型操作(数字):</h5>
<p>一个简单的神奇的数字:<span th:text="2019">1000</span>.</p>
<p>算术运算: 2019+1=<span th:text="${number1}+1">0</span>.</p>
<p>算术运算: 667-1=<span th:text="2021-1">0</span>.</p>
<p>算术运算: 673 * 3=<span th:text="673*${number2}">0</span>.</p>
<p>算术运算: 9 ÷ 3=<span th:text="9/3">0</span>.</p>
</div>
<div>
<h5>基本类型操作(布尔值):</h5>
<p>一个简单的数字比较:2020 > 2019=<span th:text="2020>2019"> </span>.</p>
<p>字符串比较:thymeleafText == 'yangmufa.com',结果为<span th:text="${thymeleafText} == 'yangmufa.com'">0</span>.</p>
<p>数字比较:13 == 39/3 结果为: <span th:text="13 == 39/3">0</span>.</p>
</div>
</body>
</html>其中也有部分变量为后台设置的值,与字面量结合进行实践演示,新增 Controller 方法:
// ThymeleafController.java

    @GetMapping("/simple")
    public String simple(ModelMap map) {
        map.put("thymeleafText", "www.yangmufa.com");
        map.put("number1", 2020);
        map.put("number2", 3);
        return "simple";
    }
之后重启在浏览器输入方可查看效果:
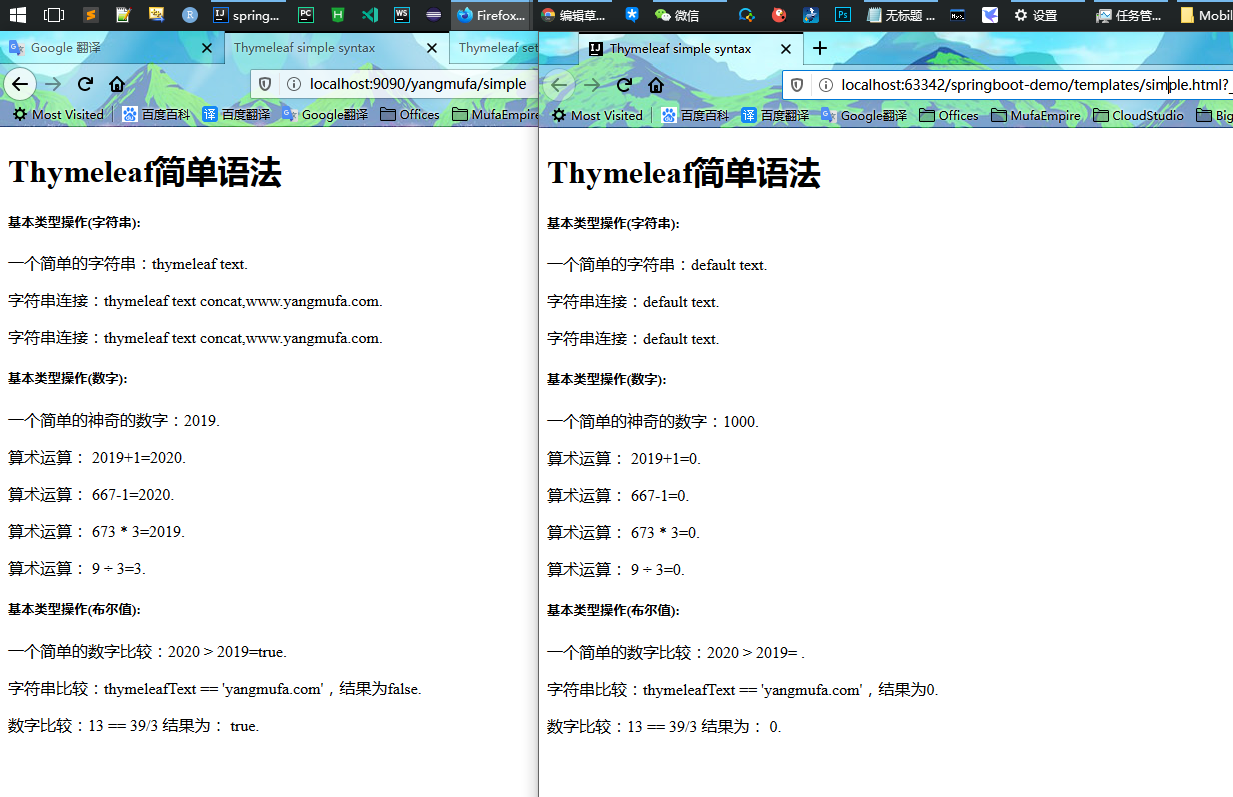
左侧为静态 html 结果,右侧为 Thymeleaf 模板引擎渲染的结果,可以看到字面量的展示及运算结果。以上为 Thymeleaf 语法中的变量使用方法和简单的运算操作。
4.3-表达式语法:
表达式包括:变量表达式 ${...}、选择变量表达式 *{...}、信息表达式 #{...}、链接 URL 表达式:@{...}、分段表达式: ~{...},这些表达式一般只能写在 Thymeleaf 模板文件的 th 标签内,不然不会生效,表达式语法的主要作用就是获取变量值、获取绑定对象的变量值、国际化变量取值、URL 拼接与生成、 Thymeleaf 模板布局。
♬ 变量表达式:
变量表达式即 OGNL 表达式或 Spring EL 表达式,作用是获取模板中与后端返回数据所绑定对象的值,写法为 ${...},这是最常见的一个表达式,在取值赋值、逻辑判断、循环语句中都可以使用该表达式,示例如下:
<!-- 读取参数 -->
<p>算术运算: 2019+1=<span th:text="${number1}+1">0</span>.</p>
<!-- 读取参数并运算 -->
<div th:class="${path}=='links'?'nav-link active':'nav-link'"></div>
<!-- 读取对象中的属性 -->
<p>读取blog对象中title字段:<span th:text="${blog.blogTitle}">default text</span>.</p>
<!-- 循环遍历 -->
<li th:each="blog : ${blogs}">
变量表达式也可以使用内置的基本对象:
- ctx : the context object。
- vars : the context variables。
- locale : the context locale。
- request : web 环境下的 HttpServletRequest 对象。
- response :web 环境下的 HttpServletResponse 对象 。
- session : web 环境下的 HttpSession 对象。
- servletContext : web 环境下的 ServletContext 对象。
示例如下:
    <p>读取内置对象中 request 中的内容:<span th:text="${#request.getAttribute('requestObject')}">default text</span>.</p>
    <p>读取内置对象中 session 中的内容:<span th:text="${#session.getAttribute('sessionObject')}">default text</span>.</p>
同时,Thymeleaf 还提供了一系列 Utility 工具对象(内置于 Context 中),可以通过 # 直接访问,工具类如下:
- dates : java.util.Date 的功能方法类。
- calendars : 类似 #dates,面向 java.util.Calendar
- numbers : 格式化数字的工具方法类
- strings : 字符串对象的工具方法类,contains,startWiths,prepending/appending 等等。
- bools:对布尔值求值的工具方法。
- arrays:对数组的工具方法。
- lists:对 java.util.List 的工具方法
- sets:对 java.util.Set 的工具方法
- maps:对 java.util.Map 的工具方法
你可以将这些方法视为工具类,通过这些方法可以使得 Thymeleaf 在操作变量时更加方便。
♬ 选择(星号)表达式:
选择表达式与变量表达式类似,不过它会用一个预先选择的对象来代替上下文变量容器(map)来执行,语法如下: *{blog.blogId},被指定的对象由 th:object 标签属性进行定义,前文中读取 blog 对象的 title 字段可以替换为:
<p th:object="${blog}">读取blog对象中title字段:<span th:text="*{blogTitle}">text</span>.</p>如果不考虑上下文的情况下,两者没有区别,使用 ${...} 读取的内容也完全可以替换为使用 *{...} 进行读取,唯一的区别是使用*{...}前可以预先在父标签中通过 th:object 定义一个对象并进行操作。
<p>读取blog对象中title字段:<span th:text="*{blog.blogTitle}">default text</span></p>
    <p>读取text字段:<span th:text="*{text}">default text</span>.</p>
♬ URL 表达式:
th:href 对应的是 html 中的 href 标签,它将计算并替换 href 标签中的链接 URL 地址,th:href 中可以直接设置为静态地址,也可以使用表达式语法读取到的变量值进行动态拼接 URL 地址。
比如一个详情页 URL 地址:http://localhost:9090/blog/2,当使用 URL 表达式时,可以写成这样:
<a th:href="@{'http://localhost:9090/blog/2'}">详情页</a>也可以根据 id 值进行替换,写法为:
<a th:href="@{'/blog/'+${blog.blogId}}">详情页</a>或者也可以写成这样:
<a th:href="@{/blog/{blogId}(blogId=${blog.blogId})">详情页</a>以上三种表达式写法生成 URL 的最终结果都是相同的,开发者可以自己使用字符串拼接的方法组装 URL (第二种写法),也可以使用 URL 表达式提供的语法进行 URL 组装(第三种写法)。如果有多个参数可以自行拼装字符串,或者使用逗号进行分隔,写法如下:
<a th:href="@{/blog/{blogId}(blogId=${blog.blogId},title=${blog.blogTitle},tag='java')}">详情页</a>最终生成的 URL 为 http://localhost:9090/blog/2?title=lou-springboot&tag=java 另外,URL 中以 "/" 开头的路径(比如 /blog/2 ),默认生成的 URL 会加上项目的当前地址形成完整的 URL 。
4.4-复杂语法:
结合前文中的一些知识点进行更加复杂一些的语法实践,主要是后续教程中会出现的一些方法,比如判断语句、循环语句、工具类使用等等。
ThymeleafComplex grammarTest.html 模板文件如下:
<!DOCTYPE html>
<html lang="en" xmlns:th="http://www.thymeleaf.org">
<head>
    <meta charset="UTF-8">
    <title th:text="${title}">语法测试</title>
</head>
<body>
<h3>#strings 工具类测试 </h3>
<div th:if="${not #strings.isEmpty(testString)}" >
    <p>testString初始值 : <span th:text="${testString}"/></p>
    <p>toUpperCase : <span th:text="${#strings.toUpperCase(testString)}"/></p>
    <p>toLowerCase : <span th:text="${#strings.toLowerCase(testString)}"/></p>
    <p>equalsIgnoreCase : <span th:text="${#strings.equalsIgnoreCase(testString, '13')}"/></p>
    <p>indexOf : <span th:text="${#strings.indexOf(testString, 'r')}"/></p>
    <p>substring : <span th:text="${#strings.substring(testString, 5, 9)}"/></p>
    <p>startsWith : <span th:text="${#strings.startsWith(testString, 'Spring')}"/></p>
    <p>contains : <span th:text="${#strings.contains(testString, 'Boot')}"/></p>
</div>
<h3>#bools 工具类测试</h3>
<!-- 如果 bool 的值为false的话,该div将不会显示-->
<div th:if="${#bools.isTrue(bool)}">
    <p th:text="${bool}"></p>
</div>
<h3>#arrays 工具类测试</h3>
<div th:if="${not #arrays.isEmpty(testArray)}">
    <p>length : <span th:text="${#arrays.length(testArray)}"/></p>
    <p>contains : <span th:text="${#arrays.contains(testArray, 5)}"/></p>
    <p>containsAll : <span th:text="${#arrays.containsAll(testArray, testArray)}"/></p>
    <p>循环读取 : <span th:each="i:${testArray}" th:text="${i+' '}"/></p>
</div>
<h3>#lists 工具类测试</h3>
<div th:unless="${#lists.isEmpty(testList)}">
    <p>size : <span th:text="${#lists.size(testList)}"/></p>
    <p>contains : <span th:text="${#lists.contains(testList, 0)}"/></p>
    <p>sort : <span th:text="${#lists.sort(testList)}"/></p>
    <p>循环读取 : <span th:each="i:${testList}" th:text="${i+' '}"/></p>
</div>
<h3>#maps 工具类测试</h3>
<div th:if="${not #maps.isEmpty(testMap)}">
    <p>size : <span th:text="${#maps.size(testMap)}"/></p>
    <p>containsKey : <span th:text="${#maps.containsKey(testMap, 'platform')}"/></p>
    <p>containsValue : <span th:text="${#maps.containsValue(testMap, '13')}"/></p>
    <p>读取map中键为title的值 : <span th:if="${#maps.containsKey(testMap,'title')}" th:text="${testMap.get('title')}"/></p>
</div>
<h3>#dates 工具类测试</h3>
<div>
    <p>year : <span th:text="${#dates.year(testDate)}"/></p>
    <p>month : <span th:text="${#dates.month(testDate)}"/></p>
    <p>day : <span th:text="${#dates.day(testDate)}"/></p>
    <p>hour : <span th:text="${#dates.hour(testDate)}"/></p>
    <p>minute : <span th:text="${#dates.minute(testDate)}"/></p>
    <p>second : <span th:text="${#dates.second(testDate)}"/></p>
    <p>格式化: <span th:text="${#dates.format(testDate)}"/></p>
    <p>yyyy-MM-dd HH:mm:ss 格式化: <span th:text="${#dates.format(testDate, 'yyyy-MM-dd HH:mm:ss')}"/></p>
</div>
</body>
</html>
增加 Controller 方法如下:
//ThymeleafController.java


    @GetMapping("/test")
    public String ThymeleafCompleGrammarTest(ModelMap map) {
        map.put("title", "Thymeleaf 语法测试");
        map.put("testString", "玩转 Spring Boot");
        map.put("bool", true);
        map.put("testArray", new Integer[]{2018,2019,2020,2021});
        map.put("testList", Arrays.asList("Spring", "Spring Boot", "Thymeleaf", "MyBatis", "Java"));
        Map testMap = new HashMap();
        testMap.put("platform", "yangmufa.com");
        testMap.put("title", "玩转 Spring Boot");
        testMap.put("author", "绿源网www.lvyvan.cn");
        map.put("testMap", testMap);
        map.put("testDate", new Date());
        return "test";
    }
之后重启项目并访问 /test 即可,结果如下:
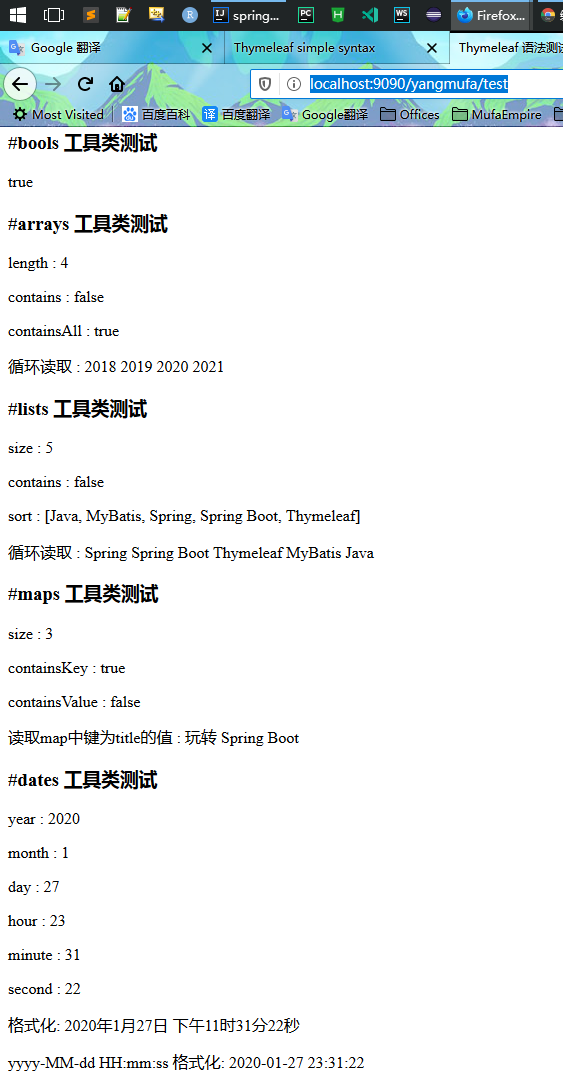
在 strings 工具类测试中,我们首先使用了 th:if 标签进行逻辑判断,th:if="${not #strings.isEmpty(testString)}" 即为一条判断语句,${...} 表达式中会返回一个布尔值结果,如果为 true 则该 div 中的内容会继续显示,否则将不会显示 th:if 所在的主标签。
#strings.isEmpty 的作用为字符串判空,如果 testString 为空则会返回 true,而表达式前面的 not 则表示逻辑非运算,即如果 testString 不为空则继续展示该 div 中的内容。
与 th:if 类似的判断标签为 th:unless ,它与 th:if 刚好相反,当表达式中返回的结果为 false 时,它所在标签中的内容才会继续显示,在 #lists 工具类测试中我们使用了 th:unless ,大家在调试代码时可以比较二者的区别。
Thymeleaf 模板引擎中的循环语句语法为 th:each="i:${testList}" ,类似于 JSP 中的 c:foreach 表达式,主要是做循环的逻辑,很多页面逻辑在生成时会使用到该语法。
还有读取 Map 对象的方式为 ${testMap.get('title')} ,与 Java 语言中也很类似。逻辑判断、循环语句这两个知识点是系统开发中比较常用也比较重要的内容,希望大家能够结合代码练习并牢牢掌握。
5-Thymeleaf 模板引擎使用注意事项 :
5.1- 必须引入名称空间:
<html lang="en" xmlns:th="http://www.thymeleaf.org">即使不引入以上名称空间,静态资源访问以及模板动态访问都不会报错,因此有时候可能会忽略这个事情。但是建议在开发过程中最好引入该名称空间,因为引入之后会有 Thymeleaf 代码的语法提示,能够提升开发效率,也减少人为造成的低级错误。
5.2- 禁用模板缓存:

Thymeleaf 的默认缓存设置是通过配置文件的 spring.thymeleaf.cache 配置属性决定的,通过如上 Thymeleaf 模板的配置属性类 ThymeleafProperties 可以发现该属性默认为 true,因此 Thymeleaf 默认是使用模板缓存的,该设置有助于改善应用程序的性能,因为模板只需编译一次即可,但是在开发过程中不能实时看到页面变更的效果,除非重启应用程序,因此建议将该属性设置为 false,在配置文件中修改如下:
spring.thymeleaf.cache=false5.2-IDEA 中通过 Thymeleaf 语法读取变量时爆红色波浪线问题 :
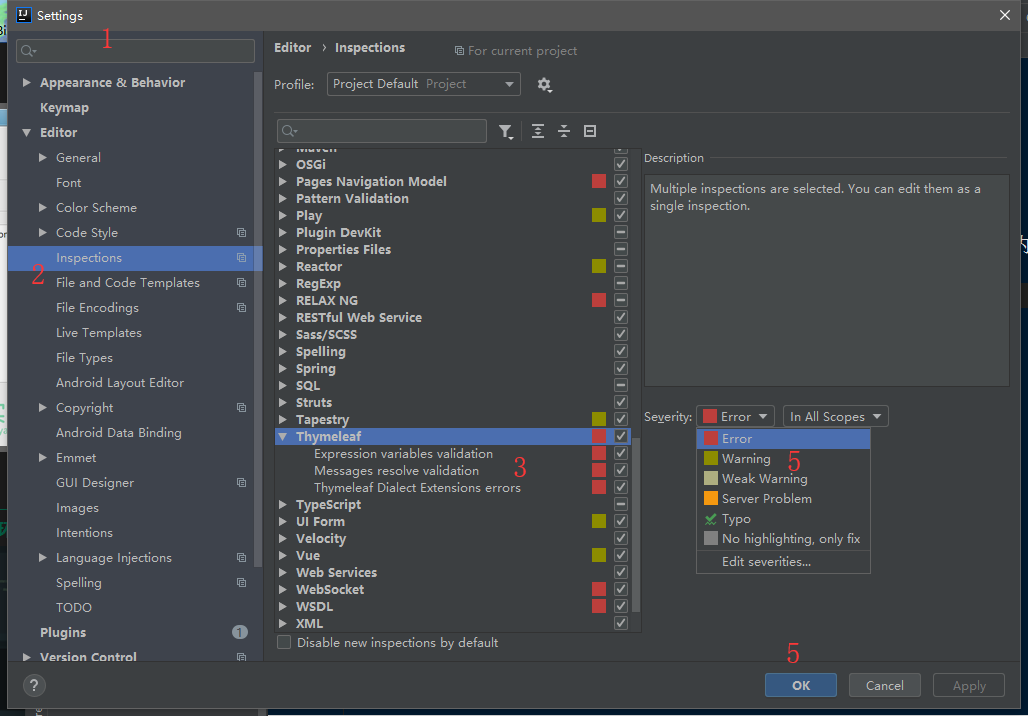
如下图所示,在刚开始使用 Thymeleaf 开发时可能会碰到这种问题,在模板文件中通过 Thymeleaf 语法读取变量时,该变量名称下会出现红色波浪线,也就是错误的标志。

如果不熟的朋友可能会人为自己的模板文件有问题,但其实并不是那么严重,只是由于 IDEA 中默认开启了表达式参数验证,即使在后端的 model 数据中添加了该变量,但是对于前端文件是无法感知的,因此会报这个错误,可以在 IDEA 中默认将验证关闭或者将提示级别修改掉也可以。
♬ 总结:
本文详细的记录了 Thymeleaf 模板引擎技术,也进行了 Spring Boot 和 Thymeleaf 的整合操作。最后整理了几项在使用 Thymeleaf 模板引擎开发时需要注意的点,如果是刚接触 Thymeleaf 的话,遇到类似问题也无需困扰,这些坑已经有人帮咱踩过了,为了后续能够学习的更顺畅,还是要多练习一下基础语法。
/*-------------------反网络爬虫声明o(*////▽////*)咻咻咻--------------------
作者:杨木发
版权声明:
本文为博主倾情原创文章,整篇转载请附上源文链接!
如果觉得本文对你有所收获,你的请评论点赞 与
合理优质的转发也将是鼓励支持我继续创作的动力,
更多精彩可百度搜索 杨木发 或:
个人网站:www.yangmufa.com ,
开源中国:https://my.oschina.net/yangmufa ,
Gitee:https://gitee.com/yangmufa ,
GitHub:https://github.com/yangmufa 。
坚持创作 善于总结 开源共享 高质进步。
-------------------反网络爬虫声明o(*////▽////*)咻咻咻--------------------*/
来源:oschina
链接:https://my.oschina.net/yangmufa/blog/3161665