
Kurento Java Tutorial - Hello World
这个web应用程序是为Java开发人员介绍用Kurento编程的原则而设计的。它包含一个WebRTC镜像视频通信(环回)。本教程假设您具备Java、JavaScript、HTML和WebRTC的基本知识。在开始本教程之前,我们还建议阅读关于Kurento和WebRTC的部分。
注释
此应用程序使用HTTPS。如果您在本地主机中运行它并在浏览器中接受安全异常,它将正常工作,但是如果远程运行,您应该保护您的应用程序。有关更多信息,请选中“配置Java服务器以使用HTTPS”。
快速开始
跟着下面的步骤运行演示程序:
1、安装Kurento Media Server: 安装向导链接
2、运行这些命令:
git clone https://github.com/Kurento/kurento-tutorial-java.git
cd kurento-tutorial-java/kurento-hello-world
git checkout 6.13.0
mvn -U clean spring-boot:run -Dkms.url=ws://localhost:8888/kurento
3、使用WebRTC兼容浏览器(Chrome、Firefox)打开演示页:https://localhost:8443/
4、单击“开始”开始演示。
5、允许访问您的网络摄像头。
6、一旦协商并建立环回连接,您就应该在本地和远程占位符中看到您的网络摄像机视频。
7、单击“停止”完成演示。
理解这个例子
Kurento为开发人员提供了一个Kurento Java客户端来控制Kurento媒体服务器。这个客户端库可以用于任何类型的Java应用程序:服务器端Web、桌面、Android等。它与任何框架都兼容,如JavaEE、Spring、Play、Vert.x、Swing和JavaFX。
这个Hello World演示是使用Kurento可以创建的最简单的web应用程序之一。下图显示了此演示运行的屏幕截图:
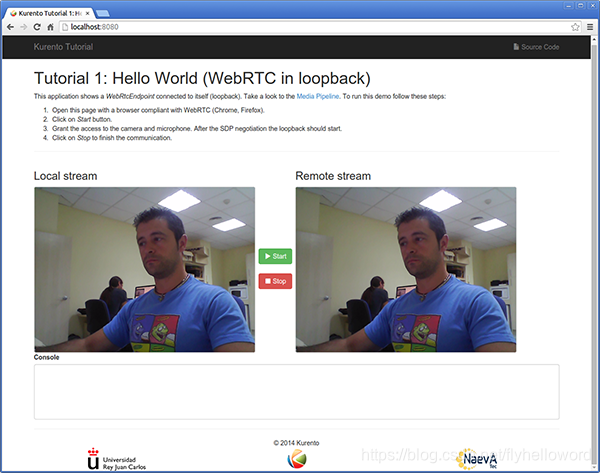
Kurento Hello World Screenshot: WebRTC in loopback
应用程序的界面(一个HTML网页)由两个HTML5标记组成:一个显示本地流(由设备网络摄像头捕获),另一个显示媒体服务器发送回客户端的远程流。
应用程序的逻辑非常简单:本地流被发送到Kurento媒体服务器,该服务器将其发送回客户端,而无需修改。要实现此行为,我们需要创建一个由单个媒体元素(即WebRtcEndpoint)组成的媒体管道,该管道具有交换全双工(双向)WebRTC媒体流的能力。此媒体元素连接到自身,以便将它从浏览器接收到的媒体发送回浏览器。此媒体管道如下图所示:

这是一个web应用程序,因此它遵循客户机-服务器体系结构。在客户端,逻辑是用JavaScript实现的。在服务器端,我们使用基于Spring引导的应用服务器,使用Kurento Java客户机API来控制Kurento媒体服务器的功能。总之,这个演示的顶层架构是三层的。为了与这些实体通信,使用了两个websocket:
1.在客户端和应用服务器之间创建一个WebSocket来实现一个自定义的信令协议。
2、另一个WebSocket用于执行Kurento Java客户端和Kurento媒体服务器之间的通信。
此通信使用Kurento协议进行。有关详细说明,请阅读本节:Kurento协议。
下图显示了与应用程序接口交互的完整序列图:
i)JavaScript逻辑;
ii)应用服务器逻辑(使用Kurento Java客户端);
iii)Kurento媒体服务器。
Kurento Hello World(loopbak中的WebRTC)演示的完整序列图
应用服务逻辑
这个演示是在服务器端使用Java开发的,基于Spring Boot框架,它在生成的maven工件中嵌入了Tomcat web服务器,从而简化了开发和部署过程。
注释
您可以使用您喜欢的任何Java服务器端技术来使用Kurento构建web应用程序。例如,一个纯Java EE应用程序、SIP Servlets、Play、Vert.x等等。为了方便起见,我们选择了Spring Boot。
在下图中,您可以看到服务器端代码的类图:
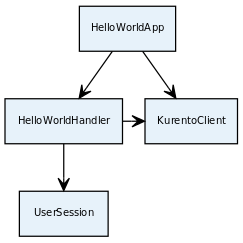
HelloWorld应用程序的服务器端类图
这个演示的main class是HelloWorldApp。
如您所见,KurentoClient在这个类中被实例化为一个Spring Bean。此bean用于创建Kurento媒体管道,用于向应用程序添加媒体功能。在这个实例中,我们看到需要向客户机库指定Kurento媒体服务器的位置。在这个例子中,我们假设它位于localhost,监听端口8888。如果复制此示例,则需要在其中插入Kurento媒体服务器实例的特定位置。
一旦Kurento客户端被实例化,就可以与Kurento媒体服务器通信并控制其多媒体功能。
@SpringBootApplication
@EnableWebSocket
public class HelloWorldApp implements WebSocketConfigurer {
  @Bean
  public HelloWorldHandler handler() {
    return new HelloWorldHandler();
  }

  @Bean
  public KurentoClient kurentoClient() {
    return KurentoClient.create();
  }

  @Override
  public void registerWebSocketHandlers(WebSocketHandlerRegistry registry) {
    registry.addHandler(handler(), "/helloworld");
  }

  public static void main(String[] args) throws Exception {
    SpringApplication.run(HelloWorldApp.class, args);
  }
}
此web应用程序遵循单页应用程序体系结构(SPA),并使用WebSocket通过请求和响应与应用服务器通信。具体来说,main app类实现接口WebSocketConfigurer以注册一个WebSocketHandler,该WebSocketHandler处理 /helloworld 的WebSocket请求。
类HelloWorldHandler实现TextWebSocketHandler来处理文本WebSocket请求。这个类的中心部分是handleTextMessage方法。此方法实现请求的操作,通过WebSocket返回响应。换句话说,它实现了前面序列图中描述的信令协议的服务器部分。
public void handleTextMessage(WebSocketSession session, TextMessage message)
    throws Exception {
  [...]
  switch (messageId) {
    case "start":
      start(session, jsonMessage);
      break;
    case "stop": {
      stop(session);
      break;
    }
    case "onIceCandidate":
      onRemoteIceCandidate(session, jsonMessage);
      break;
    default:
      sendError(session, "Invalid message, ID: " + messageId);
      break;
  }
  [...]
}
The start() method performs the following actions:
- 配置媒体处理逻辑。这是应用程序配置Kurento如何处理媒体的部分。换句话说,媒体管道就是在这里创建的。为此,对象KurentoClient用于创建mediapipline对象。使用它,我们需要的媒体元素被创建和连接。在本例中,我们只实例化一个WebRtcEndpoint,用于接收WebRTC流并将其发送回客户端。
final MediaPipeline pipeline = kurento.createMediaPipeline();

final WebRtcEndpoint webRtcEp =
    new WebRtcEndpoint.Builder(pipeline).build();

webRtcEp.connect(webRtcEp);
- 创建事件侦听器。由Kurento管理的所有对象都能够发出几种类型的事件,如端点事件中所述。应用服务器可以监听它们,以便对媒体服务器的处理逻辑内部的情况有更多的了解。监听所有可能的事件是一个很好的实践,因此客户机应用程序拥有尽可能多的信息。
// Common events for all objects that inherit from BaseRtpEndpoint
addErrorListener(
    new EventListener<ErrorEvent>() { ... });
addMediaFlowInStateChangeListener(
    new EventListener<MediaFlowInStateChangeEvent>() { ... });
addMediaFlowOutStateChangeListener(
    new EventListener<MediaFlowOutStateChangeEvent>() { ... });
addConnectionStateChangedListener(
    new EventListener<ConnectionStateChangedEvent>() { ... });
addMediaStateChangedListener(
    new EventListener<MediaStateChangedEvent>() { ... });
addMediaTranscodingStateChangeListener(
    new EventListener<MediaTranscodingStateChangeEvent>() { ... });

// Events specific to objects of class WebRtcEndpoint
addIceCandidateFoundListener(
    new EventListener<IceCandidateFoundEvent>() { ... });
addIceComponentStateChangeListener(
    new EventListener<IceComponentStateChangeEvent>() { ... });
addIceGatheringDoneListener(
    new EventListener<IceGatheringDoneEvent>() { ... });
addNewCandidatePairSelectedListener(
    new EventListener<NewCandidatePairSelectedEvent>() { ... });
- WebRTC SDP协商。在WebRTC中,SDP提供/应答模型用于协商将在对等方之间交换的音频或视频轨迹,以及它们支持的公共特性的子集。此协商通过在一个对等方中生成SDP提议,将其发送给另一个对等方,并返回将生成的SDP响应来完成。
在这种特殊情况下,SDP提议由浏览器生成并发送给Kurento,Kurento随后生成SDP应答,该应答必须作为响应发送回浏览器。
// 'webrtcSdpOffer' is the SDP Offer generated by the browser;
// send the SDP Offer to KMS, and get back its SDP Answer
String webrtcSdpAnswer = webRtcEp.processOffer(webrtcSdpOffer);
sendMessage(session, webrtcSdpAnswer);
- Gather ICE candidates。当SDP提供/应答协商正在进行时,每个对等方都可以开始收集将用于ICE协议的连接候选。此过程的工作方式与浏览器通过发出事件RTCPeerConnection.onicecandidate通知其客户机代码的方式非常相似;同样,Kurento的WebRtcEndpoint将通过事件IceCandidateFound通知其客户机应用程序。
webRtcEp.gatherCandidates();
Client-Side Logic
现在让我们转到应用程序的客户端。要在服务器端调用先前创建的WebSocket服务,我们使用JavaScript类WebSocket。我们使用一个名为Kurento-utils.js的特定Kurento JavaScript库来简化WebRTC与服务器的交互。这个库依赖于adapter.js,这是一个由Google维护的JavaScript WebRTC实用程序,它可以消除浏览器之间的差异。
这些库作为Maven依赖项引入到项目中,Maven依赖项从WebJars.org下载所有必需的文件;它们加载在index.html页面中,并在index.js文件中使用。
在下面的代码片段中,我们可以看到在path/helloworld中创建的WebSocket。然后,使用WebSocket的onmessage监听器在客户端实现JSON信令协议。请注意,有三条传入客户端的消息:startResponse、error和iceCandidate。为实现通信中的每一步都采取了方便的措施。例如,在函数start中,kurento-utils.js的函数webrtcpeeer.WebRtcPeerSendrecv用于启动WebRTC通信。
var ws = new WebSocket('ws://' + location.host + '/helloworld');

ws.onmessage = function(message) {
   var parsedMessage = JSON.parse(message.data);
   console.info('Received message: ' + message.data);

   switch (parsedMessage.id) {
   case 'startResponse':
      startResponse(parsedMessage);
      break;
   case 'error':
      if (state == I_AM_STARTING) {
         setState(I_CAN_START);
      }
      onError('Error message from server: ' + parsedMessage.message);
      break;
   case 'iceCandidate':
      webRtcPeer.addIceCandidate(parsedMessage.candidate, function(error) {
         if (error)
            return console.error('Error adding candidate: ' + error);
      });
      break;
   default:
      if (state == I_AM_STARTING) {
         setState(I_CAN_START);
      }
      onError('Unrecognized message', parsedMessage);
   }
}

function start() {
   console.log('Starting video call ...');

   // Disable start button
   setState(I_AM_STARTING);
   showSpinner(videoInput, videoOutput);

   console.log('Creating WebRtcPeer and generating local sdp offer ...');

   var options = {
      localVideo : videoInput,
      remoteVideo : videoOutput,
      onicecandidate : onIceCandidate
   }
   webRtcPeer = new kurentoUtils.WebRtcPeer.WebRtcPeerSendrecv(options,
         function(error) {
            if (error)
               return console.error(error);
            webRtcPeer.generateOffer(onOffer);
         });
}

function onOffer(error, offerSdp) {
   if (error)
      return console.error('Error generating the offer');
   console.info('Invoking SDP offer callback function ' + location.host);
   var message = {
      id : 'start',
      sdpOffer : offerSdp
   }
   sendMessage(message);
}

function onIceCandidate(candidate) {
   console.log('Local candidate' + JSON.stringify(candidate));

   var message = {
      id : 'onIceCandidate',
      candidate : candidate
   };
   sendMessage(message);
}

function startResponse(message) {
   setState(I_CAN_STOP);
   console.log('SDP answer received from server. Processing ...');

   webRtcPeer.processAnswer(message.sdpAnswer, function(error) {
      if (error)
         return console.error(error);
   });
}

function stop() {
   console.log('Stopping video call ...');
   setState(I_CAN_START);
   if (webRtcPeer) {
      webRtcPeer.dispose();
      webRtcPeer = null;

      var message = {
         id : 'stop'
      }
      sendMessage(message);
   }
   hideSpinner(videoInput, videoOutput);
}

function sendMessage(message) {
   var jsonMessage = JSON.stringify(message);
   console.log('Sending message: ' + jsonMessage);
   ws.send(jsonMessage);
}
依赖项
这个Java Spring应用程序是使用Maven实现的。pom.xml的相关部分是声明Kurento依赖项的地方。如下面的代码片段所示,我们需要两个依赖项:客户端的Kurento客户机Java依赖项(Kurento客户机)和JavaScript Kurento实用程序库(Kurento实用程序库)。其他客户端库由WebJars管理。
来源:CSDN
作者:flyhelloword
链接:https://blog.csdn.net/flyhelloword/article/details/104324416