一.概述
Spring与JavaWeb整合时,Spring可以完成的任务有:
1)Spring来控制事务(dao-JdbcTemplate)
2)所有组件Autowried
3)管理数据库...
1.1 整合的步骤
1.导包
2.写配置
1)将所有组件加入到容器中,并能正确获取
@Controller:servlet层,目前不能标注在Servlet层(Tomcat启动时会创建Servlet,使用注解的话会创建新的Servlet)
@Service :业务逻辑层
@Repository :dao层
@Component:其他组件
2)每个组件之间自动装配
3)配置声明式事务
事务管理器控制数据库连接池
4)IOC创建和销毁都要在合适的时机完成--使用监听器启动容器。
项目启动{
    IOC创建完成
}

项目销毁{

  IOC销毁
}
可以写一个监听器完成这个工作,Spring写好了这个监听器。这个监听器创建好的IOC容器在ContextLoader(这个属性就是IOC容器)。有一个静态方法能获取:getCurrentWebApplicationContext。
private WebApplicationContext context;
3.测试
二.整合实验
以之前的书城为例:
1.导包:导入Spring所需要的包
spring-aop-4.0.0.RELEASE.jar
spring-aspects-4.0.0.RELEASE.jar
spring-beans-4.0.0.RELEASE.jar
spring-context-4.0.0.RELEASE.jar
spring-core-4.0.0.RELEASE.jar
spring-expression-4.0.0.RELEASE.jar
spring-jdbc-4.0.0.RELEASE.jar
spring-orm-4.0.0.RELEASE.jar
spring-tx-4.0.0.RELEASE.jar
2.写配置:
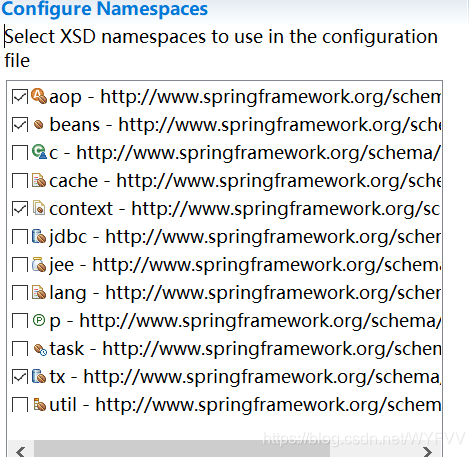
1)将所有组件加入到容器中,并能正确获取。首先创建Spring的配置文件,并在配置文件中选择需要的名称空间:
<?xml version="1.0" encoding="UTF-8"?>
<beans xmlns="http://www.springframework.org/schema/beans"
	xmlns:xsi="http://www.w3.org/2001/XMLSchema-instance"
	xmlns:aop="http://www.springframework.org/schema/aop"
	xmlns:context="http://www.springframework.org/schema/context"
	xmlns:tx="http://www.springframework.org/schema/tx"
	xsi:schemaLocation="http://www.springframework.org/schema/beans http://www.springframework.org/schema/beans/spring-beans-3.2.xsd
		http://www.springframework.org/schema/context http://www.springframework.org/schema/context/spring-context-4.0.xsd
		http://www.springframework.org/schema/aop http://www.springframework.org/schema/aop/spring-aop-4.0.xsd
		http://www.springframework.org/schema/tx http://www.springframework.org/schema/tx/spring-tx-4.0.xsd">

  <context:component-scan base-package="com.atguigu"></context:component-scan>

</beans>
根据上面所讲,在业务逻辑层和Dao层加上注解,下面为例:
@Repository
public class BookDaoImpl extends BaseDaoImpl<Book> implements BookDao{...}

@Service
public class BookServiceImpl implements BookService{...}

//注意注解是写在实现类上的,不能写在接口上
2)每个组件之间自动装配,如下面会分为两种情况:
- 在加注解的类中使用@Autowired直接注入
- 在Servlet(不能加注解)中,调用方法获得组件(这个方法写在一个类中,供所有的Servlet调用。因为Tomcat在启动时会创建Servlet,Servlet会调用这个方法,在这个方法中创建了IOC容器,从IOC容器中获得这个Service组件)。
//有两种情况,一种是在加了注解的类中直接使用@Autowired注解直接注入

@Service
public class BookServiceImpl implements BookService {

	@Autowired
	private BookDao bookDao;
    ...
}

//另一种是在不能加注解的Servlet中,使用特殊方法获得
public class BookServlet extends BaseServlet {
	private static final long serialVersionUID = 1L;

	private BookService bookService=WebUtils.getBean(BookService.class);
    ...
}

//因为启动Tomcat后,首先会创建Servlet,然后这些Servelt会想获得Service,就会调用这个方法,这个方法就会创建IOC容器,然后从容器中获得Service组件
public class WebUtils {

   private static ApplicationContext ioc=new ClassPathXmlApplicationContext("applicationContext.xml");
	/*
	 * 从IOC容器中获取组件
	 */
		public static <T>T getBean(Class<T> clazz){
			return ioc.getBean(clazz);

		}
   ...
}
3)配置声明式事务
事务管理器控制数据库连接池。
(1)首先在配置文件中配置数据源和JdbcTemplate:
<!-- 引用外部配置文件 -->
  <context:property-placeholder location="classpath:dbconfig.properties"/>
  <!-- 1.配置数据源 -->
  <bean class="com.mchange.v2.c3p0.ComboPooledDataSource" id="dataSoure">
     <property name="user" value="${jdbc.user}"></property>
     <property name="password" value="${jdbc.password}"></property>
     <property name="jdbcUrl" value="${jdbc.jdbcUrl}"></property>
     <property name="driverClass" value="${jdbc.driverClass}"></property>
  </bean>
  <!-- 2.JdbcTemplate操作数据库 -->
  <bean class="org.springframework.jdbc.core.JdbcTemplate" id="jdbcTemplate">
     <constructor-arg name="dataSource" ref="dataSoure"></constructor-arg>
  </bean>
(2)下来对Dao层实现类进行更改,因为之前编写的逻辑是所有的Dao实现类都继承了BaseDao实现类,为了更改方便起见,所有对更改都在BaseDao实现类中进行更改。在这个类中使用JdbcTemplate来操作数据库。
@Repository
public abstract class BaseDaoImpl<T> {


//	protected QueryRunner queryRunner;
	@Autowired
	private JdbcTemplate jdbcTemplate;
	/**
	 * 保存BaseDaoImpl类的泛型对象class类型
	 */
	protected Class<T> type;

	@SuppressWarnings("unchecked")
	public BaseDaoImpl() {
		// 创建一个QueryRunner对象实例

		// 获取父类中带有泛型的父类的class类型
		ParameterizedType supperClass = (ParameterizedType) getClass().getGenericSuperclass();
		// 获取泛型中的具体的类型的class
		type = (Class<T>) supperClass.getActualTypeArguments()[0];
	}

	/**
	 * 执行update,delete,insert语句
	 *
	 * @param sql
	 *            要执行的sql语句
	 * @param params
	 *            执行的sql语句的参数
	 * @return 如果语句执行成功返回true<br/>
	 *         如果执行失败返回false
	 * @throws SQLException
	 */
	public int update(String sql, Object... params) throws SQLException {
		int update=jdbcTemplate.update(sql,params);
		return update;
	}

	/**
	 * 执行查询语句,只返回第一个记录
	 *
	 * @param sql
	 *            要执行的sql语句
	 * @param params
	 *            执行的sql语句的参数
	 * @return 返回查询对象的具体实例 <br/>
	 *         如果查询的数据不存在,则返回null<br/>
	 *         查询失败也返回null
	 * @throws SQLException
	 */
	public T queryOne(String sql, Object... params) throws SQLException {
	T Object=null;
	try {
		Object = jdbcTemplate.queryForObject(sql, new BeanPropertyRowMapper<T>(type),params);
	} catch (DataAccessException e) {
		// TODO Auto-generated catch block
		e.printStackTrace();
	}
	return Object;
	}

	/**
	 * 执行查询语句,返回查询后的对象实例集合
	 *
	 * @param sql
	 *            要执行的sql语句
	 * @param params
	 *            sql语句的参数
	 * @return 返回的是查找到的对象集合<br/>
	 *         查询失败返回null
	 * @throws Exception
	 */
	public List<T> queryList(String sql, Object... params) throws Exception {
		return jdbcTemplate.query(sql, new BeanPropertyRowMapper<T>(type),params);
	}


	/**
	 * 查询只有一个返回值的语句
	 *
	 * @param sql
	 * @param params
	 * @return
	 * @throws Exception
	 */
	public Object querySingleValue(String sql, Object... params) throws Exception {
		Object object=jdbcTemplate.queryForObject(sql, Object.class, params);
		return object;
	}

}
(3)在配置文件中配置事务管理器和配置基于Xml的事务(因为使用注解@Transactional配置事务,需要给所有方法添加,不太方便)
 <!-- 3.配置事务管理器 -->
   <bean class="org.springframework.jdbc.datasource.DataSourceTransactionManager" id="dataSourceTransactionManager">
     <property name="dataSource" ref="comboPooldeDataSource"></property>
   </bean>

  <!-- 基于配置的事务 -->
  <aop:config>
      <aop:pointcut expression="execution(* com.atguigu.service.impl.*.*(..))" id="txPoint"/>
      <aop:advisor advice-ref="myTx" pointcut-ref="txPoint"/>
  </aop:config>
  <tx:advice id="myTx" transaction-manager="dataSourceTransactionManager">
      <tx:attributes>
         <tx:method name="*"/>
         <tx:method name="get*" read-only="true"/>
      </tx:attributes>
  </tx:advice>
(4)测试:因为在数据库中设置书的库存量不能小于0,所以在结账操作时,选择库存量为0的书进行结账,会跳转到异常界面,显示结账失败。因为是给所有方法添加了事务管理,所以出现异常时,事务回滚,数据库中的数据不会进行更改。所以,上述情况才会成功。
4)使用监听器来启动容器。在之前的实验步骤中我们在Servlet中调用一个方法来创建容器,并通过这个容器来获得组件。这样做容易存在问题,例如,通过反射可以创建更多的容器,或者容器在项目启动的时候创建,但在项目关闭的时候并没有销毁,不断的开启项目会消耗内存。所以使用一个监听器来启动容器,这个监听器Spring已经创建好了。我们要使用,首先在web,xml中进行注册:
   <!-- needed for ContextLoaderListener -->
	<context-param>
		<param-name>contextConfigLocation</param-name>
		<param-value>classpath:applicationContext.xml</param-value>
	</context-param>

	<!-- Bootstraps the root web application context before servlet initialization -->
	<listener>
		<listener-class>org.springframework.web.context.ContextLoaderListener</listener-class>
	</listener>
注册成功后,然后在Servlet中获得组件是这样使用的:
public static <T>T getBean(Class<T> clazz){
			//获取IOC容器
			WebApplicationContext ioc=ContextLoader.getCurrentWebApplicationContext();
			return ioc.getBean(clazz);

		}
这样就可以使用监听器来启动容器了。
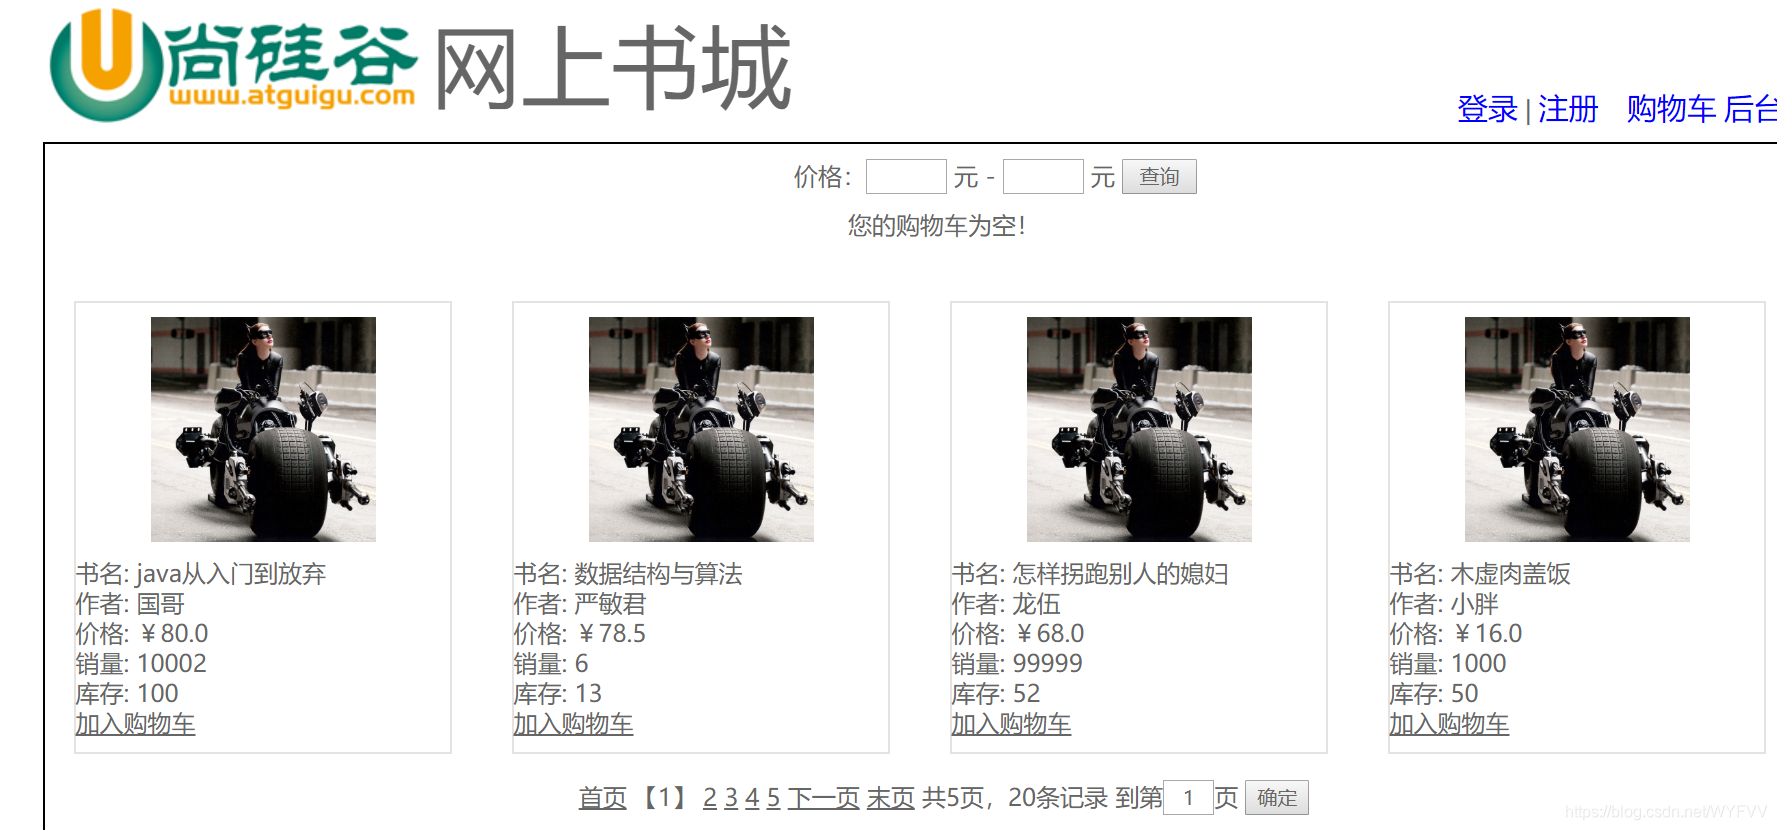
3.测试,执行成功后,页面如下:
来源:CSDN
作者:WYFVV
链接:https://blog.csdn.net/WYFVV/article/details/103950478