在之前的博文中有讲到如何编译安装c++版的Tensorflow,并简单调用自己训练的pb文件。在本文中将进一步结合代码调用pb文件。之前经常使用google发布在github上基于tensorflow的object detection模块,在该模块中官方事先提供了一系列预训练模型,如下图所示,我们可以直接使用这些模型也可以针对自己的项目进行re-train操作并得到最终的pb文件。

接下来我们在C++中调用这些模型,之前在网上找了好久都没找到可用的事例代码,而且官方提供的API看着也是一脸懵(编程菜鸟),后来摸索了很久总结代码如下:
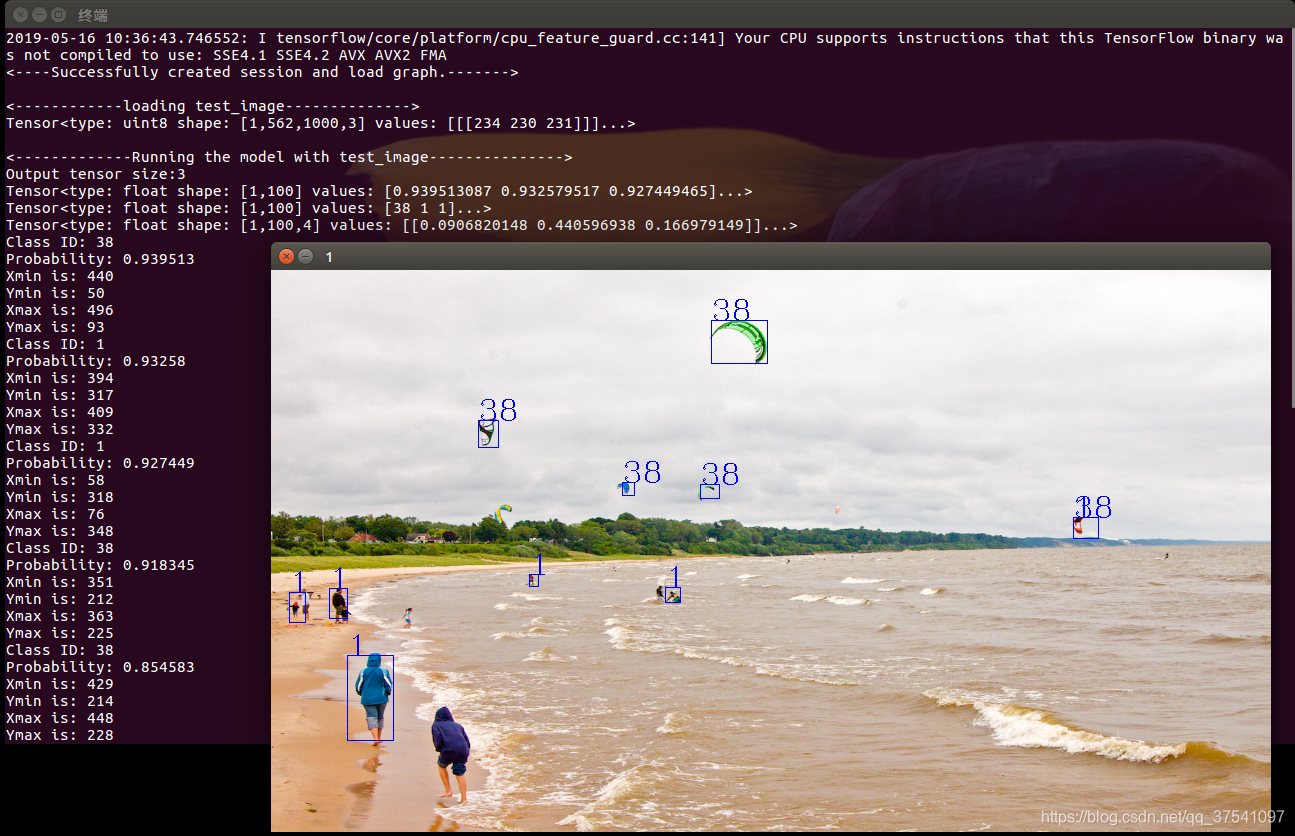
#include <iostream> #include "tensorflow/cc/ops/const_op.h" #include "tensorflow/cc/ops/image_ops.h" #include "tensorflow/cc/ops/standard_ops.h" #include "tensorflow/core/framework/graph.pb.h" #include "tensorflow/core/framework/tensor.h" #include "tensorflow/core/graph/default_device.h" #include "tensorflow/core/graph/graph_def_builder.h" #include "tensorflow/core/lib/core/errors.h" #include "tensorflow/core/lib/core/stringpiece.h" #include "tensorflow/core/lib/core/threadpool.h" #include "tensorflow/core/lib/io/path.h" #include "tensorflow/core/lib/strings/stringprintf.h" #include "tensorflow/core/platform/env.h" #include "tensorflow/core/platform/init_main.h" #include "tensorflow/core/platform/logging.h" #include "tensorflow/core/platform/types.h" #include "tensorflow/core/public/session.h" #include "tensorflow/core/util/command_line_flags.h" #include <opencv2/opencv.hpp> #include <cv.h> #include <highgui.h> #include <Eigen/Core> #include <Eigen/Dense> using namespace std; using namespace cv; using namespace tensorflow; // 定义一个函数讲OpenCV的Mat数据转化为tensor,python里面只要对cv2.read读进来的矩阵进行np.reshape之后, // 数据类型就成了一个tensor,即tensor与矩阵一样,然后就可以输入到网络的入口了,但是C++版本,我们网络开放的入口 // 也需要将输入图片转化成一个tensor,所以如果用OpenCV读取图片的话,就是一个Mat,然后就要考虑怎么将Mat转化为 // Tensor了 void CVMat_to_Tensor(Mat img,Tensor* output_tensor,int input_rows,int input_cols) { //imshow("input image",img); //图像进行resize处理 resize(img,img,cv::Size(input_cols,input_rows)); //imshow("resized image",img); //归一化 img.convertTo(img,CV_8UC3); // CV_32FC3 //img=1-img/255; //创建一个指向tensor的内容的指针 uint8 *p = output_tensor->flat<uint8>().data(); //创建一个Mat,与tensor的指针绑定,改变这个Mat的值,就相当于改变tensor的值 cv::Mat tempMat(input_rows, input_cols, CV_8UC3, p); img.convertTo(tempMat,CV_8UC3); // waitKey(0); } int main() { /*--------------------------------配置关键信息------------------------------*/ string model_path="/home/xx/retrain_tf/ssd_inception_v2_coco/frozen_inference_graph.pb"; string image_path="/home/xx/image2.jpg"; int input_height = 562; int input_width = 1000; string input_tensor_name="image_tensor"; vector<string> out_put_nodes; //注意,在object detection中输出的三个节点名称为以下三个 out_put_nodes.push_back("detection_scores"); //detection_scores detection_classes detection_boxes out_put_nodes.push_back("detection_classes"); out_put_nodes.push_back("detection_boxes"); /*--------------------------------创建session------------------------------*/ Session* session; Status status = NewSession(SessionOptions(), &session);//创建新会话Session /*--------------------------------从pb文件中读取模型--------------------------------*/ GraphDef graphdef; //Graph Definition for current model Status status_load = ReadBinaryProto(Env::Default(), model_path, &graphdef); //从pb文件中读取图模型; if (!status_load.ok()) { cout << "ERROR: Loading model failed..." << model_path << std::endl; cout << status_load.ToString() << "\n"; return -1; } Status status_create = session->Create(graphdef); //将模型导入会话Session中; if (!status_create.ok()) { cout << "ERROR: Creating graph in session failed..." << status_create.ToString() << std::endl; return -1; } cout << "<----Successfully created session and load graph.------->"<< endl; /*---------------------------------载入测试图片-------------------------------------*/ cout<<endl<<"<------------loading test_image-------------->"<<endl; Mat img; img = imread(image_path); cvtColor(img, img, CV_BGR2RGB); if(img.empty()) { cout<<"can't open the image!!!!!!!"<<endl; return -1; } //创建一个tensor作为输入网络的接口 Tensor resized_tensor(DT_UINT8, TensorShape({1,input_height,input_width,3})); //DT_FLOAT //将Opencv的Mat格式的图片存入tensor CVMat_to_Tensor(img,&resized_tensor,input_height,input_width); cout << resized_tensor.DebugString()<<endl; /*-----------------------------------用网络进行测试-----------------------------------------*/ cout<<endl<<"<-------------Running the model with test_image--------------->"<<endl; //前向运行,输出结果一定是一个tensor的vector vector<tensorflow::Tensor> outputs; Status status_run = session->Run({{input_tensor_name, resized_tensor}}, {out_put_nodes}, {}, &outputs); if (!status_run.ok()) { cout << "ERROR: RUN failed..." << std::endl; cout << status_run.ToString() << "\n"; return -1; } //把输出值给提取出 cout << "Output tensor size:" << outputs.size() << std::endl; //3 for (int i = 0; i < outputs.size(); i++) { cout << outputs[i].DebugString()<<endl; // [1, 50], [1, 50], [1, 50, 4] } cvtColor(img, img, CV_RGB2BGR); // opencv读入的是BGR格式输入网络前转为RGB resize(img,img,cv::Size(1000,562)); // 模型输入图像大小 int pre_num = outputs[0].dim_size(1); // 50 模型预测的目标数量 auto tmap_pro = outputs[0].tensor<float, 2>(); //第一个是score输出shape为[1,50] auto tmap_clas = outputs[1].tensor<float, 2>(); //第二个是class输出shape为[1,50] auto tmap_coor = outputs[2].tensor<float, 3>(); //第三个是coordinate输出shape为[1,50,4] float probability = 0.5; //自己设定的score阈值 for (int pre_i = 0; pre_i < pre_num; pre_i++) { if (tmap_pro(0, pre_i) < probability) { break; } cout << "Class ID: " << tmap_clas(0, pre_i) << endl; cout << "Probability: " << tmap_pro(0, pre_i) << endl; string id = to_string(int(tmap_clas(0, pre_i))); int xmin = int(tmap_coor(0, pre_i, 1) * input_width); int ymin = int(tmap_coor(0, pre_i, 0) * input_height); int xmax = int(tmap_coor(0, pre_i, 3) * input_width); int ymax = int(tmap_coor(0, pre_i, 2) * input_height); cout << "Xmin is: " << xmin << endl; cout << "Ymin is: " << ymin << endl; cout << "Xmax is: " << xmax << endl; cout << "Ymax is: " << ymax << endl; rectangle(img, cvPoint(xmin, ymin), cvPoint(xmax, ymax), Scalar(255, 0, 0), 1, 1, 0); putText(img, id, cvPoint(xmin, ymin), FONT_HERSHEY_COMPLEX, 1.0, Scalar(255,0,0), 1); } imshow("1", img); cvWaitKey(0); return 0; } 这里偷个懒直接使用官网下载的基于coco的预训练模型(用自己训练的pb文件方法是一样的),以下是终端输出结果以及将结果简单的标注在图片上:

在coco数据集标签中id:1对应的是person,id:38对应的是kite。
在使用过程中需要注意:
1)修改pb模型的路径
2)修改图片的路径
3)修改网络输入图片的大小(object detection中输入都是RGB彩色图片,如果使用灰度还需要修改CVMat_to_Tensor函数中的相关信息)
4)注意输入输出的节点名称,如果使用object detection内模型使用代码中的三个名称即可detection_scores ;detection_classes;detection_boxes
文章来源: https://blog.csdn.net/qq_37541097/article/details/90257985