json和pickle
JSON(JavaScript Object Notation, JS 对象标记) 是一种轻量级的数据交换格式。JSON的数据格式其实就是python里面的字典格式,里面可以包含方括号括起来的数组,也就是python里面的列表。
在python中,有专门处理json格式的模块—— json 和 picle模块
Json 模块提供了四个方法: dumps、dump、loads、load
json vs pickle:
JSON:
优点:跨语言、体积小
缺点:只能支持int\str\list\tuple\dict
Pickle:
优点:专为python设计,支持python所有的数据类型
缺点:只能在python中使用,存储数据占空间大
一. dumps 和 dump:
def dumps(obj, skipkeys=False, ensure_ascii=True, check_circular=True,
        allow_nan=True, cls=None, indent=None, separators=None,
        default=None, sort_keys=False, **kw):
    # Serialize ``obj`` to a JSON formatted ``str``.
    # 序列号 “obj” 数据类型 转换为 JSON格式的字符串
def dump(obj, fp, skipkeys=False, ensure_ascii=True, check_circular=True,
allow_nan=True, cls=None, indent=None, separators=None,
default=None, sort_keys=False, **kw):
"""Serialize ``obj`` as a JSON formatted stream to ``fp`` (a
``.write()``-supporting file-like object).
我理解为两个动作,一个动作是将”obj“转换为JSON格式的字符串,还有一个动作是将字符串写入到文件中,也就是说文件描述符fp是必须要的参数 """示例代码:
>>> import json
>>> json.dumps([])    # dumps可以格式化所有的基本数据类型为字符串
'[]'
>>> json.dumps(1)    # 数字
'1'
>>> json.dumps('1')   # 字符串
'"1"'
>>> dict = {"name":"Tom", "age":23}
>>> json.dumps(dict)     # 字典
'{"name": "Tom", "age": 23}'
a = {"name":"Tom", "age":23}
with open("test.json", "w", encoding='utf-8') as f:
# indent 超级好用,格式化保存字典,默认为None,小于0为零个空格
f.write(json.dumps(a, indent=4))
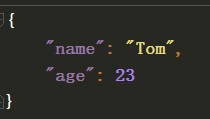
# json.dump(a,f,indent=4) # 和上面的效果一样保存的文件效果:

二. loads 和 load
loads和load 反序列化方法
查看源码:
def loads(s, encoding=None, cls=None, object_hook=None, parse_float=None, parse_int=None, parse_constant=None, object_pairs_hook=None, **kw):
    """Deserialize ``s`` (a ``str`` instance containing a JSON document) to a Python object.
       将包含str类型的JSON文档反序列化为一个python对象"""
def load(fp, cls=None, object_hook=None, parse_float=None, parse_int=None, parse_constant=None, object_pairs_hook=None, **kw):
"""Deserialize ``fp`` (a ``.read()``-supporting file-like object containing a JSON document) to a Python object.
将一个包含JSON格式数据的可读文件饭序列化为一个python对象"""实例:
>>> json.loads('{"name":"Tom", "age":23}')
{'age': 23, 'name': 'Tom'}
import json
with open("test.json", "r", encoding='utf-8') as f:
aa = json.loads(f.read())
f.seek(0)
bb = json.load(f) # 与 json.loads(f.read())
print(aa)
print(bb)
# 输出:
{'name': 'Tom', 'age': 23}
{'name': 'Tom', 'age': 23}三. json 和 pickle 模块
json模块和pickle模块都有 dumps、dump、loads、load四种方法,而且用法一样。
不用的是json模块序列化出来的是通用格式,其它编程语言都认识,就是普通的字符串,
而picle模块序列化出来的只有python可以认识,其他编程语言不认识的,表现为乱码
不过picle可以序列化函数,但是其他文件想用该函数,在该文件中需要有该文件的定义(定义和参数必须相同,内容可以不同)
注意,pickle,dump接收的文件需要是字节类型
import pickle
data = {'k1':123,'k2':'Hello'}

# pickle.dumps 将数据通过特殊的形式转换位只有python语言认识的字符串
p_str = pickle.dumps(data)
print(p_str)

#pickle.dump 将数据通过特殊的形式转换位只有python语言认识的字符串,并写入文件
with open('D:/result.pk','wb',encoding='utf8') as fp:
    pickle.dump(data,fp)
四. python对象(obj) 与json对象的对应关系
+-------------------+---------------+
    | Python            | JSON          |
    +===================+===============+
    | dict              | object        |
    +-------------------+---------------+
    | list, tuple       | array         |
    +-------------------+---------------+
    | str               | string        |
    +-------------------+---------------+
    | int, float        | number        |
    +-------------------+---------------+
    | True              | true          |
    +-------------------+---------------+
    | False             | false         |
    +-------------------+---------------+
    | None              | null          |
    +-------------------+---------------+
五. 总结
1. json序列化方法:
dumps:无文件操作 dump:序列化+写入文件
2. json反序列化方法:
loads:无文件操作 load: 读文件+反序列化
3. json模块序列化的数据 更通用
picle模块序列化的数据 仅python可用,但功能强大,可以序列号函数
4. json模块可以序列化和反序列化的 数据类型 见 python对象(obj) 与json对象的对应关系表
5. 格式化写入文件利用 indent = 4
configparser模块
ConfigParser模块在python3中修改为configparser.这个模块定义了一个ConfigParser类,该类的作用是使用配置文件生效,配置文件的格式和windows的INI文件的格式相同
该模块的作用 就是使用模块中的RawConfigParser()、ConfigParser()、 SafeConfigParser()这三个方法(三者择其一),创建一个对象使用对象的方法对指定的配置文件做增删改查 操作。
详见https://blog.csdn.net/miner_k/article/details/77857292
读取配置文件
-read(filename) 直接读取ini文件内容
-sections() 得到所有的section,并以列表的形式返回
-options(section) 得到该section的所有option(key)
-items(section) 得到该section的所有键值对
-get(section,option) 得到section中option的值(value),返回为string类型
-getint(section,option) 得到section中option的值,返回为int类型
写入配置文件
-add_section(section) 添加一个新的section
-set( section, option, value) 对section中的option进行设置,option和value必须都是字符串
需要调用write将内容写入配置文件。
我们来看一个非常基本的配置文件,如下所示:
[DEFAULT]
ServerAliveInterval = 45
Compression = yes
CompressionLevel = 9
ForwardX11 = yes

[bitbucket.org]
User = hg

[topsecret.server.com]
Port = 50022
ForwardX11 = no
本质上,该文件由部分组成,每个部分包含带值的键(键值对都必须是字符串)。 configparser类可以读写这些文件。我们首先以编程方式创建上述配置文件。
import configparser
config = configparser.ConfigParser()
config['DEFAULT'] = {'ServerAliveInterval': '45',
                     'Compression': 'yes',
                     'CompressionLevel': '9'}
config['bitbucket.org'] = {}
config['bitbucket.org']['User'] = 'hg'
config['topsecret.server.com'] = {}
topsecret = config['topsecret.server.com']
topsecret['Port'] = '50022'     # mutates the parser
topsecret['ForwardX11'] = 'no'  # same here
config['DEFAULT']['ForwardX11'] = 'yes'
with open('example.ini', 'w') as configfile:
config.write(configfile)如您所见,我们可以将配置解析器视为字典。稍后概述差异,但行为非常接近您对字典的期望。
还可以如此写带参数的配置文件
config = ConfigParser.RawConfigParser()
config.set('Section1', 'baz', 'fun')
config.set('Section1', 'bar', 'Python')
config.set('Section1', 'foo', '%(bar)s is %(baz)s!')
现在我们已经创建并保存了一个配置文件,下面是类似于字典的取值操作
>>> import configparser # 导入模块
>>> config = configparser.ConfigParser()  #实例化(生成对象)
>>> config.sections()  #调用sections方法
[]
>>> config.read('example.ini')  # 读配置文件(注意文件路径)
['example.ini']
>>> config.sections() #调用sections方法(默认不会读取default)
['bitbucket.org', 'topsecret.server.com']
>>> 'bitbucket.org' in config #判断元素是否在sections列表内
True
>>> 'bytebong.com' in config
False
>>> config['bitbucket.org']['User'] # 通过字典的形式取值
'hg'
>>> config['DEFAULT']['Compression']
'yes'
>>> topsecret = config['topsecret.server.com']
>>> topsecret['ForwardX11']
'no'
>>> topsecret['Port']
'50022'
>>> for key in config['bitbucket.org']: print(key) # for循环 bitbucket.org 字典的key
...
user
compressionlevel
serveraliveinterval
compression
forwardx11
>>> config['bitbucket.org']['ForwardX11']
'yes'
其他增删改查操作
[group1]
k1 = v1
k2:v2
k3 = 123

[group2]
k1 = v1
##########


import configparser

config = configparser.ConfigParser()
config.read('i.cfg')

# ########## 读 ##########
secs = config.sections()
print(secs)
options = config.options('group2') # 获取指定section的keys
print(options)

item_list = config.items('group2') # 获取指定 section 的 keys & values ,key value 以元组的形式
print(item_list)

val = config.get('group1','k1') # 获取指定的key 的value
print(val)

val = config.getint('group1','k3')
print(val)
# ########## 改写 ##########
sec = config.remove_section('group1') # 删除section 并返回状态(true, false)
print(sec)
config.write(open('i.cfg', "w")) # 对应的删除操作要写入文件才会生效

sec = config.has_section('wupeiqi')
print(sec)

sec = config.add_section('wupeiqi')
print(sec)
config.write(open('i.cfg', "w")) #


config.set('group2','k1','11111')
config.write(open('i.cfg', "w"))

config.remove_option('group2','age')
config.write(open('i.cfg', "w"))

#############
['group1', 'group2']
['k1']
[('k1', 'v1')]
v1
123
True
False
None
使用add_section时,如果有了要创建的section,则会报错
来源:oschina
链接:https://my.oschina.net/u/4301507/blog/3877832


