Kafka安装
首先我们需要在windows服务器上安装kafka以及zookeeper,有关zookeeper的介绍将会在后续进行讲解。
在网上可以找到相应的安装方式,我采用的是腾讯云服务器,借鉴的是https://www.cnblogs.com/lnice/p/9668750.html
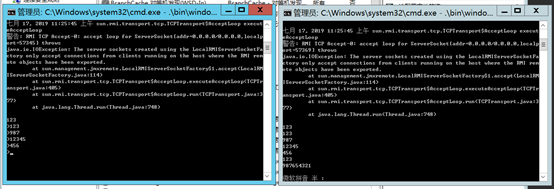
根据上面博客安装完成后,我们在kafka中新建了一个名叫test的Topic,并新建了一个生产者和一个消费者。

注:控制台生产者和控制台消费者的数据不同是因为我用.net开发了一个生产者所致,后面会讲
.net生产者
当前市面上比较好的.NET的kafka开源包有两个:kafka-net和rdkafka,我采用的是RdKafka;
新建项目后首先添加Nuget包,我的生产者源码如下所示
 1             string brokerList = "118.24.184.36:9092";
 2             string topicName = "test";
 3
 4
 5             using (Producer producer = new Producer("118.24.184.36:9092"))
 6             using (Topic topic = producer.Topic(topicName))
 7             {
 8                 Console.WriteLine("{" + producer.Name + "} producing on {" + topic.Name + "}. q to exit.");
 9
10                 string text;
11                 while ((text = Console.ReadLine()) != "q")
12                 {
13                     byte[] data = Encoding.UTF8.GetBytes(text);
14                     Task<DeliveryReport> deliveryReport = topic.Produce(data);
15                     var unused = deliveryReport.ContinueWith(task =>
16                     {
17                         Console.WriteLine("Partition: {" + task.Result.Partition + "}, Offset: {" + task.Result.Offset + "}");
18                     });
19                  }
20             }
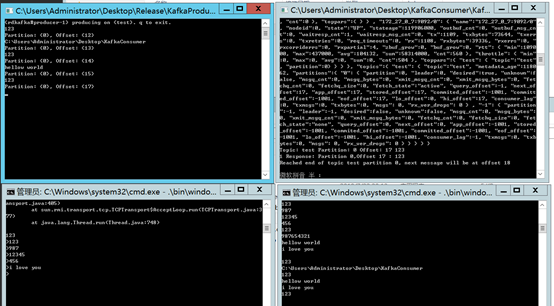
21如你所见,当我们在软件的输入框输入hellow world并回车后,控制台的消费者就收到了。

如上图,控制台消费者收到了.net生产者发布的消息。
.net 消费者
我采用的还是RfKafka这个插件,采用的代码如下
 1 static void Main(string[] args)
 2         {
 3             string brokerList = "118.24.184.36:9092";
 4             List<string> topic = new List<string>();
 5             topic.Add("test");
 6             Run(brokerList, topic);
 7         }
 8         public static void Run(string brokerList, List<string> topics)
 9         {
10             bool enableAutoCommit = false;
11
12             var config = new Config()
13             {
14                 GroupId = "advanced-csharp-consumer",
15                 EnableAutoCommit = enableAutoCommit,
16                 StatisticsInterval = TimeSpan.FromSeconds(60)
17             };
18
19             using (var consumer = new EventConsumer(config, brokerList))
20             {
21                 consumer.OnMessage += (obj, msg) =>
22                 {
23                     string text = Encoding.UTF8.GetString(msg.Payload, 0, msg.Payload.Length);
24                     Console.WriteLine($"Topic: {msg.Topic} Partition: {msg.Partition} Offset: {msg.Offset} {text}");
25                     Console.WriteLine("1 Response: Partition {0},Offset {1} : {2}",
26                     msg.Partition, msg.Offset, text);
27                     if (!enableAutoCommit && msg.Offset % 10 == 0)
28                     {
29                         Console.WriteLine("Committing offset");
30                         consumer.Commit(msg).Wait();
31                         Console.WriteLine("Committed offset");
32                     }
33                 };
34
35                 consumer.OnConsumerError += (obj, errorCode) =>
36                 {
37                     Console.WriteLine($"Consumer Error: {errorCode}");
38                 };
39
40                 consumer.OnEndReached += (obj, end) =>
41                 {
42                     Console.WriteLine($"Reached end of topic {end.Topic} partition {end.Partition}, next message will be at offset {end.Offset}");
43                 };
44
45                 consumer.OnError += (obj, error) =>
46                 {
47                     Console.WriteLine($"Error: {error.ErrorCode} {error.Reason}");
48                 };
49
50                 if (enableAutoCommit)
51                 {
52                     consumer.OnOffsetCommit += (obj, commit) =>
53                     {
54                         if (commit.Error != ErrorCode.NO_ERROR)
55                         {
56                             Console.WriteLine($"Failed to commit offsets: {commit.Error}");
57                         }
58                         Console.WriteLine($"Successfully committed offsets: [{string.Join(", ", commit.Offsets)}]");
59                     };
60                 }
61
62                 consumer.OnPartitionsAssigned += (obj, partitions) =>
63                 {
64                     Console.WriteLine($"Assigned partitions: [{string.Join(", ", partitions)}], member id: {consumer.MemberId}");
65                     consumer.Assign(partitions);
66                 };
67
68                 consumer.OnPartitionsRevoked += (obj, partitions) =>
69                 {
70                     Console.WriteLine($"Revoked partitions: [{string.Join(", ", partitions)}]");
71                     consumer.Unassign();
72                 };
73
74                 consumer.OnStatistics += (obj, json) =>
75                 {
76                     Console.WriteLine($"Statistics: {json}");
77                 };
78
79                 consumer.Subscribe(topics);
80                 consumer.Start();
81
82                 Console.WriteLine($"Assigned to: [{string.Join(", ", consumer.Assignment)}]");
83                 Console.WriteLine($"Subscribed to: [{string.Join(", ", consumer.Subscription)}]");
84
85                 Console.WriteLine($"Started consumer, press enter to stop consuming");
86                 Console.ReadLine();
87             }
88         }
运行后得到如下效果,以下四个框分别是.net生产者,控制台生产者,.net消费者,控制台消费者。

至此.net关于kafka的使用就讲完了。
这里有一篇文章分享给大家,把很多kafka的一些深入理解进行了很通俗的讲解:
http://melanx.com/2019/01/07/深入浅出理解基于-kafka-和-zookeeper-的分布式消息队列/#12kafkatopic
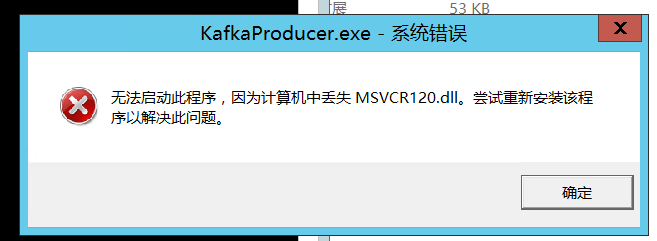
如果你在使用上诉代码时遇到了如下问题:

解决方案如下:将工程切到.net4.0,再将工程切到.net4.5或你需要的版本
不要问我为什么,我是这样解决的,否则就需要根据缺失的库进行相关插件安装。
来源:oschina
链接:https://my.oschina.net/u/4337264/blog/3454589