【推荐】2019 Java 开发者跳槽指南.pdf(吐血整理) >>> 
兼容老项目的痛谁懂,唯有亲身整合过的人才懂了。
拿到老项目代码,发现项目用的activity 是5.12 版本,赶紧找一上网上的资源对于这么早期的activity 版本的资料,一查,发现,喔阖,
结合5.22版本做理解吧,自己吃自己了。
一、首先重构项目基于maven 管理,包怎么导进来啊,啊啊? activity 5.12 的版本没有整合到maven,那么意味着,我们需要自己搭建一个maven 私服
把老项目的jar包发布到私服自己下载下来
1)windows 采用nexus 搭建maven 私服 版本 nexus-2.14.5-02-bundle.zip
不要问我为什么用这么老的,翻不了墙,下不到新了,在网上找到网盘的资源下载的,有条件的自己下载最新的玩,需要这个的加,可以私信找我要,
解压出来,有两个文件夹nexus-2.14.5-02,sonatype-work,找到E:\nexus-2.14.5-02-bundle\nexus-2.14.5-02\bin\jsw\windows-x86-64,
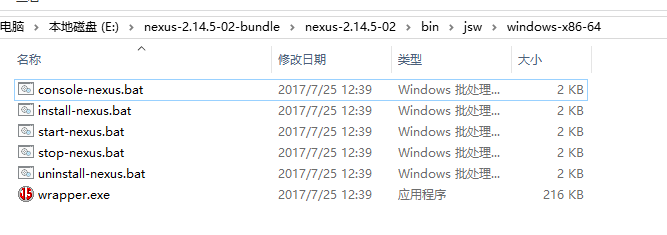
以管理员的方式运行console-nexus.bat,
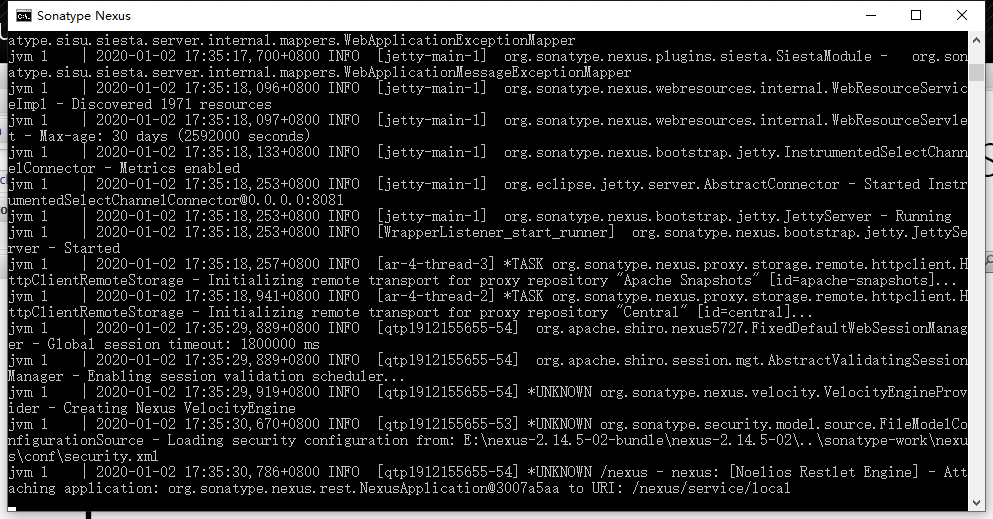
启动完成后,在浏览器打开 http://localhost:8081/nexus/#welcome,在E:\nexus-2.14.5-02-bundle\nexus-2.14.5-02\conf 下的
nexus.properties可以修改启动端口

看到页面,log in ,初始账户密码admin/admin123

登录成功,点击repositories,选中3rd party,
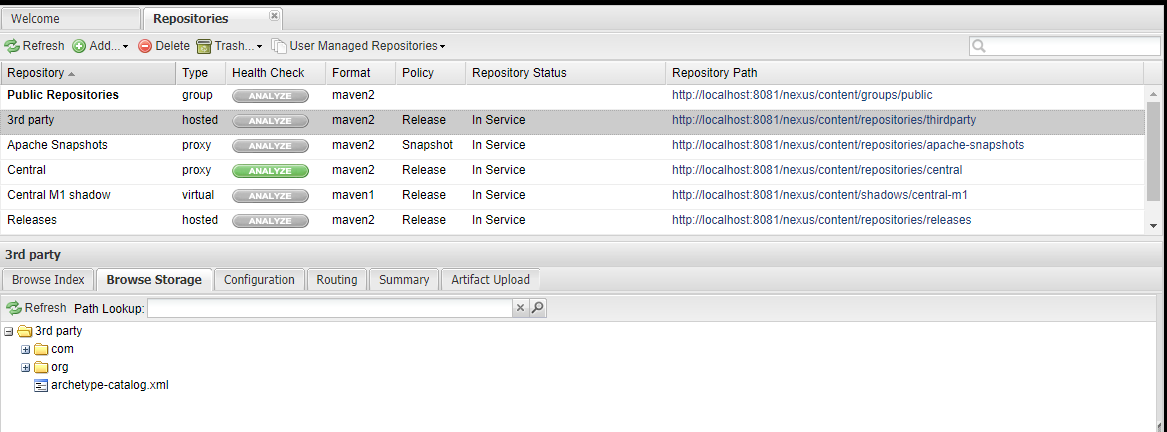
点击,artifact upload,
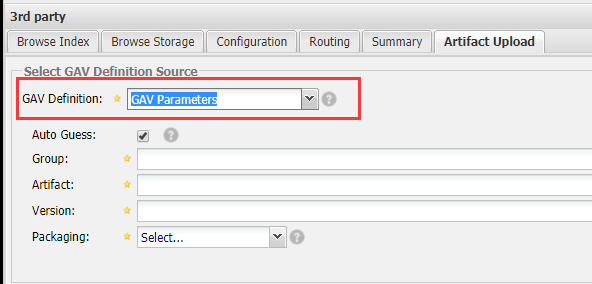
选择 GAV Parameters
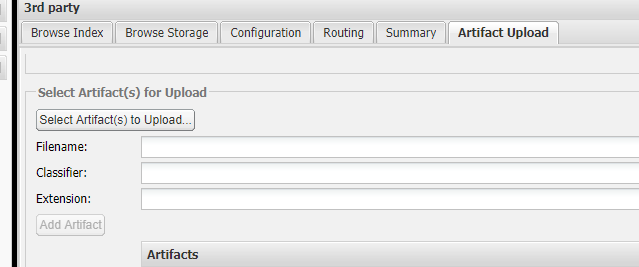
往下拉,选择包上传,会自动填充上面的参数,add artifact 一个一个upload,
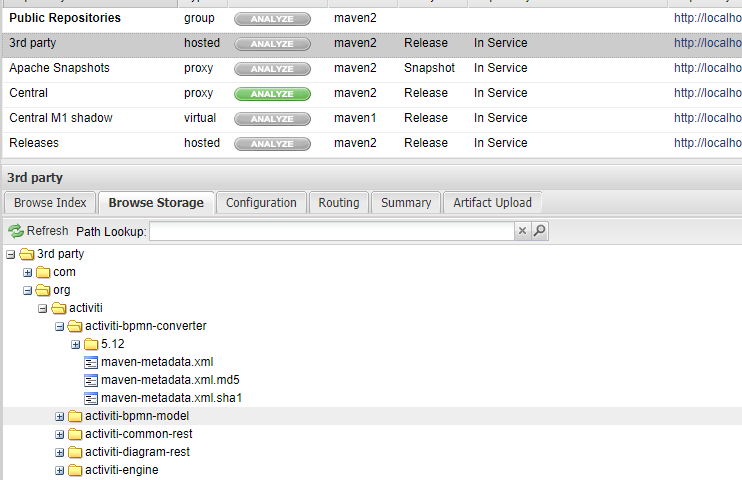
最终效果
在上面可以看到jar 已上传成功
2)在项目中引用私服,以及下载jar 包到spring boot 项目中
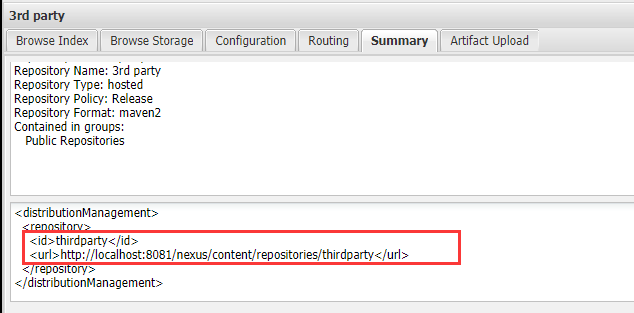
点击sunmary,把repository,添加到pom.xml 中
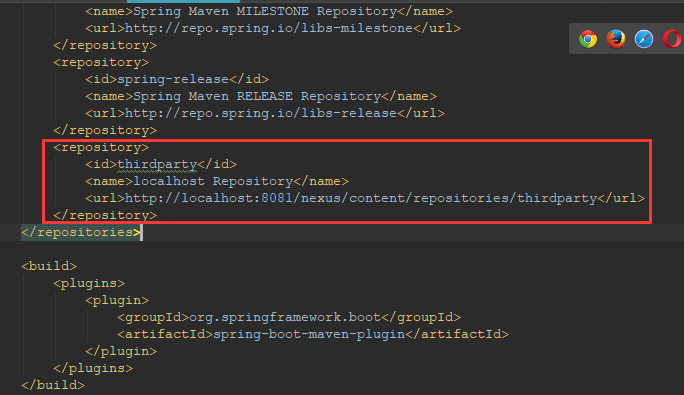
在项目中加上刚才上传的jar 包,
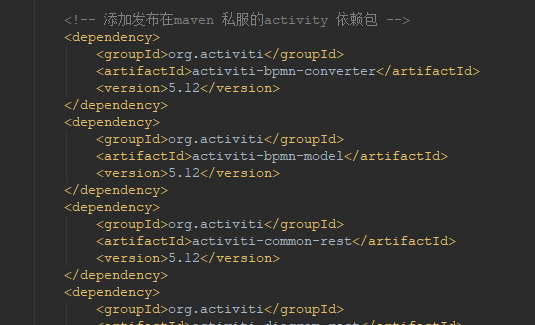
到这里为止,activiti 5.12的jar包已成功下载到我们的spring boot 项目中了
二、包下载下来了,搭建的项目用的mybatis-spring-boot-start 1.3.2,用到的mybatis 的版本是 3.4.6吧好像,支持@Mapper 注解,
然后发现,哎呀卧槽,版本不兼容,Error parsing Mapper XML. The XML location is 'org/activiti/db/mapping/entity/Execution.xml'.
面对疾风吧~!!!!!好了,问题还是要解决,至于是如何发现是版本不兼容的,中途找了大量的资料,切换了大量的版本做测试,
终于测试到activity 5.12 是兼容mybatis 3.1.1的,好了,@Mapper 是3.4.0以上的mybatis 才有的特性,那么就需要我们自己配置spring +mybatis 的xml了,
用spring boot ,回到xml的时代,难受。
1)在项目中加上spring-jdbc 和spring-tx 配置需要用到
<dependency>
    <groupId>org.springframework</groupId>
    <artifactId>spring-jdbc</artifactId>
</dependency>
<dependency>
    <groupId>org.springframework</groupId>
    <artifactId>spring-tx</artifactId>
</dependency>
2)加入mybatis 和mybatis-spring
<!-- 以下部分用于集成mybatis-->
<!-- https://mvnrepository.com/artifact/org.mybatis/mybatis -->
<dependency>
    <groupId>org.mybatis</groupId>
    <artifactId>mybatis</artifactId>
    <version>3.1.1</version>
</dependency>
<!-- mybatis/spring包 -->
<dependency>
    <groupId>org.mybatis</groupId>
    <artifactId>mybatis-spring</artifactId>
    <version>1.2.2</version>
</dependency>
3)加入数据库驱动
<dependency>
    <groupId>com.oracle</groupId>
    <artifactId>ojdbc7</artifactId>
    <version>12.1.0</version>
</dependency>
4)采用dbcp 连接
<!-- 导入dbcp的jar包,用来在applicationContext.xml中配置数据库 -->
<dependency>
    <groupId>commons-dbcp</groupId>
    <artifactId>commons-dbcp</artifactId>
    <version>1.2.2</version>
</dependency>
需要用的包就差不多了,spring boot 本身用的包肯定要引用的,还要引入
<dependency>
    <groupId>org.springframework.boot</groupId>
    <artifactId>spring-boot-starter-web</artifactId>
</dependency>
测试使用
5)开始配置,都放在resource 下吧,方便查看测试
jdbc.properties
#jdbc驱动类
driver=oracle.jdbc.driver.OracleDriver
#服务器url
url=jdbc:oracle:thin:@localhost:1521:orcl
username=XXX
password=XXX123


initialSize=3
maxActive=20
maxIdle=20
minIdle=1
maxWait=60000
spring-application.xml 配置
<?xml version="1.0" encoding="UTF-8" ?>
<beans xmlns="http://www.springframework.org/schema/beans"
       xmlns:xsi="http://www.w3.org/2001/XMLSchema-instance" xmlns:p="http://www.springframework.org/schema/p"
       xmlns:tx="http://www.springframework.org/schema/tx"
       xmlns:aop="http://www.springframework.org/schema/aop"
       xmlns:context="http://www.springframework.org/schema/context"
       xsi:schemaLocation="http://www.springframework.org/schema/beans
    http://www.springframework.org/schema/beans/spring-beans-4.0.xsd
    http://www.springframework.org/schema/aop http://www.springframework.org/schema/aop/spring-aop-4.0.xsd
    http://www.springframework.org/schema/context http://www.springframework.org/schema/context/spring-context-4.0.xsd
    http://www.springframework.org/schema/tx
    http://www.springframework.org/schema/tx/spring-tx-4.0.xsd">


    <!-- 自动扫描 -->
    <context:component-scan base-package="com.xxx.xxx.activity" />
    <!-- 引入配置文件 -->
    <bean id="propertyConfigurer"
          class="org.springframework.beans.factory.config.PropertyPlaceholderConfigurer">
        <property name="location"
                  value="classpath:jdbc.properties"/>
    </bean>
    <!-- ignore-unresolvable为true时,配置文件${}找不到对应占位符的值 不会报错,会直接赋值'${}' -->
    <context:property-placeholder ignore-unresolvable="true" />


    <bean id="dataSource"
          class="org.apache.commons.dbcp.BasicDataSource" destroy-method="close">
        <property name="driverClassName" value="${driver}"/>
        <property name="url" value="${url}"/>
        <property name="username" value="${username}"/>
        <property name="password" value="${password}"/>
        <!-- 初始化连接大小 -->
        <property name="initialSize" value="${initialSize}"></property>
        <!-- 连接池最大数量 -->
        <property name="maxActive" value="${maxActive}"></property>
        <!-- 连接池最大空闲 -->
        <property name="maxIdle" value="${maxIdle}"></property>
        <!-- 连接池最小空闲 -->
        <property name="minIdle" value="${minIdle}"></property>
        <!-- 获取连接最大等待时间 -->
        <property name="maxWait" value="${maxWait}"></property>
    </bean>

    <!-- spring和MyBatis完美整合,不需要mybatis的配置映射文件 -->
    <bean id="sqlSessionFactory"
          class="org.mybatis.spring.SqlSessionFactoryBean">
        <property name="dataSource" ref="dataSource"/>
        <!-- 自动扫描mapping.xml文件 -->
        <property name="mapperLocations" value="classpath:mapper/*.xml"></property>
        <property name="typeAliasesPackage" value="com.xxx.xxx.common.model"></property>
        <!-- 配置mybatis配置文件的位置 -->
        <!--<property name="configLocation" value="classpath:mybatis-config.xml"/>-->
    </bean>

    <!-- DAO接口所在包名,Spring会自动查找其下的类 -->
    <bean class="org.mybatis.spring.mapper.MapperScannerConfigurer">
        <property name="basePackage" value="com.xxx.xxx.activity.mapper" />
        <property name="sqlSessionFactoryBeanName"
                  value="sqlSessionFactory"></property>
    </bean>

    <bean id="sqlSessionTemplate" class="org.mybatis.spring.SqlSessionTemplate">
        <constructor-arg ref="sqlSessionFactory"/>
    </bean>

    <bean id="transactionManager"
          class="org.springframework.jdbc.datasource.DataSourceTransactionManager"
          p:dataSource-ref="dataSource"/>
    <aop:aspectj-autoproxy expose-proxy="true" proxy-target-class="true" />

    <tx:advice id="txAdvice" transaction-manager="transactionManager" >
        <tx:attributes>
            <tx:method name="start*" propagation="REQUIRED"/>
            <tx:method name="submit*" propagation="REQUIRED"/>
            <tx:method name="clear*" propagation="REQUIRED"/>
            <tx:method name="create*" propagation="REQUIRED"/>
            <tx:method name="activate*" propagation="REQUIRED"/>
            <tx:method name="save*" propagation="REQUIRED"/>
            <tx:method name="insert*" propagation="REQUIRED"/>
            <tx:method name="add*" propagation="REQUIRED"/>
            <tx:method name="update*" propagation="REQUIRED"/>
            <tx:method name="delete*" propagation="REQUIRED"/>
            <tx:method name="remove*" propagation="REQUIRED"/>
            <tx:method name="execute*" propagation="REQUIRED"/>
            <tx:method name="del*" propagation="REQUIRED"/>
            <tx:method name="*" read-only="true"/>
        </tx:attributes>
    </tx:advice>
    <aop:config proxy-target-class="true" expose-proxy="true">
        <aop:pointcut id="pt" expression="execution(public * com.xxx.xxx.*.*(..))" />
        <aop:advisor order="200" pointcut-ref="pt" advice-ref="txAdvice"/>
    </aop:config>

</beans>
配置到这里,测试mybatis 是否是正常使用,
新建一个controller ,写个test方法,
@RestController
@RequestMapping("/process")
public class ProcessController {

    @Autowired
    ProcessService processService;

    @RequestMapping("/test")
    public Result test(){
        Result result = new Result();
        String test = processService.getUsername();
        result.setData(test);
        return result;
    }

}
写一个service
@Service
public class ProcessService {

    @Autowired
    ProcessMapper processMapper;

    public String getUsername(){
        return processMapper.getUserName();
    }

}
写一个mapper
public interface ProcessMapper {

    public String getUserName();
}
新建一个xml
<?xml version="1.0" encoding="UTF-8" ?>
<!DOCTYPE mapper PUBLIC "-//mybatis.org//DTD Mapper 3.0//EN" "http://mybatis.org/dtd/mybatis-3-mapper.dtd" >
<!--namespace就是与此文件对应的Dao接口的全路径 -->
<mapper namespace="com.pactera.abs.activity.mapper.ProcessMapper">
    <!--自己配置的查询表所有数据的sql -->
    <!--如下type的PrintField就是mybatis-config.xml中配置的PrintField -->
    <!-- <select id="selectAllUser" resultType="PrintField"> -->
    <!-- resultMap是上面resultMap的id -->
    <select id="getUserName" resultType="java.lang.String">
        select usernamezw FROM user where username='1'
    </select>

</mapper>
在application,加载刚才的配置
@SpringBootApplication
@EnableDiscoveryClient
@MapperScan("com.xxx.xxx.activity.mapper")
@ImportResource("classpath:spring-application.xml")
public class ActivityApplication {

    public static void main(String[] args) {
        SpringApplication.run(ActivityApplication.class,args);
    }


}
访问这个方法,成功返还字符串
OK,mybatis 已整合成功
三、好了,springboot 整合mybatis 3.1.1已经成功了,不要忘记我们的初衷,是在spring boot 中使用activity 5.12
1)新建activiti.cfg.xml
<?xml version="1.0" encoding="UTF-8"?>
<beans xmlns="http://www.springframework.org/schema/beans"
       xmlns:xsi="http://www.w3.org/2001/XMLSchema-instance"
       xsi:schemaLocation="http://www.springframework.org/schema/beans http://www.springframework.org/schema/beans/spring-beans.xsd">

    <bean id="processEngineConfiguration" class="org.activiti.engine.impl.cfg.StandaloneProcessEngineConfiguration">
        <property name="jdbcUrl" value="jdbc:oracle:thin:@localhost:1521:orcl" />
        <property name="jdbcDriver" value="oracle.jdbc.driver.OracleDriver"/>
        <property name="jdbcUsername" value="XXX"/>
        <property name="jdbcPassword" value="XXX123"/>
        <property name="databaseSchemaUpdate" value="true"/>
        <property name="transactionsExternallyManaged" value="true"/>
    </bean>

</beans>
2)编写一个初始化activiti 5.12 的类,这里不直接在spring 初始化bean 是因为,需要读取activiti.cfg.xml 后build一个实例出来,高版本集成
spring 后可以在spring 配置时初始化bean,像5.12这种老版本,我只能想到时这样使用了
@Component
public class ProcessInit {

    @Autowired
    ProcessEngine processEngine;

    @Bean
    ProcessEngine processEngine(){
        return ProcessEngines.getDefaultProcessEngine();
    }

    @Bean
    RepositoryService repositoryService(){
        return processEngine.getRepositoryService();
    }
}
3)在controller 注解
@Autowired
protected RepositoryService repositoryService;
编写一个方法调用
@RequestMapping("/list")
public String getProcessListPage(){
    ProcessDefinitionQuery query = repositoryService.createProcessDefinitionQuery();
    // 分页查询
    query.listPage(0, 10);
    List<ProcessDefinition> list = query.list();
    String str = "";
    for (ProcessDefinition processDefinition : list) {
        str += processDefinition.getName()+",";
        System.out.println(processDefinition.getName());
    }
    return str;
}
可以看到返回的字符串,OK,成功,大功告成,
转载请注明出处
来源:oschina
链接:https://my.oschina.net/u/2285090/blog/3152773