修改动态SQL
主要用来解决修改时造成的数据丢失问题
解决这个问题 就需要使用动态的额SQL语句
这个SQL的语句的意思是:你需要手动的去加上判断!
 <update id="update">
        UPDATE t_student
        <set>
          <if test="name!=null and name!=''">
              name=#{name},
          </if>
          <if test="age!=null">
              age=#{age},
          </if>
          <if test="email!=null and email!=''">
              email=#{email},
          </if>
          <if test="sex!=null">
              sex=#{sex},
          </if>
        </set>
        WHERE id=#{id}
    </update>
关联关系
所谓关联关系,就是做多表CRUD 重点是查询
多对一
保存
一般都是先保存一方 这样性能更好
 @Test
    public void testSave() throws Exception{
        SqlSession sqlSession = MybatisUtils.openSession();
        EmployeeMapper employeeMapper = sqlSession.getMapper(EmployeeMapper.class);
        DeptMapper deptMapper = sqlSession.getMapper(DeptMapper.class);
        Dept dept = new Dept();
        dept.setName("好骚部");
        deptMapper.save(dept);
        Employee e1 = new Employee();
        e1.setName("金莲");
        e1.setAge(22);
        e1.setDept(dept);
        Employee e2 = new Employee();
        e2.setName("孙二娘");
        e2.setAge(23);
        e2.setDept(dept);
        employeeMapper.save(e1);
        employeeMapper.save(e2);
        sqlSession.commit();

    }
查询(重点)
1、关联对象查询
需要自定义映射
 <!--自定义映射规则-->
    <resultMap id="employeeResultMap" type="employee">
        <!--这是多方-->
        <id column="id" property="id"/>
        <result column="name" property="name"/>
        <result column="age" property="age"/>
        <!--
            映射关联对象 association
            property="dept"  映射Employee中的dept属性
            javaType="dept dept属性对应的类型

            注意:当你使用了association映射之后,默认映射规则失效

            这是一方,
        -->
        <association property="dept" javaType="dept">
            <id column="did" property="id"/>
            <result column="dname" property="name"/>
        </association>
    </resultMap>
**查询语句**
 <!--关联对象的查询语句-->
    <select id="selectAll" resultMap="employeeResultMap">
        select e.id,e.name,e.age,d.id did,d.name dname
        from t_employee e join t_dept d
        on e.id = d.id
    </select>
2、子查询(一般不用,为啥呢!性能太低,真的太低,所以我就不在这里介绍了!)
一对多
保存
   @Test
    public void testSave() throws Exception{
        SqlSession sqlSession = MybatisUtils.openSession();
        DeptMapper deptMapper = sqlSession.getMapper(DeptMapper.class);
        EmployeeMapper employeeMapper = sqlSession.getMapper(EmployeeMapper.class);
        Dept dept = new Dept();
        dept.setName("测试部门");
        Employee e1 = new Employee();
        e1.setName("乔峰");
        e1.setAge(22);

        Employee e2 = new Employee();
        e2.setName("楚楚");
        e2.setAge(33);

        dept.getEmployees().add(e1);
        dept.getEmployees().add(e2);
        deptMapper.save(dept);
        for (Employee employee : dept.getEmployees()) {
            employeeMapper.save(employee, dept.getId());
        }
        sqlSession.commit();
    }
查询
  <resultMap id="deptResultMap" type="cn.com.aijiejieya.on2many.domain.Dept">
        <!--一方-->
        <id column="id" property="id"/>
        <result column="name" property="name"/>
        <!--
            映射集合要使用collection
            注意:使用了collection映射之后,默认映射规则失效

            多方
        -->
        <collection property="employees" ofType="cn.com.aijiejieya.on2many.domain.Employee">
            <id column="eid" property="id"/>
            <result column="ename" property="name"/>
            <result column="eage" property="age"/>
        </collection>
    </resultMap>


    <!--ctrl+shift+x   大小写快速切换-->
    <select id="selectAll" resultMap="deptResultMap">
        SELECT d.id,d.name,e.id eid,e.name ename,e.age eage
        FROM t_dept d JOIN t_employee e
        ON d.id = e.id
        ORDER BY d.id
    </select>
ssm集成
首先建一个动态的web工程
我们先来说说集成的步骤:
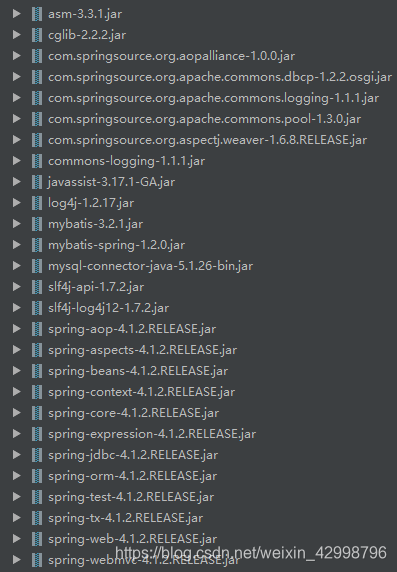
1、导包
2、配置spring的核心配置文件
2.1 配置jdbc.properties
2.2 配置dataSource
2.3 配置SqlSessionFactory
2.4 配置mapper
2.5 配置service
2.6 配置事务
3、配置SpringMVC核心文件
4、配置web.xml
导包

配置spring核心文件
<beans xmlns="http://www.springframework.org/schema/beans"
       xmlns:context="http://www.springframework.org/schema/context"
       xmlns:tx="http://www.springframework.org/schema/tx"
       xmlns:xsi="http://www.w3.org/2001/XMLSchema-instance"
       xsi:schemaLocation="http://www.springframework.org/schema/beans http://www.springframework.org/schema/beans/spring-beans.xsd
        http://www.springframework.org/schema/context http://www.springframework.org/schema/context/spring-context.xsd
        http://www.springframework.org/schema/tx http://www.springframework.org/schema/tx/spring-tx.xsd
    ">

    <!--加载jdbc.properties文件-->
    <context:property-placeholder location="classpath:jdbc.properties"/>

   <!-- 扫描service层-->
    <context:component-scan base-package="cn.com.aijiejieya.service"/>

    <!--配置连接池对象-->
    <bean id="dataSource" class="org.apache.commons.dbcp.BasicDataSource" destroy-method="close">
        <property name="username" value="${jdbc.username}"/>
        <property name="password" value="${jdbc.password}"/>
        <property name="url" value="${jdbc.url}"/>
        <property name="driverClassName" value="${jdbc.driverClassName}"/>
    </bean>


    <!--创建SessionFactory-->
    <bean id="sqlSessionFactory" class="org.mybatis.spring.SqlSessionFactoryBean">
        <property name="dataSource" ref="dataSource"/>
       <!-- 去加载所有的mapper.xml文件-->
        <property name="mapperLocations" value="classpath:mybatis/*.xml"/>
        <!--定义公共的基础包
            用来定义别名
        -->
        <property name="typeAliasesPackage">
            <value>
                cn.com.aijiejieya.domain
            </value>
        </property>
    </bean>

    <!--mapper扫描器的配置 扫描接口-->
    <bean class="org.mybatis.spring.mapper.MapperScannerConfigurer">
        <!--只要扫描到该包下所有的接口,我都使用代理模式进行实现

        -->
        <property name="basePackage" value="cn.com.aijiejieya.mapper"/>
    </bean>

    <!--配置事务管理器-->
    <bean id="transactionManager" class="org.springframework.jdbc.datasource.DataSourceTransactionManager">
        <property name="dataSource" ref="dataSource"/>
    </bean>

   <!-- 开启事务注解的支持-->
    <tx:annotation-driven/>

</beans>
配置SpringMVC文件
<?xml version="1.0" encoding="UTF-8"?>
<beans xmlns="http://www.springframework.org/schema/beans"
       xmlns:context="http://www.springframework.org/schema/context"
       xmlns:mvc="http://www.springframework.org/schema/mvc"
       xmlns:xsi="http://www.w3.org/2001/XMLSchema-instance"
       xsi:schemaLocation="http://www.springframework.org/schema/beans http://www.springframework.org/schema/beans/spring-beans.xsd
        http://www.springframework.org/schema/context http://www.springframework.org/schema/context/spring-context.xsd
        http://www.springframework.org/schema/mvc http://www.springframework.org/schema/mvc/spring-mvc.xsd
    ">


   <!-- 扫描service层-->
    <context:component-scan base-package="cn.com.aijiejieya.web.controller"/>

    <mvc:annotation-driven/>

    <mvc:default-servlet-handler/>

    <!--视图解析器-->
    <bean class="org.springframework.web.servlet.view.InternalResourceViewResolver">
        <property name="suffix" value=".jsp"/>
        <property name="prefix" value="/WEB-INF/views/"/>
    </bean>


</beans>
配置web.xml
<?xml version="1.0" encoding="UTF-8"?>
<web-app xmlns="http://java.sun.com/xml/ns/javaee"
           xmlns:xsi="http://www.w3.org/2001/XMLSchema-instance"
           xsi:schemaLocation="http://java.sun.com/xml/ns/javaee
		  http://java.sun.com/xml/ns/javaee/web-app_3_1.xsd"
           version="3.1">

    <!--在指定的位置加载applicationContext.xml文件-->
    <context-param>
        <param-name>contextConfigLocation</param-name>
        <param-value>classpath:applicationContext.xml</param-value>
    </context-param>

    <!--监听 让spring核心配置文件在Tomcat启动而启动-->
    <listener>
        <listener-class>org.springframework.web.context.ContextLoaderListener</listener-class>
    </listener>

    <servlet>
        <!--启动springMvc容器-->
        <servlet-name>springMvc</servlet-name>
        <servlet-class>org.springframework.web.servlet.DispatcherServlet</servlet-class>
        <init-param>
            <param-name>contextConfigLocation</param-name>
            <param-value>classpath:applicationContext-mvc.xml</param-value>
        </init-param>
        <load-on-startup>1</load-on-startup>
    </servlet>
    <servlet-mapping>
        <servlet-name>springMvc</servlet-name>
        <url-pattern>/</url-pattern>
    </servlet-mapping>

    <filter>
        <!--解决post提交乱码问题-->
        <filter-name>CharacterEncodingFilter</filter-name>
        <filter-class>org.springframework.web.filter.CharacterEncodingFilter</filter-class>
        <init-param>
            <param-name>encoding</param-name>
            <param-value>UTF-8</param-value>
        </init-param>
        <init-param>
            <param-name>forceEncoding</param-name>
            <param-value>true</param-value>
        </init-param>
    </filter>
    <filter-mapping>
        <filter-name>CharacterEncodingFilter</filter-name>
        <url-pattern>/*</url-pattern>
    </filter-mapping>

</web-app>
到这里,ssm就是集成完成,然后就可以测试了!
来源:CSDN
作者:不是程序员的程序员
链接:https://blog.csdn.net/weixin_42998796/article/details/103738480