前言
去年写过一篇热修复的文章,那时候刚开始接触,照猫画虎画的还算比较成功。但是那种修复需要重新启动APP,也就是在JAVA层实现的热修复。我们知道目前Android主流的修复还有在Native层实现修复的,就是在Native层替换方法,不用重新启动APP。今天写了个Demo,下面主要分享一下它的主要原理。
1、热修复
目前,热修复的原理主要有两种技术,一是不需要启动APP就能实现修复,在Native层实现的。一种时需要启动APP,在JAVA层实现的。
- Native层:andfix sophix (即时修复 不重启APP)
- JAVA层:Tinker robust等(需要启动APP)
出现异常的根源在于方法
我们的程序出现异常(BUG)的根源是什么?为什么会出现异常呢,要出现异常肯定是我们程序中的某个方法抛出了异常,所以异常的根源是方法。那么我们修复包的目的就是去替换异常的方法所在的包名类名下的方法。我们需要准确的找到这个方法,那么我们怎么去找这个方法呢?
如何替换已经运行的APK ?
是直接替换运行时的APK加载的有bug的类吗?显然不行,因为Java的懒加载机制,在不启动APP时新类不能替换老的类。class类只被ClassLoader加载一次,所以已经有bug的类,再不启动APP的情况下我们不能直接再虚拟机中替换。那我们要怎么去做呢?我们根据JAVA的内存运行机制来寻找有没有突破口。
2、class加载(内存运行机制)
Java虚拟机(JVM)在java程序运行的过程中,会将它所管理的内存划分为若干个不同的数据区域,这些区域有的随着JVM的启动而创建,有的随着用户线程的启动和结束而建立和销毁。一个基本的JVM运行时内存模型如下所示:
我们分别看下它的运行时数据区
- 方法区:class会被加载到方法区,当JVM使用类加载器定位class文件,并将其载入到内存中,会提取class文件的类型信息,并将这些信息存储到方法区中,同时,放入方法区中的还有该类型中的类静态变量。【方法表,静态变量,】
- 堆区: Java程序在运行时创建的所有类型对象和数组都存储在堆中/JVM会根据new指令在堆中开辟一个确定类型的对象内存空间。但是堆中开辟对象的空间并没有任何人工指令可以回收,而是通过JVM的垃圾回收器负责回收。
- 栈区:方法的执行是在虚拟机,Java方法执行存储在栈区,每个Java方法对应一个栈帧。每启动一个线程,JVM都会为它分配一个Java栈,用于存放方法中的局部变量,操作数以及异常数据等。当线程调用某个方法时,JVM会根据方法区中该方法的字节码组建一个栈帧,并将该栈帧压入Java栈中,方法执行完毕时,JVM会弹出该方法栈并释放掉。
- 本地方法栈(Native 堆): 本地方法栈的功能和特点类似于虚拟机栈,不同的是,本地方法栈服务的对象是JVM执行的native方法,而虚拟机栈服务的是JVM执行的java方法。
- 程序计数器(PC寄存器):程序计数器是一个记录着当前线程所执行的字节码的行号指示器。 JAVA代码编译后的字节码在未经过JIT(实时编译器)编译前,其执行方式是通过“字节码解释器”进行解释执行。简单的工作原理为解释器读取装载入内存的字节码,按照顺序读取字节码指令。读取一个指令后,将该指令“翻译”成固定的操作,并根据这些操作进行分支、循环、跳转等流程。
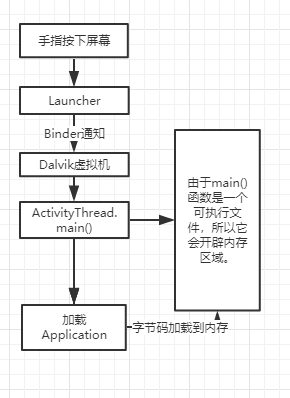
当手指触摸APP ICON启动APP的流程如下:
类加载之前有个,int型符号变量指向class内存区域,即将要加载class类信息。(字节码文件内有方法、成员变量)
加载过程由文件变成内存的过程
- 加载ActivityThread 生成方法表
- 加载main()函数
- 虚拟机将main()函数压栈,生成一个栈帧,压入栈区。
- 加载Application.class,生成它的方法表。
- 创建Application的对象,存放在堆区。每个对象都指向一个符号变量(类)
- Object.getClass()得到变量对应的类,最终是通过native方法,最终执行调用
klass变量,他存放在堆区,指向符号变量,符号变量指向对象所在的内存区域(方法表,成员表)。 - 执行
Application的onCreate()方法,他是一个对象方法,执行一个对象方法他会从对象出发,去发送一个事件。根据符号变量找打方法表,找到onCreate()方法,并生成一个onCreate()栈帧,压入栈区。
类什么时候被加载到内存?
1、Application app
2、=  new Application();
执行到第一行在方法区开辟一个符号变量,这个符号变量为int类型。并不会将Application类加载到内存。当执行第二行时才会被加载到内存。类的初始化只有在主动引用这时候才会被加载到内存,如new创建 | 反射 Class.fromName()|JNI.findClass()、序列化
如何实现替换有bug的方法?
- 根据以上原理我们明白,Java层不能实现方法的替换,那么我们另辟蹊径,通过Native层操控虚拟机内存,这就是我们前面所说的突破口。
- 由于java对象可以创建多个,我们不能替换某一个对象而不替换其他对象的方法,所以我们需要找打一个方法替换所有对象的方法。那就是需要在方法表中替换有bug 的方法。
- 方法在虚拟机中叫
ArtMethod结构体,它是Native层的。方法表其实就是一个List集合。方法最终是转换为ArtMethod结构体被执行。一个方法被压栈多次这个方法就是递归调用。 - FindClass(实现父委托机制,bootstrapClassLoad) 调用 LookUpClass —>DefineClass(定义一个Class类型,定义klass,所有类型全部置空,之后再加载类)—>LinkClass(加载类信息。从/data/app/包名,Apk中的dex文件中来)—>LinkSuperClass(父类先被加载到内存)—>LinkMethods(父类加载方法){LinkInterfaceMethods 拿到方法数,形成方法表,实例一个ArrayList<
ArtMethod>,每个方法实例一个ArtMethod结构体}
类是抽象的,必须要有一个内存载体{klass,每个类都有一个,并且是唯一的.}
3、手写实现Andfix
写一个bug类
首先我们要自己写一个bug类,BugClass的test()方法抛出一个异常
/**
 * bug测试类
 */
public class BugClass {
    public int test(){
        //测试bug
        throw new RuntimeException("这是一个异常!");
    }
}
在Activity中调用异常的方法
比如说点击某个按钮,这里就不写了。
我们要实现修复
我们实现修复,也就是之前说的替换虚拟机中内存中的方法表里的方法,那么怎么替换呢?一个APK中有成千上万个方法,就某一个有异常,我们怎么区分呢?那就是用注解来区分。
定义注解
package com.example.bthvi.mycloassloaderapplication;

import java.lang.annotation.ElementType;
import java.lang.annotation.Retention;
import java.lang.annotation.RetentionPolicy;
import java.lang.annotation.Target;

@Target(ElementType.METHOD)
@Retention(RetentionPolicy.RUNTIME)
public @interface Replace {
    //修复哪一个class
    String clazz();
    //修复哪一个方法
    String method();
}
修复对应方法所,并给他加上注解
import com.example.bthvi.mycloassloaderapplication.Replace;

/**
 * bug测试类
 */
public class BugClass {

    @Replace(clazz = "com.example.bthvi.mycloassloaderapplication.xxx.BugClass",method = "test")
    public int test(){
        return 1;
    }
}
生成dex文件查分包
怎么生成dex文件,前面一篇文章以及说过了:Android学习——手把手教你实现Android热修复,这里就不多做说明了。
实现修复工具类
- 首先我们要拿到对应的已经修复的dex文件,项目中我们肯定是从网络和获取,这里我们之还是定义在本地文件夹下。
- 其次我们加载这个Dex文件,拿到它的所有的类,遍历类中的方法,根据注解得到哪些方法时候需要修复的。
- 再根据注解中的类名方法名通过反射得到已经加载的有bug的方法。
- 调用Native方法替换有bug的方法。
package com.example.bthvi.mycloassloaderapplication;
import android.content.Context;
import android.os.Environment;

import java.io.File;
import java.io.IOException;
import java.lang.reflect.Method;
import java.util.Enumeration;

import dalvik.system.DexFile;
/**
 *@author bthvi
 *@time 2019/7/20
 *@desc 不用启动APP实现热修复
 */
public class FixDexManager {
    private final static String TAG = "FixDexUtil";
    private static final String DEX_SUFFIX = ".dex";
    private static final String APK_SUFFIX = ".apk";
    private static final String JAR_SUFFIX = ".jar";
    private static final String ZIP_SUFFIX = ".zip";
    public static final String DEX_DIR = "odex";
    private static final String OPTIMIZE_DEX_DIR = "optimize_dex";
    private Context context;

    public FixDexManager(Context context) {
        this.context = context;
    }

    public void isGoingToFix() {
        File externalStorageDirectory = Environment.getExternalStorageDirectory();

        // 遍历所有的修复dex , 因为可能是多个dex修复包
        File fileDir = externalStorageDirectory != null ?
                new File(externalStorageDirectory,"007"):
                new File(context.getFilesDir(), DEX_DIR);// data/data/包名/files/odex(这个可以任意位置)

        File[] listFiles = fileDir.listFiles();
        if (listFiles != null){
            System.out.println("TAG==目录下文件数量="+listFiles.length);
            for (File file : listFiles) {
                System.out.println("TAG==文件名称="+file.getName());
                if (file.getName().startsWith("fix") &&
                        (file.getName().endsWith(DEX_SUFFIX))) {
                    loadDex(file);// 开始修复
                    //有目标dex文件, 需要修复
                }
            }
        }
    }
    /**
     * 加载Dex文件
     * @param file
     */
    public void loadDex(File file) {
        try {
            DexFile dexFile = DexFile.loadDex(file.getAbsolutePath(),
                    new File(context.getCacheDir(), "opt").getAbsolutePath(), Context.MODE_PRIVATE);
            //当前的dex里面的class 类名集合
            Enumeration<String> entry=dexFile.entries();
            while (entry.hasMoreElements()) {
                //拿到Class类名
                String clazzName= entry.nextElement();
                //通过加载得到类  这里不能通过反射,因为当前的dex没有加载到虚拟机内存中
                Class realClazz= dexFile.loadClass(clazzName, context.getClassLoader());
                if (realClazz != null) {
                    fixClazz(realClazz);
                }
            }
        } catch (IOException e) {
            e.printStackTrace();
        }

    }

    /**
     * 修复有bug的方法
     * @param realClazz
     */
    private void fixClazz(Class realClazz) {
        //得到类中所有方法
        Method[] methods=realClazz.getMethods();
        //遍历方法 通过注解 得到需要修复的方法
        for (Method rightMethod : methods) {
            //拿到注解
            Replace replace = rightMethod.getAnnotation(Replace.class);
            if (replace == null) {
                continue;
            }
            //得到类名
            String clazzName=replace.clazz();
            //得到方法名
            String methodName=replace.method();
            try {
                //反射得到本地的有bug的方法的类
                Class wrongClazz=  Class.forName(clazzName);
                //得到有bug的方法(注意修复包中的方法参数名和参数列表必须一致)
                Method wrongMethod = wrongClazz.getDeclaredMethod(methodName, rightMethod.getParameterTypes());
                //调用native方法替换有bug的方法
                replace(wrongMethod, rightMethod);
            } catch (Exception e) {
                e.printStackTrace();
            }
        }


    }

    public native static void replace(Method wrongMethod, Method rightMethod) ;
}
实现Native方法替换
我们前面说了,方法在虚拟机中是以ArtMethod结构体存在的,那么我们替换就是要去替换旧的方法的ArtMethod对象的所有属性。
#include <jni.h>
#include <string>
#include "art_method.h"

extern "C"
JNIEXPORT void JNICALL
Java_com_example_bthvi_mycloassloaderapplication_FixDexManager_replace(JNIEnv *env, jclass type, jobject wrongMethod,
                                             jobject rightMethod) {

    //ArtMethod存在于Android 系统源码中,只需要导入我们需要的部分(art_method.h)
    art::mirror::ArtMethod *wrong=  (art::mirror::ArtMethod *)env->FromReflectedMethod(wrongMethod);
    art::mirror::ArtMethod *right=  (art::mirror::ArtMethod *)env->FromReflectedMethod(rightMethod);
    //    method   --->class ----被加载--->ClassLoader
    //错误的成员变量替换为正确的成员变量
    wrong->declaring_class_ = right->declaring_class_;
    wrong->dex_cache_resolved_methods_ = right->dex_cache_resolved_methods_;
    wrong->access_flags_ = right->access_flags_;
    wrong->dex_cache_resolved_types_ = right->dex_cache_resolved_types_;
    wrong->dex_code_item_offset_ = right->dex_code_item_offset_;
    //    这里   方法索引的替换
    wrong->method_index_ = right->method_index_;
    wrong->dex_method_index_ = right->dex_method_index_;

}
这里由于要用到ArtMethod所以我们要从源码中拿到ArtMethod,源码中ArtMethod引用太多的系统源码我们这里简化一下,只要声明我们需要的变量即可。
namespace art {
    namespace mirror {
        class Object{
            // The Class representing the type of the object.
            uint32_t klass_;
            // Monitor and hash code information.
            uint32_t monitor_;

        };
        //简化ArtMethod  只需要关注我们需要的,只需要成员变量声明
        class ArtMethod : public Object {
        public:

            uint32_t access_flags_;
            uint32_t dex_code_item_offset_;
            // Index into method_ids of the dex file associated with this method
            //方法再dex中的索引
            uint32_t method_dex_index_;
            uint32_t dex_method_index_;
            //在方法表的索引
            uint32_t method_index_;
            const void *native_method_;

            const uint16_t *vmap_table_;
            // Short cuts to declaring_class_->dex_cache_ member for fast compiled code access.
            uint32_t dex_cache_resolved_methods_;
            //方法 自发
            // Short cuts to declaring_class_->dex_cache_ member for fast compiled code access.
            uint32_t dex_cache_resolved_types_;


            // Field order required by test "ValidateFieldOrderOfJavaCppUnionClasses".
            // The class we are a part of.
            //所属的函数
            uint32_t declaring_class_;
        };
    }
}
这里还用到了Object所以我们还是要声明Object这个的源码太多这里就不复制了,我们也不需要特意去搞懂这些底层源码,只需要关注我们需要的就行。到这里我们就实现了Native层的热修复。
Andfix的兼容性
前面我们说的就是Andfix的原理及简单实现,但是Andfix兼容性比较差。它的兼容性差是为什么呢?我们这里主要的原理是替换ArtMethod结构体的成员变量,这个结构体是初始化方法表时虚拟机创建的,Google对于不同的系统版本ArtMethod结构体的成员变量都有做变动如下:我们看下Android 6.0和7.0中ArtMethod的不同点[简单找一两个]。
//  Android 6.0系统源码中ArtMethod 精简版  去掉注释
class ArtMethod {
public:
    uint32_t declaring_class_;
    uint32_t dex_cache_resolved_methods_;
    uint32_t dex_cache_resolved_types_;
    uint32_t access_flags_;
    uint32_t dex_code_item_offset_;
    uint32_t dex_method_index_;
    uint32_t method_index_;

    struct PtrSizedFields {
        // Method dispatch from the interpreter invokes this pointer which may cause a bridge into
        // compiled code.
        void* entry_point_from_interpreter_;
        // Pointer to JNI function registered to this method, or a function to resolve the JNI function.
        void* entry_point_from_jni_;
        // Method dispatch from quick compiled code invokes this pointer which may cause bridging into
        // the interpreter.
        void* entry_point_from_quick_compiled_code_;
    } ptr_sized_fields_;
};

//  Android 7.0系统源码中ArtMethod 精简版  去掉注释
class ArtMethod {
public:

	uint32_t declaring_class_;
	uint32_t access_flags_;
	uint32_t dex_code_item_offset_;
	uint32_t dex_method_index_;
	uint16_t method_index_;
	uint16_t hotness_count_;
	struct PtrSizedFields {
		// Short cuts to declaring_class_->dex_cache_ member for fast compiled code access.
		ArtMethod** dex_cache_resolved_methods_;

		// Short cuts to declaring_class_->dex_cache_ member for fast compiled code access.
		void* dex_cache_resolved_types_;

		// Pointer to JNI function registered to this method, or a function to resolve the JNI function,
		// or the profiling data for non-native methods, or an ImtConflictTable.
		void* entry_point_from_jni_;

		// Method dispatch from quick compiled code invokes this pointer which may cause bridging into
		// the interpreter.
		void* entry_point_from_quick_compiled_code_;
	} ptr_sized_fields_;

};
从上面的源码中我们明显看到ArtMethod结构体中成员变量的改变,如method_index_在6.0是32位在7.0中就是16位了。还有PtrSizedFields结构体的成员变量也有修改。所以这就使的AndFix的兼容性很差,要想兼容所有版本就得对不同版本去做兼容适配。
由于AndFix的兼容性和它是免费开源的,阿里在sophix出来之后就以及不再维护AndFix了。Sophix它的方案可以说是比较完美了,它是结合了JAVA层和Native层的两者的有点,它的原理介绍大家可以看看这本书:《深入探索Android热修复技术原理》
总结
我们这里是对它的热修复原理的学习。最后附上项目链接
来源:CSDN
作者:紫雾凌寒
链接:https://blog.csdn.net/u013132758/article/details/96644721