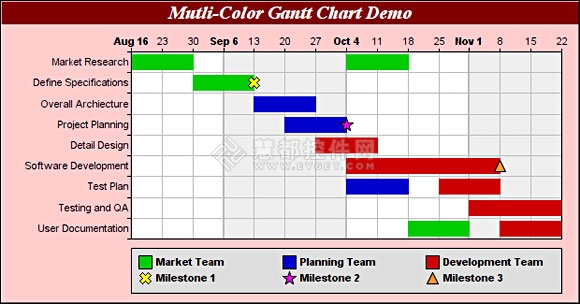
甘特图非常适合用于展示工作进度,而如果把甘特图的进度条以不同的颜色进行区分,将会进一步提高甘特图的可读性。本示例演示用Web图表控件ChartDirector创建彩色的甘特图,这个甘特图中有3个Milestone标签。如图所示:

甘特图的彩色进度条来自一个彩色箱须盒,用到了XYChart.addBoxWhiskerLayer2参数。而Milestone标签来自散点层,用到了XYChart.addScatterLayer参数。在本例中,数据序列用于指定彩色条的任务号,这样可以把同一个任务的彩色条连接起来。任务号作为彩色条的X轴坐标,用 Layer.setXData 参数进行设置。另一个数据序列用于指定甘特图进度条的颜色。
ChartDirector创建彩色甘特图示例代码:
#include "chartdir.h"

int main(int argc, char *argv[])
{
    // The tasks for the gantt chart
    const char *labels[] = {"Market Research", "Define Specifications",
        "Overall Archiecture", "Project Planning", "Detail Design",
        "Software Development", "Test Plan", "Testing and QA", "User Documentation"};

    // The task index, start date, end date and color for each bar
    double taskNo[] = {0, 0, 1, 2, 3, 4, 5, 6, 6, 7, 8, 8};
    double startDate[] = {Chart::chartTime(2004, 8, 16), Chart::chartTime(2004, 10, 4
        ), Chart::chartTime(2004, 8, 30), Chart::chartTime(2004, 9, 13),
        Chart::chartTime(2004, 9, 20), Chart::chartTime(2004, 9, 27),
        Chart::chartTime(2004, 10, 4), Chart::chartTime(2004, 10, 4),
        Chart::chartTime(2004, 10, 25), Chart::chartTime(2004, 11, 1),
        Chart::chartTime(2004, 10, 18), Chart::chartTime(2004, 11, 8)};
    double endDate[] = {Chart::chartTime(2004, 8, 30), Chart::chartTime(2004, 10, 18
        ), Chart::chartTime(2004, 9, 13), Chart::chartTime(2004, 9, 27),
        Chart::chartTime(2004, 10, 4), Chart::chartTime(2004, 10, 11),
        Chart::chartTime(2004, 11, 8), Chart::chartTime(2004, 10, 18),
        Chart::chartTime(2004, 11, 8), Chart::chartTime(2004, 11, 22),
        Chart::chartTime(2004, 11, 1), Chart::chartTime(2004, 11, 22)};
    int colors[] = {0x00cc00, 0x00cc00, 0x00cc00, 0x0000cc, 0x0000cc, 0xcc0000,
        0xcc0000, 0x0000cc, 0xcc0000, 0xcc0000, 0x00cc00, 0xcc0000};

    // Create a XYChart object of size 620 x 325 pixels. Set background color to
    // light red (0xffcccc), with 1 pixel 3D border effect.
    XYChart *c = new XYChart(620, 325, 0xffcccc, 0x000000, 1);

    // Add a title to the chart using 15 points Times Bold Itatic font, with white
    // (ffffff) text on a dark red (800000) background
    c->addTitle("Mutli-Color Gantt Chart Demo", "timesbi.ttf", 15, 0xffffff
        )->setBackground(0x800000);

    // Set the plotarea at (140, 55) and of size 460 x 200 pixels. Use alternative
    // white/grey background. Enable both horizontal and vertical grids by setting
    // their colors to grey (c0c0c0). Set vertical major grid (represents month
    // boundaries) 2 pixels in width
    c->setPlotArea(140, 55, 460, 200, 0xffffff, 0xeeeeee, Chart::LineColor, 0xc0c0c0,
        0xc0c0c0)->setGridWidth(2, 1, 1, 1);

    // swap the x and y axes to create a horziontal box-whisker chart
    c->swapXY();

    // Set the y-axis scale to be date scale from Aug 16, 2004 to Nov 22, 2004, with
    // ticks every 7 days (1 week)
    c->yAxis()->setDateScale(Chart::chartTime(2004, 8, 16), Chart::chartTime(2004,
        11, 22), 86400 * 7);

    // Set multi-style axis label formatting. Month labels are in Arial Bold font in
    // "mmm d" format. Weekly labels just show the day of month and use minor tick
    // (by using '-' as first character of format string).
    c->yAxis()->setMultiFormat(Chart::StartOfMonthFilter(),
        "<*font=arialbd.ttf*>{value|mmm d}", Chart::StartOfDayFilter(), "-{value|d}")
        ;

    // Set the y-axis to shown on the top (right + swapXY = top)
    c->setYAxisOnRight();

    // Set the labels on the x axis
    c->xAxis()->setLabels(StringArray(labels, (int)(sizeof(labels) / sizeof(labels[0]
        ))));

    // Reverse the x-axis scale so that it points downwards.
    c->xAxis()->setReverse();

    // Set the horizontal ticks and grid lines to be between the bars
    c->xAxis()->setTickOffset(0.5);

    // Add some symbols to the chart to represent milestones. The symbols are added
    // using scatter layers. We need to specify the task index, date, name, symbol
    // shape, size and color.
    double coor1[] = {1};
    double date1[] = {Chart::chartTime(2004, 9, 13)};
    c->addScatterLayer(DoubleArray(coor1, (int)(sizeof(coor1) / sizeof(coor1[0]))),
        DoubleArray(date1, (int)(sizeof(date1) / sizeof(date1[0]))), "Milestone 1",
        Chart::Cross2Shape(), 13, 0xffff00);
    double coor2[] = {3};
    double date2[] = {Chart::chartTime(2004, 10, 4)};
    c->addScatterLayer(DoubleArray(coor2, (int)(sizeof(coor2) / sizeof(coor2[0]))),
        DoubleArray(date2, (int)(sizeof(date2) / sizeof(date2[0]))), "Milestone 2",
        Chart::StarShape(5), 15, 0xff00ff);
    double coor3[] = {5};
    double date3[] = {Chart::chartTime(2004, 11, 8)};
    c->addScatterLayer(DoubleArray(coor3, (int)(sizeof(coor3) / sizeof(coor3[0]))),
        DoubleArray(date3, (int)(sizeof(date3) / sizeof(date3[0]))), "Milestone 3",
        Chart::TriangleSymbol, 13, 0xff9933);

    // Add a multi-color box-whisker layer to represent the gantt bars
    BoxWhiskerLayer *layer = c->addBoxWhiskerLayer2(DoubleArray(startDate, (int)(
        sizeof(startDate) / sizeof(startDate[0]))), DoubleArray(endDate, (int)(
        sizeof(endDate) / sizeof(endDate[0]))), DoubleArray(), DoubleArray(),
        DoubleArray(), IntArray(colors, (int)(sizeof(colors) / sizeof(colors[0]))));
    layer->setXData(DoubleArray(taskNo, (int)(sizeof(taskNo) / sizeof(taskNo[0]))));
    layer->setBorderColor(Chart::SameAsMainColor);

    // Divide the plot area height ( = 200 in this chart) by the number of tasks to
    // get the height of each slot. Use 80% of that as the bar height.
    layer->setDataWidth(200 * 4 / 5 / (int)(sizeof(labels) / sizeof(labels[0])));

    // Add a legend box at (140, 265) - bottom of the plot area. Use 8 pts Arial Bold
    // as the font with auto-grid layout. Set the width to the same width as the plot
    // area. Set the backgorund to grey (dddddd).
    LegendBox *legendBox = c->addLegend2(140, 265, Chart::AutoGrid, "arialbd.ttf", 8)
        ;
    legendBox->setWidth(461);
    legendBox->setBackground(0xdddddd);

    // The keys for the scatter layers (milestone symbols) will automatically be
    // added to the legend box. We just need to add keys to show the meanings of the
    // bar colors.
    legendBox->addKey("Market Team", 0x00cc00);
    legendBox->addKey("Planning Team", 0x0000cc);
    legendBox->addKey("Development Team", 0xcc0000);

    // Output the chart
    c->makeChart("colorgantt.png");

    //free up resources
    delete c;
    return 0;
}来源:oschina
链接:https://my.oschina.net/u/1163318/blog/163810