本人基于环境已经安装了Redis等相关软件搭建新的Redis集群,环境原本已经存在7000-7005的Redis集群,由于资源配置及业务的需要,在此基础再搭建新的集群。
搭建方式:采用redis cluster原生命令搭建
- 1、创建8000-8005文件及配置
#查看Redis的进程
ps -ef|grep redis
#查看Redis的安装目录,得到了进程号 xxxx
ls -l /proc/xxxx/cwd
#进入Redis的目录
lrwxrwxrwx. 1 root root 0 5月  23 14:00 /proc/28004/cwd -> /usr/local/redis/redis-cluster/7005
[root@localhost /]# cd usr/local/redis
[root@localhost redis]# ll
总用量 0
drwxr-xr-x.  2 root root 204 5月  23 15:05 bin
drwxr-xr-x. 14 root root 168 5月  23 14:48 redis-cluster
[root@localhost redis]# cd redis-cluster/
[root@localhost redis-cluster]# mkdir 8000 8001 8002 8003 8004 8005
[root@localhost redis-cluster]# ll
总用量 60
drwxr-xr-x. 2 root root    63 5月  23 16:00 7000
drwxr-xr-x. 2 root root    63 5月  23 16:14 7001
drwxr-xr-x. 2 root root    63 5月  23 15:59 7002
drwxr-xr-x. 2 root root    63 5月  23 16:23 7003
drwxr-xr-x. 2 root root    63 5月  23 16:26 7004
drwxr-xr-x. 2 root root    63 5月  23 16:28 7005
drwxr-xr-x. 2 root root    63 5月  23 16:01 8000
drwxr-xr-x. 2 root root    63 5月  23 15:46 8001
drwxr-xr-x. 2 root root    63 5月  23 16:01 8002
drwxr-xr-x. 2 root root    63 5月  23 16:01 8003
drwxr-xr-x. 2 root root    63 5月  23 15:46 8004
drwxr-xr-x. 2 root root    63 5月  23 15:53 8005
-rw-r--r--. 1 root root 57764 7月  15 2019 redis.conf

#将redis.conf修改放入对应的文件夹中
以8005为示例,修改位置是:
pidfile /var/run/redis_8005.pid
cluster-config-file nodes-8005.conf           #开启集群节点状态记录文件
dir /usr/local/redis/redis-cluster/8005       #log目录
pidfile /var/run/redis_8005.pid               #不同的redis进程,会与不同的pid号,这个pid号就保存在这个文件里,不同的redis服务,需要点缀端口号
port 8005                                     #Redis端口号
bind 10.10.90.82                              #绑定的IP地址
daemonize yes                                 #需设置yes,否则无法计算槽道号,无法创建集群
一般来说,最简单修改配置文件方式:直接复制一份已经配置好的redis-conf,然后批量替换端口号,再修改bind绑定的IP地址(例如:bind 10.10.90.82),最后检查一下相关参数,配置文件就修改完毕。
- 2、启动8000-8005的Redis服务端口
#启动Redis服务
[root@localhost redis]# cd bin
[root@localhost bin]# ll
总用量 21940
-rw-r--r--. 1 root root     110 7月  15 2019 dump.rdb
-rwxr-xr-x. 1 root root 2451016 6月   5 2019 redis-benchmark
-rwxr-xr-x. 1 root root 5752112 6月   5 2019 redis-check-aof
-rwxr-xr-x. 1 root root 5752112 6月   5 2019 redis-check-rdb
-rwxr-xr-x. 1 root root 2616152 6月   5 2019 redis-cli
-rw-r--r--. 1 root root   57764 6月   5 2019 redis.conf
lrwxrwxrwx. 1 root root      12 6月   5 2019 redis-sentinel -> redis-server
-rwxr-xr-x. 1 root root 5752112 6月   5 2019 redis-server
-rwxr-xr-x. 1 root root   60843 7月  15 2019 redis-trib.rb
#在/usr/local/redis/bin下执行

./redis-server /usr/local/redis/redis-cluster/8000/redis.conf
./redis-server /usr/local/redis/redis-cluster/8001/redis.conf
./redis-server /usr/local/redis/redis-cluster/8002/redis.conf
./redis-server /usr/local/redis/redis-cluster/8003/redis.conf
./redis-server /usr/local/redis/redis-cluster/8004/redis.conf
./redis-server /usr/local/redis/redis-cluster/8005/redis.conf
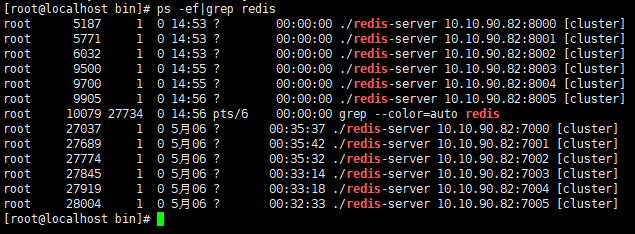
- 3、进入Redis的8000客户端,以8000、8001、8002为master主节点,8003、8004、8005为slave从节点。
#在/usr/local/redis/bin下执行(客户端命令:redis-cli -c -p port -h ip)
#提前准备6个启动的节点,前提也需删除持久化文件,以及节点状态记录文件
#登录任何一个节点,和其他5个进行meet,这里使用8000的客户端来完成,meet完后任意一个节点都认为自己是主节点

[root@localhost bin]# ./redis-cli -c -p 8000 -h 10.10.90.82
10.10.90.82:8000>

# 使用cluster meet命令
cluster meet 192.168.175.196 8001
cluster meet 192.168.175.196 8002
cluster meet 192.168.175.196 8003
cluster meet 192.168.175.196 8004
cluster meet 192.168.175.196 8005

#查看节点连接信息
cluster nodes

#槽道号之间有多个需要用空格隔开,将0-5槽道号分配给8000
CLUSTER ADDSLOTS 0 1 2 3 4 5
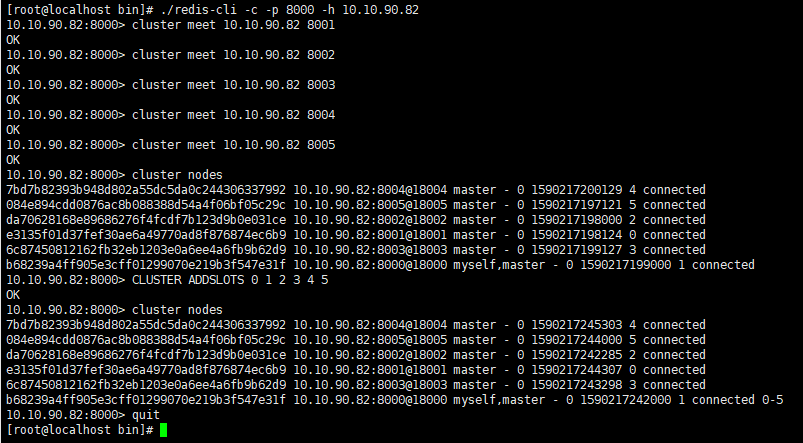
- 4、 给8000,8001和8002分配槽道号,让其作为主节点。分配槽道号的命令为cluster addslots 槽道号...。分配完成后不管登录哪个节点都能看到槽道号信息
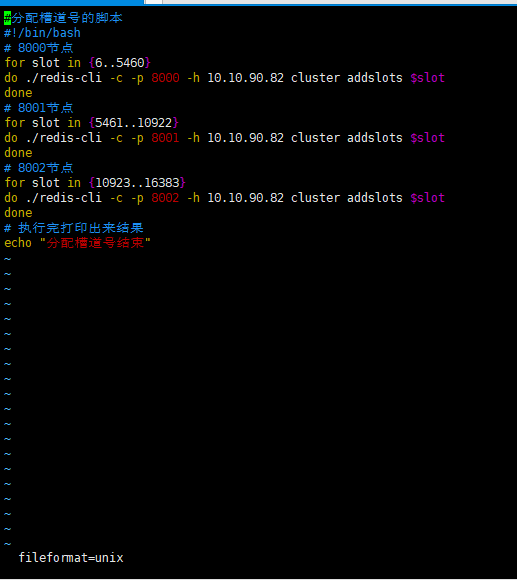
一个个写来分配会比较费力气,可以写一个shell脚本来批量分配槽道号,使用for循环来实现。shell脚本如下所示:
#分配槽道号的脚本
#!/bin/bash
# 8000主节点
for slot in {6..5460}
do ./redis-cli -c -p 8000 -h 10.10.90.82 cluster addslots $slot
done
# 8001主节点
for slot in {5461..10922}
do ./redis-cli -c -p 8001 -h 10.10.90.82 cluster addslots $slot
done
# 8002主节点
for slot in {10923..16383}
do ./redis-cli -c -p 8002 -h 10.10.90.82 cluster addslots $slot
done
# 执行完打印出来结果
echo "分配槽道号结束"
将此脚本命名为slot.sh(shell脚本名称可自定义,以.sh为文件类型后缀)
#分配主节点8000,8001,8002
#分配槽道号的脚本放在/usr/local/redis/bin下执行

#给slot.sh授权限
chmod 764 slot.sh
#执行slot.sh脚本
./slot.sh
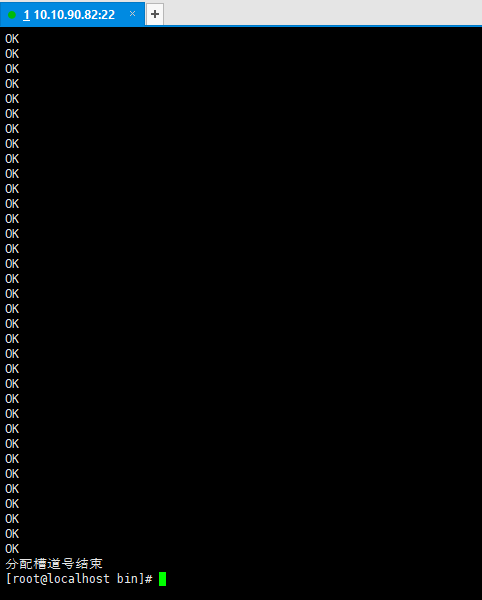
有时候会出现slot.sh执行失败,一般是脚本格式不是unix造成。需要vim slot.sh进入查看。进入后直接输入":",然后在":"之后输入"set ff"如下图所示
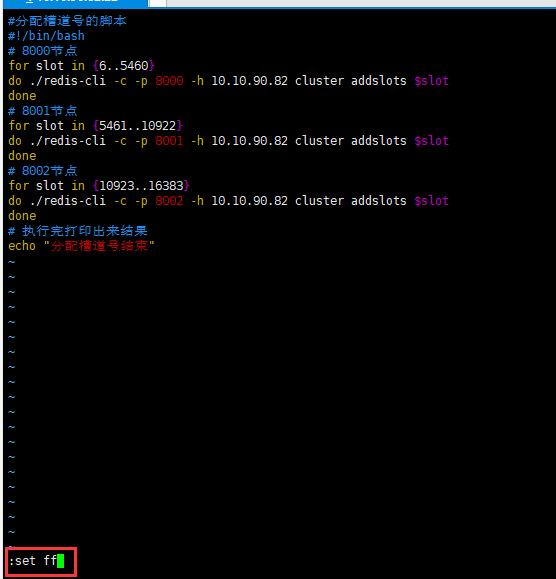
如果格式不是unix,我们需要把格式改为unix,方法是输入":set ff=unix",也可以输入":set fileformat=unix",修改成功后如图所示:
- 5、将8003、8004和8005角色转换为从节点,使用cluster replicate 主节点id 命令。最后查看集群信息,发现成功的分配了槽道号
在/usr/local/redis/bin执行

#8003成为8000的从节点,进入8003客户端,获取8000主节点ID
./redis-cli -c -p 8003 -h 10.10.90.82
cluster replicate b68239a4ff905e3cff01299070e219b3f547e31f

#8004成为8001的从节点,进入8004客户端,获取8001主节点ID
./redis-cli -c -p 8004 -h 10.10.90.82
cluster replicate e3135f01d37fef30ae6a49770ad8f876874ec6b9

#8005成为8002的从节点,进入8005客户端,获取8002主节点ID
./redis-cli -c -p 8005 -h 10.10.90.82
cluster replicate da70628168e89686276f4fcdf7b123d9b0e031ce

#查看集群信息
cluster nodes
cluster info
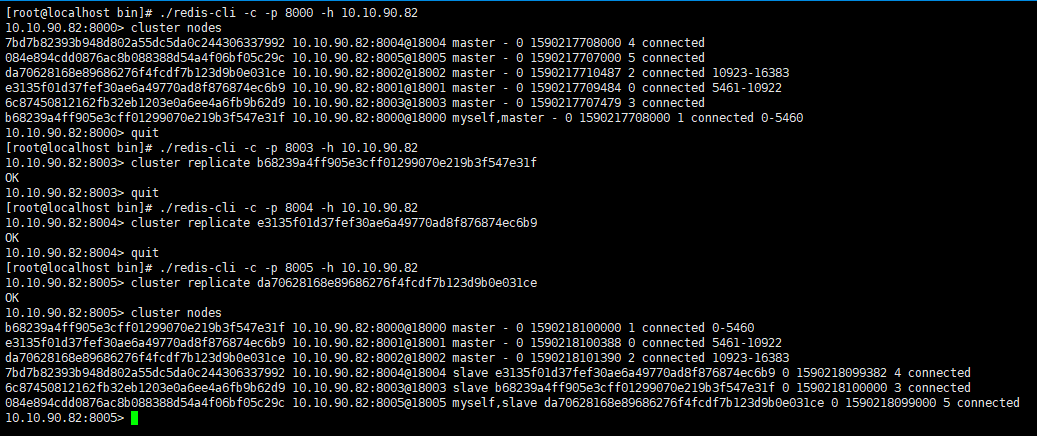
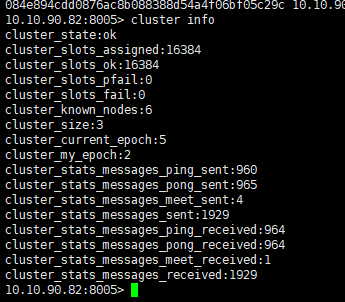
最后集群状态为ok,槽道全部分配完成,形成了三主三从的结构。
10.10.90.82:8000> cluster info
cluster_state:ok
cluster_slots_assigned:16384
cluster_slots_ok:16384
cluster_slots_pfail:0
cluster_slots_fail:0
# 6个节点
cluster_known_nodes:6
# 3个主
cluster_size:3
cluster_current_epoch:5
cluster_my_epoch:1
cluster_stats_messages_ping_sent:7832
cluster_stats_messages_pong_sent:8402
cluster_stats_messages_meet_sent:5
cluster_stats_messages_sent:16239
cluster_stats_messages_ping_received:8402
cluster_stats_messages_pong_received:7837
cluster_stats_messages_received:16239
10.10.90.82:8000>
参考网址:
https://www.cnblogs.com/youngchaolin/p/12027448.html#_label3
https://www.cnblogs.com/kevingrace/p/7910692.html
https://www.cnblogs.com/youngchaolin/p/11983705.html#_label0
来源:oschina
链接:https://my.oschina.net/hongjunzhan/blog/4288460