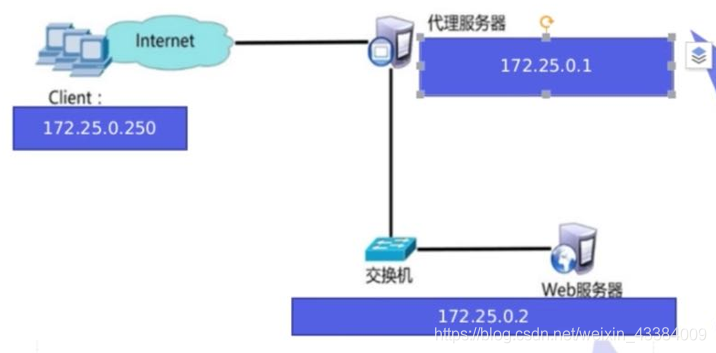
1. 什么是varnish?
- varnish是一个反向http代理,有时称为http加速器或web加速器。
- varnish将文件或文件片段存储在内存中,使他们能够快速被提供。
- varnish本质上是一个键/值存储,它通过使用url作为键。
- varnish是为现代硬件、现代操作系统和现代工作负载而设计的。
2. http协议
internet的基本协议是tcp/ip协议栈(传输控制协议和网际协议),目前广泛使用的ftp(文件传输协议)、http(超文本传输协议)、archie gopher等都是建立在tcp/ip上面的应用层协议,不同的协议对应不同的应用,而http协议是web应用所使用的主要协议。
http协议是基于请求相应模式的。客户端项服务器发送一个请求,请求头包含请求的方法(get、post、put等),url,协议版本(第几版),以及包含请求修饰符,客户端信息和内容的类似mime的消息结果。服务器则以一个状态行作为相应,相应内容包括消息协议的版本,成功或者错误编码加上包含服务器信息,实体源信息以及可能的实体内容。
http是无状态协议,依赖于瞬间或者近乎瞬间的请求处理。请求信息被立即发送,理想的情况时没有延时的进行处理,不过延时还是客观存在的。http有一种内置的机制,在消息的传递时间上有一定的灵活性:超时机制,一个超时就是客户机等待请求消息的返回信息的最长时间。
无状态协议:每一次请求和相应都是相对独立的,web服务器不能记住同样的请求,所以可能会做一些重复的动作。所以出现了cache缓存。
基于http协议的c/s请求响应机制的信息交换过程包括四个步骤:
- 建立连接:客户端与服务端建立tcp连接
- 发送请求:打开一个连接后,客户端把请求消息送到服务器的相应端口上,完成请求动作提交。
- 发送响应:服务器在处理完客户端请求之后,要想客户端发送响应消息
- 关闭连接:客户端和服务器双方都可以通过关闭套接字来结束tcp/ip对话。
3.varnish实验
- 准备工作
用快照开启三台虚拟机
第一台:ip:172.25.60.253 hostname:server1
第二台:ip:172.25.60.2 hostname:server2
第三台:ip:172.25.60.3 hostname:server3 - 安装varnish
scp root@172.25.60.250:/home/kiosk/Desktop/software/varnish-6.3.1-1.el7.x86_64.rpm .
scp root@172.25.60.250:/home/kiosk/Desktop/software/jemalloc-3.6.0-1.el7.x86_64.rpm .
yum install jemalloc-3.6.0-1.el7.x86_64.rpm varnish-6.3.1-1.el7.x86_64.rpm -y
- varnish的配置文件
[root@server1 ~]# rpm -qc varnish-6.3.1-1.el7.x86_64
/etc/ld.so.conf.d/varnish-x86_64.conf
/etc/logrotate.d/varnish
/etc/varnish/default.vcl
- 服务启动文件
cat /usr/lib/systemd/system/varnish.service
LimitNOFILE=131072   # 最大打开文件数
LimitMEMLOCK=85983232  # 最大锁定内存空间
- 系统中的最大文件数
[root@server1 ~]# sysctl -a |grep file    # 内存为1024
fs.file-max = 98287   # 系统中的最大文件数
fs.file-nr = 928	0	98287
fs.xfs.filestream_centisecs = 3000

[root@server1 ~]# sysctl -a | grep file   # 修改内存为2048
fs.file-max = 184182
fs.file-nr = 864	0	184182
fs.xfs.filestream_centisecs = 3000
- 修改系统参数
[root@server1 ~]# vim /etc/security/limits.conf
# End of file
vainish          -       nofile          131072
varnish          -       memlock         82000

[root@server1 ~]# id varnish
uid=996(varnish) gid=995(varnish) groups=995(varnish)
- varnish原理图

第一步:修改varnish的主配置文件(server1)
[root@server1 ~]# vim /etc/varnish/default.vcl
backend default {
    .host = "172.25.60.2";
    .port = "80";
}
第二步:在server2中安装apache
[root@server2 ~]# yum install httpd -y
[root@server2 ~]# cd /var/www/html/
[root@server2 html]# ls
[root@server2 html]# vim index.html
[root@server2 html]# cat index.html
server2
第三步:在server1上修改端口
[root@server1 ~]# vim /usr/lib/systemd/system/varnish.service  # 修改varnish的端口
ExecStart=/usr/sbin/varnishd -a :80 -T localhost:6082 -f /etc/varnish/default.vcl -s malloc,256m
[root@server1 ~]# systemctl start varnish
[root@server1 ~]# netstat -antlpe|grep varnish
tcp        0      0 0.0.0.0:80              0.0.0.0:*               LISTEN      0          24133      2120/varnishd
tcp        0      0 127.0.0.1:6082          0.0.0.0:*               LISTEN      0          24195      2120/varnishd
tcp6       0      0 :::80                   :::*                    LISTEN      0          24134      2120/varnishd
tcp6       0      0 ::1:6082                :::*                    LISTEN      0          24194      2120/varnishd
第四步:开启server2(服务器上的http)
[root@server2 html]# systemctl start httpd
第五步:测试
表示可以通过代理服务器server1(172.25.60.253)访问到服务器server2(172.25.60.02)
[root@foundation60 software]# curl 172.25.60.253
server2
来源:CSDN
作者:weixin_43384009
链接:https://blog.csdn.net/weixin_43384009/article/details/104397559
