#####3.网关######################
网关:路由器上和客户主机处在同一个网段的ip叫做客户主机的网关
在rhel7中添加一块网卡使得可以和172网段通信的地址
1.在rhel7虚拟机右键选择设置

2.添加网络适配器

3.网络连接-桥接模式

4.确定
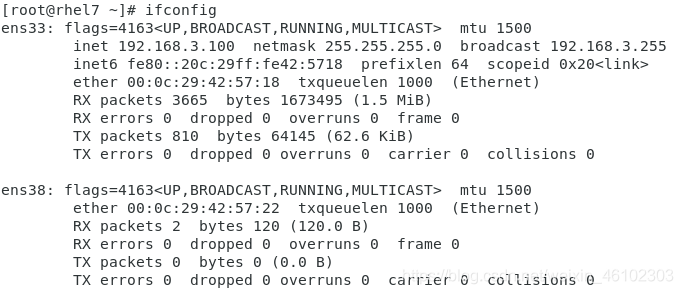
5.查看网卡
[root@rhel7 ~]# ifconfig
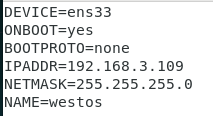
6.修改文件为静态网络
[root@rhel7 ~]# vim /etc/sysconfig/network-scripts/ifcfg-ens33
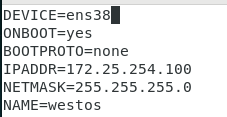
7.设置ens38文件
[root@rhel7 ~]# cd /etc/sysconfig/network-scripts/ ##进入目录

[root@rhel7 network-scripts]# cp -p ifcfg-ens33 ifcfg-ens38 ##复制大体文件
[root@rhel7 network-scripts]# vim ifcfg-ens38 ##修改文件
8.重启网络
[root@rhel7 network-scripts]# systemctl restart network

9.ping
(1).ping rhel8
[root@rhel7 network-scripts]# ping 172.25.254.209

(2).ping真实主机

10.设定路由
(1).开启路由内核功能
[root@rhel7 network-scripts]# sysctl -a | grep ip_forward ##查看功能状态

net.ipv4.ip_forward = 0 ##关闭
(2).编辑文件
[root@rhel7 network-scripts]# vim /etc/sysctl.conf

(3).使文件生效
![]()
(4).打开防火墙
[root@rhel7 network-scripts]# systemctl start firewalld
[root@rhel7 network-scripts]# firewall-cmd --list-all ##查看火墙状态

masquerade: no ##地址伪装功能
[root@rhel7 network-scripts]# firewall-cmd --permanent --add-masquerade ##打开地址伪装功能
[root@rhel7 network-scripts]# firewall-cmd --reload ##执行

(5).重新查看
[root@rhel7 network-scripts]# firewall-cmd --list-all

11.在rhel8中设定网关
网关设定方式:
(1).命令方式(临时):
-添加网关
[root@rhel8 ~]# ip route add default via 172.25.254.100 ##添加默认网关

-ping 主机
[root@rhel8 ~]# ping 192.168.3.9

-删除默认网关
[root@rhel8 ~]# ip route del default via 172.25.254.100

文件方式(永久):
-编写文件
方式一:
[root@rhel8 ~]# vim /etc/sysconfig/network
![]()
-重启服务
在rhel8中:
[root@rhel8 ~]# systemctl restart NetworkManager

[root@rhel8 ~]# nmcli connection down System\ ens160
[root@rhel8 ~]# nmcli connection up System\ ens160

-查看网关
[root@rhel8 ~]# route -n

在rhel7中:
systemctl stop NetworkManager
systemctl restart network
systemctl start NetworkManager
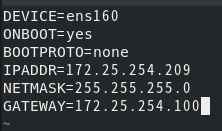
方式二:修改网卡设定网关
-进入目录
[root@rhel8 ~]# cd /etc/sysconfig/network-scripts/

-编写文件
[root@rhel8 network-scripts]# vim ifcfg-ens160
在rhel8中:
systemctl restart NetworkManager
nmcli connection down 链接名称
nmcli connection up 链接名称
在rhel7中:
systemctl stop NetworkManager
systemctl restart network
systemctl start NetworkManager
实验:
1.在rhel7中添加一块网卡使rhel7变为双网卡主机
2.设定rhel7主机的两块网卡地址为:
网卡1:192.168.3.109 (和windows主机处于同一网段)
网卡2:172.25.254.100 (和rhel8处于同一网段)
3.在rhel7中打开路由内核功能(步骤在上边)
4.在rhel7中打开地址伪装功能(步骤在上边)
#####4.DNS#################
dns:负责作域名转换成ip这个工作的主机叫做dns服务器(地址解析)
在主机cmd中ping 百度

在网页直接输入转换的地址查看是否为百度页面

在rhel7中编辑网卡:
[root@rhel7 ~]# cd /etc/sysconfig/network-scripts/ ##进入目录
-编写文件:
[root@rhel7 network-scripts]# vim ifcfg-ens33
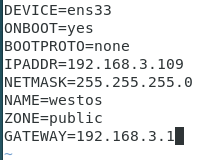
-重启网络查看网关:
[root@rhel7 network-scripts]# systemctl restart network

[root@rhel7 network-scripts]# ping www.baidu.com ##现在ping百度 不通
![]()
[root@rhel7 network-scripts]# ping 14.215.177.38 ##ping地址可以通

[root@rhel7 network-scripts]# vim /etc/hosts ##编写本地解析文件

[root@rhel7 network-scripts]# ping www.baidu.com ##ping百度

rhel7中浏览器可访问百度

[root@rhel7 network-scripts]# vim /etc/resolv.conf ##dns服务器指向文件 临时
nameserver 114.114.114.114 ##114.114.114.114为电信dns服务器
![]()
[root@rhel7 network-scripts]# ping www.qq.com ##ping QQ得知域名

dns的永久设定:
[root@rhel8 ~]# vim /etc/sysconfig/network-scripts/ifcfg-ens160
DNS1=114.114.114.114
重启网络服务
#####5.网桥设定################
[root@rhel8 ~]# nmcli connection show ##查看网卡

[root@rhel8 ~]# nmcli connection delete System\ ens160 ##删除原有的网卡
[root@rhel8 ~]# cd /etc/sysconfig/network-scripts/ ##进入目录查看是否还存在网卡

[root@rhel8 network-scripts]# vim ifcfg-ens160 ##编写桥接接口真实网卡配置文件

[root@rhel8 network-scripts]# vim ifcfg-br0 ##编写指定文件
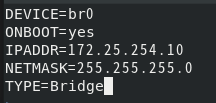
[root@rhel8 network-scripts]# systemctl restart NetworkManager ##重启服务

查看桥接:
[root@rhel8 network-scripts]# bridge link

来源:CSDN
作者:村雨626
链接:https://blog.csdn.net/weixin_46102303/article/details/104345025