所为多数据库就是采用不同数据库实例中的多个库,或者同一个数据库实例中的不同库。
下面开始实现jdbctemplate多数据源:
github:https://github.com/fengqing11/datasources-mybatis
完整项目结构图:
创建数据库:
有两个数据库,创建数据库之前请先创建好两个数据库。
jdbctemplate.sql
# Host: localhost  (Version: 5.7.26)
# Date: 2020-01-19 15:23:50
# Generator: MySQL-Front 5.3  (Build 4.234)

/*!40101 SET NAMES utf8 */;

#
# Structure for table "book"
#

CREATE TABLE `book` (
  `Id` int(11) NOT NULL AUTO_INCREMENT,
  `name` varchar(255) DEFAULT NULL,
  `author` varchar(255) DEFAULT NULL,
  PRIMARY KEY (`Id`)
) ENGINE=MyISAM AUTO_INCREMENT=2 DEFAULT CHARSET=utf8;

#
# Data for table "book"
#

INSERT INTO `book` VALUES (1,'a啊大苏打','是的啊');
jbdctemplate2.sql
# Host: localhost  (Version: 5.7.26)
# Date: 2020-01-19 15:23:59
# Generator: MySQL-Front 5.3  (Build 4.234)

/*!40101 SET NAMES utf8 */;

#
# Structure for table "book"
#

CREATE TABLE `book` (
  `Id` int(11) NOT NULL AUTO_INCREMENT,
  `name` varchar(255) DEFAULT NULL,
  `author` varchar(255) DEFAULT NULL,
  PRIMARY KEY (`Id`)
) ENGINE=MyISAM AUTO_INCREMENT=2 DEFAULT CHARSET=utf8;

#
# Data for table "book"
#

INSERT INTO `book` VALUES (1,'苏打','是的啊是的');
创建项目,pom.xml如下:
<?xml version="1.0" encoding="UTF-8"?>
<project xmlns="http://maven.apache.org/POM/4.0.0" xmlns:xsi="http://www.w3.org/2001/XMLSchema-instance"
         xsi:schemaLocation="http://maven.apache.org/POM/4.0.0 https://maven.apache.org/xsd/maven-4.0.0.xsd">
    <modelVersion>4.0.0</modelVersion>
    <parent>
        <groupId>org.springframework.boot</groupId>
        <artifactId>spring-boot-starter-parent</artifactId>
        <version>2.2.3.RELEASE</version>
        <relativePath/> <!-- lookup parent from repository -->
    </parent>
    <groupId>xyz.fengqing11</groupId>
    <artifactId>datasources-mybatis</artifactId>
    <version>0.0.1-SNAPSHOT</version>
    <name>datasources-mybatis</name>
    <description>Demo project for Spring Boot</description>

    <properties>
        <java.version>1.8</java.version>
    </properties>

    <dependencies>
        <dependency>
            <groupId>org.springframework.boot</groupId>
            <artifactId>spring-boot-starter-web</artifactId>
        </dependency>
        <dependency>
            <groupId>org.mybatis.spring.boot</groupId>
            <artifactId>mybatis-spring-boot-starter</artifactId>
            <version>2.1.1</version>
        </dependency>

        <dependency>
            <groupId>mysql</groupId>
            <artifactId>mysql-connector-java</artifactId>
            <scope>runtime</scope>
        </dependency>

        <dependency>
            <groupId>com.alibaba</groupId>
            <artifactId>druid-spring-boot-starter</artifactId>
            <version>1.1.10</version>
        </dependency>

        <dependency>
            <groupId>org.springframework.boot</groupId>
            <artifactId>spring-boot-starter-test</artifactId>
            <scope>test</scope>
            <exclusions>
                <exclusion>
                    <groupId>org.junit.vintage</groupId>
                    <artifactId>junit-vintage-engine</artifactId>
                </exclusion>
            </exclusions>
        </dependency>
    </dependencies>

    <build>
        <resources>
            <resource>
                <directory>src/main/java</directory>
                <includes>
                    <include>**/*.xml</include>
                </includes>
            </resource>
            <resource>
                <directory>src/main/resources</directory>
            </resource>
        </resources>
        <plugins>
            <plugin>
                <groupId>org.springframework.boot</groupId>
                <artifactId>spring-boot-maven-plugin</artifactId>
            </plugin>
        </plugins>
    </build>

</project>
注意这里的依赖有一项是druid-spring-boot-starter,它可以帮助开发者在Springboot项目中轻松的继承Druid数据库连接池和监控。
配置数据连接:
需要配置两个数据源,区别主要是数据库不同,其他配置都一样
# 数据源1
spring.datasource.one.type=com.alibaba.druid.pool.DruidDataSource
spring.datasource.one.jdbc-url=jdbc:mysql:///jdbctemplate?useUnicode=true&useJDBCCompliantTimezoneShift=true&useLegacyDatetimeCode=false&serverTimezone=UTC
spring.datasource.one.username=root
spring.datasource.one.password=root

# 数据源2
spring.datasource.two.type=com.alibaba.druid.pool.DruidDataSource
spring.datasource.two.jdbc-url=jdbc:mysql:///jbdctemplate2?useUnicode=true&useJDBCCompliantTimezoneShift=true&useLegacyDatetimeCode=false&serverTimezone=UTC
spring.datasource.two.username=root
spring.datasource.two.password=root
配置数据连接:
创建DataSourceConfig配置数据源,根据application.properties中的配置生成了两个数据源。
提供了两个数据源dsOne和dsTwo,默认方法名为实例名。
@ConfigurationProperties注解表示使用不同前缀的配置来实现DataSouce实例
package xyz.fengqing11.datasourcesjdbctemplate.config;

import com.alibaba.druid.pool.DruidAbstractDataSource;
import org.springframework.boot.context.properties.ConfigurationProperties;
import org.springframework.boot.jdbc.DataSourceBuilder;
import org.springframework.context.annotation.Bean;
import org.springframework.context.annotation.Configuration;

import javax.sql.DataSource;
import java.beans.ConstructorProperties;

@Configuration
public class DataSourcesConfig {
    @Bean
    @ConfigurationProperties("spring.datasource.one")
    DataSource dsOne(){
        return DataSourceBuilder.create().build();
    }

    @Bean
    @ConfigurationProperties("spring.datasource.two")
    DataSource dsTwo(){
        return DataSourceBuilder.create().build();
    }
}
配置MybatisConfig
因为有两个数据源,所以有两个mapper
package xyz.fengqing11.datasourcesmybatis.mapper1;

import xyz.fengqing11.datasourcesmybatis.pojo.Book;

import java.util.List;

public interface BookMapper1 {
    List<Book> getAllBooks();
}
<?xml version="1.0" encoding="UTF-8" ?>
<!DOCTYPE mapper
        PUBLIC "-//mybatis.org//DTD Mapper 3.0//EN"
        "http://mybatis.org/dtd/mybatis-3-mapper.dtd">

<mapper namespace="xyz.fengqing11.datasourcesmybatis.mapper2.BookMapper2">
    <select id="getAllBooks" resultType="xyz.fengqing11.datasourcesmybatis.pojo.Book">
        SELECT * FROM book
    </select>
</mapper>
mapping.xml也有两个
<?xml version="1.0" encoding="UTF-8" ?>
<!DOCTYPE mapper
        PUBLIC "-//mybatis.org//DTD Mapper 3.0//EN"
        "http://mybatis.org/dtd/mybatis-3-mapper.dtd">

<mapper namespace="xyz.fengqing11.datasourcesmybatis.mapper1.BookMapper1">
    <select id="getAllBooks" resultType="xyz.fengqing11.datasourcesmybatis.pojo.Book">
        SELECT * FROM book
    </select>
</mapper>
<?xml version="1.0" encoding="UTF-8" ?>
<!DOCTYPE mapper
        PUBLIC "-//mybatis.org//DTD Mapper 3.0//EN"
        "http://mybatis.org/dtd/mybatis-3-mapper.dtd">

<mapper namespace="xyz.fengqing11.datasourcesmybatis.mapper2.BookMapper2">
    <select id="getAllBooks" resultType="xyz.fengqing11.datasourcesmybatis.pojo.Book">
        SELECT * FROM book
    </select>
</mapper>
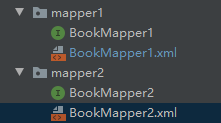
这两个mapper分别在两个不同的文件中:
创建Book实体类
package xyz.fengqing11.datasourcesjdbctemplate.pojo;

public class Book {
    private int id;
    private String name;
    private String author;

    public int getId() {
        return id;
    }

    public void setId(int id) {
        this.id = id;
    }

    public String getName() {
        return name;
    }

    public void setName(String name) {
        this.name = name;
    }

    public String getAuthor() {
        return author;
    }

    public void setAuthor(String author) {
        this.author = author;
    }

    @Override
    public String toString() {
        return "Book{" +
                "id=" + id +
                ", name='" + name + '\'' +
                ", author='" + author + '\'' +
                '}';
    }
}
创建BookController
这里为了简单起见,没有service层,直接将JdbcTemplate层注入到Controller中。
注入时,采用了两种不同方式,一种是使用@Resource注解,并指明name属性,即按照name进行装配,此时或根据实例名查找相应的实例注入;另一种是使用@AutoWired注解结合@Qualifier注解,相等等同于前者。
package xyz.fengqing11.datasourcesmybatis.controller;

import org.springframework.beans.factory.annotation.Autowired;
import org.springframework.web.bind.annotation.GetMapping;
import org.springframework.web.bind.annotation.RestController;
import xyz.fengqing11.datasourcesmybatis.mapper1.BookMapper1;
import xyz.fengqing11.datasourcesmybatis.mapper2.BookMapper2;
import xyz.fengqing11.datasourcesmybatis.pojo.Book;

import java.util.List;

@RestController
public class BookController {
    @Autowired
    BookMapper1 bookMapper1;
    @Autowired
    BookMapper2 bookMapper2;

    @GetMapping("/test")
    public void test() {
        List<Book> bs1 = bookMapper1.getAllBooks();
        List<Book> bs2 = bookMapper2.getAllBooks();
        System.out.println("bs1:" + bs1);
        System.out.println("bs2:" + bs2);
    }

}
运行效果:
-end-
来源:CSDN
作者:myloveqiqi
链接:https://blog.csdn.net/mylovewanzi/article/details/104042356