Spring boot + kafka
kafka安装
http://kafka.apache.org/downloadskafka官网下载
1、解压下载的tgz
tar xvf kafka_2.13-2.4.0.tgz
2、配置kafka
vi kafka_2.13-2.4.0/config/server.properties
host.name=192.168.139.136(kafka所在服务器IP)
listeners=PLAINTEXT://192.168.139.136:9092
advertised.listeners=PLAINTEXT://192.168.139.136:9092(kafka所在服务器IP)
3、运行kafka
运行kafka之前,需要先运行zookeeper
./bin/zookeeper-server-start.sh -daemon config/zookeeper.properties
运行kafka
./bin/kafka-server-start.sh config/server.properties
4、创建kafka Topic
./bin/kafka-topics.sh --create --bootstrap-server 192.168.139.136:9092 --topic test-topic --partitions 2 --replication-factor 1
创建一个 名为 topic-test 的 Topic。其中指定分区个数为2,副本个数为1
–bootstrap-server 后可通过逗号分割添加多个节点的kafka
例:–bootstrap-server node1:9092,node2:9092,node3:9092
5、查看创建的topic
./bin/kafka-topics.sh --list --bootstrap-server 192.168.139.136:9092
OpenJDK 64-Bit Server VM warning: If the number of processors is expected to increase from one, then you should configure the number of parallel GC threads appropriately using -XX:ParallelGCThreads=N
__consumer_offsets
test-topic
即可查看到创建的test-topic
6、查看topic详情
./bin/kafka-topics.sh --describe --bootstrap-server 192.168.139.136:9092 --topic test-topic
OpenJDK 64-Bit Server VM warning: If the number of processors is expected to increase from one, then you should configure the number of parallel GC threads appropriately using -XX:ParallelGCThreads=N
Topic: test-topic       PartitionCount: 2       ReplicationFactor: 1    Configs: segment.bytes=1073741824
        Topic: test-topic       Partition: 0    Leader: 0       Replicas: 0     Isr: 0
        Topic: test-topic       Partition: 1    Leader: 0       Replicas: 0     Isr: 0
测试kafka
1、启动kafka producter
./bin/kafka-console-producer.sh --broker-list 192.168.139.136:9092 --topic test-topic
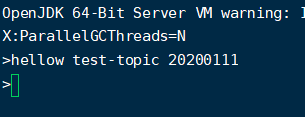
输入hellow test-topic 至test-topic
OpenJDK 64-Bit Server VM warning: If the number of processors is expected to increase from one, then you should configure the number of parallel GC threads appropriately using -XX:ParallelGCThreads=N
>hellow test-topic
2、启动kafka consumer
./bin/kafka-console-consumer.sh --bootstrap-server 192.168.139.136:9092 --topic test-topic
consumer接收推送数据
OpenJDK 64-Bit Server VM warning: If the number of processors is expected to increase from one, then you should configure the number of parallel GC threads appropriately using -XX:ParallelGCThreads=N
hellow test-topic
Spring boot +kafka
1、通过gradle 导入依赖
	testCompile 'org.springframework.boot:spring-boot-starter-test'
	compile group: 'org.springframework.kafka:spring-kafka'
	compileOnly 'org.projectlombok:lombok'
2、添加配置文件application.properties
test.kafka.servers=192.168.139.136:9092
test.kafka.topics=test-topic
test.kafka.group.id=Test1
#lombok配置文件
logging.config=classpath:logback-plus.xml
#kafkacomsumer配置信息
spring.kafka.bootstrap-servers=192.168.139.136:9092
spring.kafka.consumer.group-id=kafka1
spring.kafka.consumer.auto-offset-reset=latest
spring.kafka.consumer.key-deserializer=org.apache.kafka.common.serialization.StringDeserializer
spring.kafka.consumer.value-deserializer=org.apache.kafka.common.serialization.StringDeserializer
 #kafkaproducer配置信息
spring.kafka.producer.key-serializer=org.apache.kafka.common.serialization.StringSerializer
spring.kafka.producer.value-serializer=org.apache.kafka.common.serialization.StringSerializer
spring.kafka.producer.bootstrap-servers=192.168.139.136:9092
3、KafkaConsumer.java
import lombok.extern.slf4j.Slf4j;

import org.apache.kafka.clients.consumer.ConsumerRecord;
import org.springframework.kafka.annotation.KafkaListener;
import org.springframework.stereotype.Component;

@Slf4j
@Component
public class KafkaConsumer {
	//每次监听到${test.kafka.topics}该队列有消息进入,执行
	//kafkaConsumer(ConsumerRecord<?, ?> record)
	@KafkaListener(topics="${test.kafka.topics}")
	public void kafkaConsumer(ConsumerRecord<?, ?> record) {
		log.info("{}-{}:{}",record.topic(),record.key(),record.value());
		//之后可对每次拿到的kafka数据进行后续的解析
	}
}


4、KafkaProducer.java
import org.springframework.beans.factory.annotation.Autowired;
import org.springframework.kafka.core.KafkaTemplate;
import org.springframework.web.bind.annotation.RequestBody;
import org.springframework.web.bind.annotation.RequestMapping;
import org.springframework.web.bind.annotation.RequestMethod;
import org.springframework.web.bind.annotation.RestController;

import com.fasterxml.jackson.databind.JsonNode;

import lombok.extern.slf4j.Slf4j;

@Slf4j
@RestController
@RequestMapping("/Producer")
public class KafkaProducer {

	@Autowired
    private KafkaTemplate<String,Object> kafkaTemplate;

	@RequestMapping(value = "", method = RequestMethod.POST)
	public void producer(@RequestBody JsonNode node) {
		log.info("test-topic:{}",node.toString());
		kafkaTemplate.send("test-topic",node.toString());
		//之后可对json格式数据解析
	}
}


来源:CSDN
作者:weixin_38236447
链接:https://blog.csdn.net/weixin_38236447/article/details/103938207