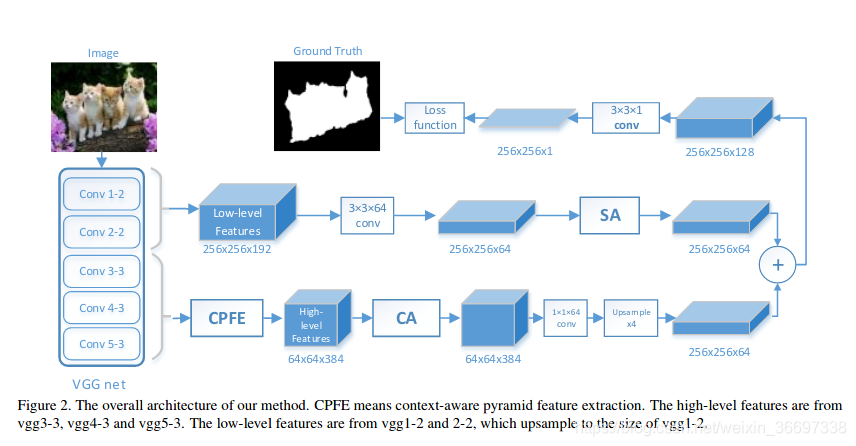
研究一下Pyramid Feature Attention Network for Saliency detection的模型代码

先是VGG16的结构
def VGG16(img_input, dropout=False, with_CPFE=False, with_CA=False, with_SA=False, droup_rate=0.3):
    # Block 1
    #shape=(?, 256, 256, 64)
    x = Conv2D(64, (3, 3), activation='relu', padding='same', name='block1_conv1')(img_input)
    #shape=(?, 256, 256, 64)
    x = Conv2D(64, (3, 3), activation='relu', padding='same', name='block1_conv2')(x)
    C1 = x
    #shape=(?, 128, 128, 64)
    x = MaxPooling2D((2, 2), strides=(2, 2), name='block1_pool')(x)

    if dropout:
        x = Dropout(droup_rate)(x)
    # Block 2
    # shape=(?, 128, 128, 128)
    x = Conv2D(128, (3, 3), activation='relu', padding='same', name='block2_conv1')(x)
    # shape=(?, 128, 128, 128)
    x = Conv2D(128, (3, 3), activation='relu', padding='same', name='block2_conv2')(x)
    C2 = x
    # shape=(?, 64, 64, 128)
    x = MaxPooling2D((2, 2), strides=(2, 2), name='block2_pool')(x)

    if dropout:
        x = Dropout(droup_rate)(x)
    # Block 3
    # shape=(?, 64, 64, 256)
    x = Conv2D(256, (3, 3), activation='relu', padding='same', name='block3_conv1')(x)
    x = Conv2D(256, (3, 3), activation='relu', padding='same', name='block3_conv2')(x)
    x = Conv2D(256, (3, 3), activation='relu', padding='same', name='block3_conv3')(x)
    C3 = x
    # shape=(?, 32, 32, 256)
    x = MaxPooling2D((2, 2), strides=(2, 2), name='block3_pool')(x)

    if dropout:
        x = Dropout(droup_rate)(x)
    # Block 4
    # shape=(?, 32, 32, 512)
    x = Conv2D(512, (3, 3), activation='relu', padding='same', name='block4_conv1')(x)
    x = Conv2D(512, (3, 3), activation='relu', padding='same', name='block4_conv2')(x)
    x = Conv2D(512, (3, 3), activation='relu', padding='same', name='block4_conv3')(x)
    C4 = x
    # shape=(?, 16, 16, 512)
    x = MaxPooling2D((2, 2), strides=(2, 2), name='block4_pool')(x)

    if dropout:
        x = Dropout(droup_rate)(x)
    # Block 5
    # shape=(?, 16, 16, 512)
    x = Conv2D(512, (3, 3), activation='relu', padding='same', name='block5_conv1')(x)
    x = Conv2D(512, (3, 3), activation='relu', padding='same', name='block5_conv2')(x)
    x = Conv2D(512, (3, 3), activation='relu', padding='same', name='block5_conv3')(x)
    if dropout:
        x = Dropout(droup_rate)(x)
    C5 = x
每一个存下来的中间过程的特征C1到C5,都是MaxPooling之前的。
在每一个MaxPooling之后都有一个dropout,也就是,在每一个卷积块的最后,都进行dropout,且drop_rate都是0.3。
并且,本文去掉了第五个卷积块之后的Maxpooling,也就是说,特征的分辨率减小了四次。
C1 256×256×64
C2 128×128×128
C3 64×64×256
C4 32×32×512
C5 16×16×512
介绍一下dropout层:
在机器学习的模型中,如果模型的参数太多,而训练样本又太少,训练出来的模型很容易产生过拟合的现象。在训练神经网络的时候经常会遇到过拟合的问题,过拟合具体表现在:模型在训练数据上损失函数较小,预测准确率较高;但是在测试数据上损失函数比较大,预测准确率较低。
过拟合是很多机器学习的通病。如果模型过拟合,那么得到的模型几乎不能用。为了解决过拟合问题,一般会采用模型集成的方法,即训练多个模型进行组合。此时,训练模型费时就成为一个很大的问题,不仅训练多个模型费时,测试多个模型也是很费时。
综上所述,训练深度神经网络的时候,总是会遇到两大缺点:
(1)容易过拟合
(2)费时
Dropout可以比较有效的缓解过拟合的发生,在一定程度上达到正则化的效果。
Dropout可以作为训练深度神经网络的一种trick供选择。在每个训练批次中,通过忽略一半的特征检测器(让一半的隐层节点值为0),可以明显地减少过拟合现象。这种方式可以减少特征检测器(隐层节点)间的相互作用,检测器相互作用是指某些检测器依赖其他检测器才能发挥作用。
Dropout说的简单一点就是:我们在前向传播的时候,让某个神经元的激活值以一定的概率p停止工作,这样可以使模型泛化性更强,因为它不会太依赖某些局部的特征,如图1所示。
注意: Keras中Dropout的实现,是屏蔽掉某些神经元,使其激活值为0以后,对激活值向量x1……x1000进行放大,也就是乘以1/(1-p)。
思考:上面我们介绍了两种方法进行Dropout的缩放,那么Dropout为什么需要进行缩放呢?
因为我们训练的时候会随机的丢弃一些神经元,但是预测的时候就没办法随机丢弃了。如果丢弃一些神经元,这会带来结果不稳定的问题,也就是给定一个测试数据,有时候输出a有时候输出b,结果不稳定,这是实际系统不能接受的,用户可能认为模型预测不准。那么一种”补偿“的方案就是每个神经元的权重都乘以一个p,这样在“总体上”使得测试数据和训练数据是大致一样的。比如一个神经元的输出是x,那么在训练的时候它有p的概率参与训练,(1-p)的概率丢弃,那么它输出的期望是px+(1-p)0=px。因此测试的时候把这个神经元的权重乘以p可以得到同样的期望。
总结:
当前Dropout被大量利用于全连接网络,而且一般认为设置为0.5或者0.3,而在卷积网络隐藏层中由于卷积自身的稀疏化以及稀疏化的ReLu函数的大量使用等原因,Dropout策略在卷积网络隐藏层中使用较少。总体而言,Dropout是一个超参,需要根据具体的网络、具体的应用领域进行尝试。
    # shape=(?, 256, 256, 64)
    C1 = Conv2D(64, (3, 3), padding='same', name='C1_conv')(C1)
    C1 = BN(C1, 'C1_BN')
    # shape=(?, 128, 128, 64)
    C2 = Conv2D(64, (3, 3), padding='same', name='C2_conv')(C2)
    C2 = BN(C2, 'C2_BN')
把C1 C2又分别经过一个conv和bn,都用的是64个通道的卷积块,没有用激活函数,在每个卷积后加了BN
C1 256×256×64
C2 128×128×64
多尺度特征提取模块:
多尺度特征提取模块是在Conv3 Conv4 Conv5 的基础上做的。
    if with_CPFE:
        C3_cfe = CFE(C3, 32, 'C3_cfe')#将C3送入多尺度模块
        C4_cfe = CFE(C4, 32, 'C4_cfe')#将C4送入多尺度模块
        C5_cfe = CFE(C5, 32, 'C5_cfe')#将C5送入多尺度模块
        #将C4 C5扩大为与C3同样的大小(一个扩大2倍,一个扩大4倍)
        C5_cfe = BilinearUpsampling(upsampling=(4, 4), name='C5_cfe_up4')(C5_cfe)
        C4_cfe = BilinearUpsampling(upsampling=(2, 2), name='C4_cfe_up2')(C4_cfe)
        #将分辨率一致的C3 C4 C5连接起来
        C345 = Concatenate(name='C345_aspp_concat', axis=-1)([C3_cfe, C4_cfe, C5_cfe])
def CFE(input_tensor, filters, block_id):
    rate = [3, 5, 7]
    cfe0 = Conv2D(filters, (1, 1), padding='same', use_bias=False, name=block_id + '_cfe0')(
        input_tensor)
    cfe1 = AtrousBlock(input_tensor, filters, rate[0], block_id + '_cfe1')
    cfe2 = AtrousBlock(input_tensor, filters, rate[1], block_id + '_cfe2')
    cfe3 = AtrousBlock(input_tensor, filters, rate[2], block_id + '_cfe3')
    cfe_concat = Concatenate(name=block_id + 'concatcfe', axis=-1)([cfe0, cfe1, cfe2, cfe3])
    cfe_concat = BN(cfe_concat, block_id)
    return cfe_concat
def AtrousBlock(input_tensor, filters, rate, block_id, stride=1):
    x = Conv2D(filters, (3, 3), strides=(stride, stride), dilation_rate=(rate, rate),
               padding='same', use_bias=False, name=block_id + '_dilation')(input_tensor)
    return x
多尺度模块,四个扩张卷积,扩张率分别为1,3,5,7,都是32个通道的卷积块,不经过激活函数,最后把他们concat起来,再进行一个BN。
        if with_CA:
            C345 = ChannelWiseAttention(C345, name='C345_ChannelWiseAttention_withcpfe')
将多尺度特征送入通道注意力机制中
def ChannelWiseAttention(inputs,name):
    H, W, C = map(int, inputs.get_shape()[1:])#得到输入的特征的大小及通道数
    attention = GlobalAveragePooling2D(name=name+'_GlobalAveragePooling2D')(inputs)#全局平均池化
    attention = Dense(int(C / 4), activation='relu')(attention)#全连接层,通道数变为C/4,并进行relu激活
    attention = Dense(C, activation='sigmoid',activity_regularizer=l1_reg)(attention)#全连接层,通道数变为C,进行sigmoid激活,并进行l1正则。
    attention = Reshape((1, 1, C),name=name+'_reshape')(attention)#将(?,384)变为(?,1,1,384)
    attention = Repeat(repeat_list=[1, H, W, 1],name=name+'_repeat')(attention)#将(?,1,1,384)变为(?,64,64,384)
    attention = Multiply(name=name + '_multiply')([attention, inputs])#逐通道逐像素相乘
    return attention
将经过多尺度和通道注意力机制的特征经过64个(1,1)的卷积块,再进行BN。
再将该特征进行上采样,扩大四倍,变为(256×256×64)
最后再经过空间注意力机制
def SpatialAttention(inputs,name):
    k = 9
    H, W, C = map(int,inputs.get_shape()[1:])#得到输入特征的长宽和通道数
    attention1 = Conv2D(int(C / 2), (1, k), padding='same', name=name+'_1_conv1')(inputs)#将input经过一个(1,9)的卷积
    attention1 = BN(attention1,'attention1_1')#BN
    attention1 = Conv2D(1, (k, 1), padding='same', name=name + '_1_conv2')(attention1)#再经过一个(9,1)的卷积
    attention1 = BN(attention1, 'attention1_2')#BN
    attention2 = Conv2D(int(C / 2), (k, 1), padding='same', name=name + '_2_conv1')(inputs)#将input经过一个(9,1)的卷积
    attention2 = BN(attention2, 'attention2_1')
    attention2 = Conv2D(1, (1, k), padding='same', name=name + '_2_conv2')(attention2)#再经过一个(1,9)的卷积
    attention2 = BN(attention2, 'attention2_2')
    attention = Add(name=name+'_add')([attention1,attention2])#将这两个attention加起来,得到的是(256,256)的单通道的特征
    attention = Activation('sigmoid')(attention)#特征映射成权值
    attention = Repeat(repeat_list=[1, 1, 1, C])(attention)#将单通道变为64通道
    return attention
    if with_SA:
        SA = SpatialAttention(C345, 'spatial_attention')
        C2 = BilinearUpsampling(upsampling=(2, 2), name='C2_up2')(C2)#将C2扩大2倍,变为与C1同样大
        C12 = Concatenate(name='C12_concat', axis=-1)([C1, C2])#将C1,C2连接起来
        C12 = Conv2D(64, (3, 3), padding='same', name='C12_conv')(C12)#经过通道数为64的(3,3)的卷积块
        C12 = BN(C12, 'C12')#BN层
        C12 = Multiply(name='C12_atten_mutiply')([SA, C12])
    fea = Concatenate(name='fuse_concat',axis=-1)([C12, C345])#将高级特征和低级特征Concat,两个特征的通道数都是64
    sa = Conv2D(1, (3, 3), padding='same', name='sa')(fea)#将通道数变为1

    model = Model(inputs=img_input, outputs=sa, name="BaseModel")
    return model
该模型在每个BN层后都加了一个relu激活
def BN(input_tensor,block_id):
    bn = BatchNorm(name=block_id+'_BN')(input_tensor)
    a = Activation('relu',name=block_id+'_relu')(bn)
    return a
来源:CSDN
作者:---222
链接:https://blog.csdn.net/weixin_36697338/article/details/103565091