访问器属性
var testObj = {
            link:'ppp'
        };
        var testOBJ2 = Object.create(testObj,{
            //数据属性
            name:{
                value:'laney',
                writable:true,//可以修改文本,false不可以修改文本
                enumerable:false,
                configurable:true
            },
            country:{
                value:'china',
                writable:true,
                enumerable:true,
                configurable:true
            },
            //访问器属性 4-
            infoPerson:{
                get(){
                    return this.name + 'come form ' +this.country
                },
                set(name,country){
                    this.name = name
                    this.country = country
                },
                enumerable:true,
                configurable:true
            }
        })
classList 兼容IE10以下
HTML
<div id="classListDom" class="test name ds">ssss</div>
JS
        // classList , 兼容问题 ,支持IE10以上
        // babel-polyfill.js
        // polyfill为旧浏览器提供兼容性支持
        // HTMLDivElement  继承 HTMLElement

var isClsList = 'classList' in HTMLElement.prototype;
if(!isClsList) {
    Object.defineProperty(HTMLElement.prototype,'classList',{
        get:function(){
            // add, remove ,contains,toggle
            // this  - >
            var _self = this;
            return {
                add:function(cls){
                    if(!this.contains(cls)){
                        _self.className +=' ' + cls;
                    }
                },
                remove(cls){
                    if(this.contains(cls)){
                        var reg= new RegExp(cls);
                        _self.className =  _self.className.replace(reg,'');
                    }
                },
                contains(cls){
                  var index =  _self.className.indexOf(cls);
                    return  index!=-1 ? true : false;
                },
                toggle(cls){
                    if(this.contains(cls)){
                        this.remove(cls)
                    } else {
                        this.add(cls)
                    }
                }
            }
        }
    })
}

var classListDom = document.getElementById('classListDom');
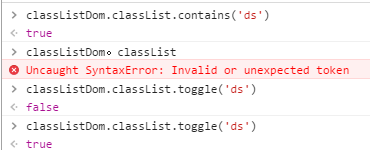
contains

控制器
![]()
toggle 1

![]()
toggle 2


图片上传
FileReader.readAsDataURL(File)//转换成base64格式
FileReader.readAsText()//转换成字符串格式
FileReader.readAsArrayBuffer(File)//转换成ArrayBuffer格式
FileReader.readBinaryString(File)//转换成原始二进制格式
步骤:
- 准备input,multiple
- 美化
- 监听文件的上传,onchange
- 如何获取后台需要的base64
- 如何用缩略图显示所选的图片
- 如何删除所xu'a选的图片
- 后台所需要的数据给他
拖拽:
图片和链接默认可以拖动
在拖动目标上触发事件(源元素):
- ondragstart -- 用户开始拖动时触发
- ondrag -- 元素正在拖动时触发
- ondragend -- 用户完成元素拖动后触发
释放目标时触发的事件:
- ondragenter -- 进入其容器范围内触发(当被鼠标拖动的对象进入其容器范围内时触发此事件)
- ondragover -- 被拖动的对象在另一个对象容器范围内拖动(当某被拖动的对象在另一个对象容器范围内拖动时触发此事件)
- ondragleave -- 拖动的对象离开其容器范围内时触发(当被鼠标拖动的对象离开其容器范围内时触发此事件)
- ondrop -- 释放鼠标键时触发(在一个拖动过程中,释放鼠标键时触发此事件)
拖动事件讲解
<!DOCTYPE html>
<html lang="en">
<head>
    <meta charset="UTF-8">
    <meta name="viewport" content="width=device-width, initial-scale=1.0">
    <meta http-equiv="X-UA-Compatible" content="ie=edge">
    <title>拖动事件讲解</title>
    <style>
        .box1, .box2 {
            padding: 10px;
            width: 200px;
            border: 1px solid #000;
        }
        .box2 {
            height: 500px;
        }
        .demo {
            list-style: none;
            background-color: aqua;
            margin: 10px;
            height:  20px;
            width:100px;
        }
    </style>
</head>
<body>
    <!-- A -->
    <!-- 图片和链接默认可以拖动 -->
    <div class="demo" draggable="true"></div>

    <!-- B -->
    <div  id="wrapper" style="width:400px;height:500px;background: red;">
    </div>

    <script>
        var demo = document.getElementsByClassName('demo')[0];

        demo.ondragstart = function (e) {
             //用户开始拖动元素时触发
            // console.log('ondragstart');
            // console.log(e);
        }
        demo.ondrag = function (e) {
            //元素正在拖动时触发,一直在监听
            // console.log('ondrag');
            // console.log(e);
        }
        demo.ondragend  = function (e) {
            //用户完成元素拖动后触发
            // console.log('ondragend ');
            // console.log(e);
        }

        // //当某被拖动的对象在另一对象容器范围内拖动时触发此事件
        wrapper.ondragover = function (e) {
            //被拖动的对象在 另一对象容器(dropbox)范围内 拖动时触发此事件
            console.log('dragover');
            e.preventDefault()
        }
        wrapper.ondragenter = function(){
            console.log('ondragenter');
        }

        wrapper.ondrop = function (e) {
             //释放鼠标键时触发此事件
            console.log('ondrop');
            // console.log(e)
        }
        wrapper.ondragleave = function(){
            console.log('ondragleave');
        }

    </script>


</body>
</html>
拖动小例子
<!DOCTYPE html>
<html lang="en">
<head>
    <meta charset="UTF-8">
    <meta name="viewport" content="width=device-width, initial-scale=1.0">
    <meta http-equiv="X-UA-Compatible" content="ie=edge">
    <title>拖动小例子</title>
    <style>
        .box1, .box2 {
            padding: 10px;
            width: 200px;
            border: 1px solid #000;
        }
        .box2 {
            height: 500px;
        }
        .demo {
            list-style: none;
            background-color: aqua;
            margin: 10px;
            height:  20px;
        }
    </style>
</head>
<body>
    <ul class="box1" id="box1Out">
        <li class="demo" draggable="true">1</li>
        <li class="demo" draggable="true">2</li>
        <li class="demo" draggable="true">3</li>
    </ul>
    <ul class="box2" id="box2Frame"></ul>
    <script>
        var demoList = document.getElementsByClassName('demo');
        var dragDom = null;

        // document.getElementById('box1Out').addEventListener('dragstart',function(ev){
        //     var target = ev.target;
        //     if(target.className=='demo') {
        //         dragDom = target;
        //     }
        // },false);

        for (var i = 0; i < demoList.length; i++) {
            demoList[i].ondragstart = function (e){
                dragDom = this;
            }
        }

        var box2Frame = document.getElementById('box2Frame');
        box2Frame.ondragover = function (e) {
            e.preventDefault();
        }
        box2Frame.ondrop = function (e) {
            this.appendChild(dragDom);
        }

    </script>
</body>
</html>
注意:图片解析是异步的,所以要等它load后,说明它就解析完了
<!DOCTYPE html>
<html lang="en">

<head>
    <meta charset="UTF-8">
    <meta name="viewport" content="width=device-width, initial-scale=1.0">
    <meta http-equiv="X-UA-Compatible" content="ie=edge">
    <title>Document</title>
    <style>
        ul,
        li {
            list-style-type: none;
            margin: 0;
            padding: 0;
        }

        .out-main-top {
            height: auto;
            overflow: auto;
            display: flex;
            justify-content: flex-start;
        }

        .out-main-top button {
            padding: 10px 40px;
            font-weight: bold;
            font-size: 21px;
            height: 52px;
            margin-left: 30px;
            vertical-align: middle;
            margin-top: 60px;
        }

        .canvas-img {
            margin-top: 20px;
            clear: both;
        }

        .canvas-img li {
            width: 150px;
            height: 150px;
            position: relative;
            border: 1px solid #ccc;
            cursor: pointer;
            float: left;
            margin-right: 10px;
            overflow: hidden;
        }

        .canvas-img li img {
            width: 90%;
            position: absolute;
            left: 50%;
            top: 50%;
            transform: translate(-50%, -50%);
        }

        .canvas-img li .close {
            position: absolute;
            right: 4px;
            top: 1px;
            font-style: normal;
            font-size: 12px;
            color: #666;
        }

        .add-pic-box {
            width: 200px;
            height: 200px;
            border: 1px dashed #999;
            border-radius: 4px;
            cursor: pointer;
            background: #fff url('./images/upload.png') center center no-repeat;
        }

        .drag-box {
            width: 250px;
            height: 200px;
            border: 1px dashed #ccc;
            margin-left: 20px;
            color: #ccc;
            font-size: 15px;
            text-align: center;
            padding-top: 90px;
            box-sizing: border-box;
        }
    </style>
</head>

<body>
    <div class="out-main-top">
        <div class="add-pic-box" id='addPicBox'>
            <input type="file" name="pic[]" multiple id="myinput" onchange="uploadFile()" style="display: none">
        </div>
        <div id="dropbox" class="drag-box">
            或者将文件拖到此处
        </div>
        <button onclick="uploadFileNow()">上传</button>
    </div>
    <ul id="canvasImg" class="canvas-img"></ul>
    <script>
        var arrimg = [],
            arrimgwh = 1024 * 400;
        addPicBox.addEventListener('click', function (e) {
            myinput.click();
        })
        function uploadFile() {
            var fileimg = myinput.files;
            transferBase(fileimg);
        };
        function transferBase(imgs) {
            for (let i = 0; i < imgs.length; i++) {
                var fileimage = imgs[i],
                    reader = new FileReader();
                reader.readAsDataURL(fileimage);
                reader.onload = function (e) {
                    var resimg = e.target.result,//获取了图片了
                        idx = arrimg.indexOf(resimg);
                    if (idx != -1) {
                        console.log('图片已上传过了');
                        return;
                    }
                    var strimg = `<li><img src="${resimg}"><i class"close">X</i></li>`;
                    canvasImg.innerHTML += strimg;
                    arrimg.push(resimg);
                }
            }
        }
        canvasImg.addEventListener('click', function (e) {
            var target = e.target;
            if (target.className = 'close') {
                var liimg = target.offsetParent.querySelector('img').getAttribute('src'),
                    idx = arrimg.indexOf(liimg);
                arrimg.splice(idx, 1);
                target.offsetParent.remove();
            }

        })
        function uploadFileNow(){
            console.log(arrimg);
        }
        dropbox.addEventListener('dragover',function(e){
          e.stopPropagation();
          e.preventDefault();
        },false);

        dropbox.addEventListener('drop',function(e){
          e.stopPropagation();
         e.preventDefault();

         var dtfiles = e.dataTransfer.files;

         transferBase(dtfiles); //转化成banse64
        //  transferBlob(dtfiles);  //arraybuffer
        },false);

    </script>
</body>

</html>
结果:

来源:CSDN
作者:崧哥的编程之路
链接:https://blog.csdn.net/weixin_41406727/article/details/103099832