实现流程
1.ssm基本流程
1.1 一个http请求,被springMVC的DispatcherServlet拦截,然后交给HandleRequest处理。
1.2 HandleRequest调用HandlerMapping与HandlerAdapter两个类,去匹配controller上的路径。
1.3 一旦匹配上,就执行该路径对应的方法。
1.4 controller层只是起一个控制作用,实际的业务处理交给service实现层。
1.5 实现层处理完数据,将结果返回给controller层。
这是一个基本的ssm流程
2.实现读写分离
2.1 配置一个动态数据源切面,将该切面添加到service上。
2.2 一旦有请求进来,执行到service层,该切面进行拦截,能够获取到请求方法的名称和参数。
2.3 这里我们只需要方法名称就够了,实际上这里拿到的方法名称与请求参数可以做缓存(即是spring缓存原理)。该切面完成的功能是:根据执行方法名称判断应该走读库还是走写库,这里返回的是一个标记(读库还是写库的标记)。
2.4 接着有一个动态数据源的bean,该bean继承spring的AbstractRoutingDataSource类,并且覆写该类的determineCurrentLookupKey方法,返回读写库标记。同时该bean配置在spring-mybatis.xml文件中,由于该bean继承自AbstractRoutingDataSource类,该类有个属性targetDataSources,这个属性的类型是map,在这个map中设置读写标记对应读写数据源,根据刚刚传进来的标记来匹配该map中的key值,根据这个key值走不同的数据源。
2.5 spring-mybatis.xml中配置两套数据源,上述的key值就是走的这两套数据源中的一个。
本文基于另一篇文章
https://my.oschina.net/u/2312022/blog/748490
spring读写分离其实就是mysql主从复制,只不过添加了动态切换数据源的功能。
参考文章
http://blog.csdn.net/jack85986370/article/details/51559232
这一篇好像更加不错
http://blog.csdn.net/u013632755/article/details/51557956#comments
###1.完成搭建ssm最小系统
参见我这篇文章 https://my.oschina.net/u/2312022/blog/743014
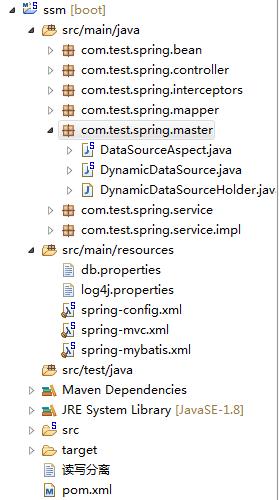
###2.添加master包
###3.DataSourceAspect
package com.test.spring.master;

import org.aspectj.lang.JoinPoint;

public class DataSourceAspect {

	/**
	 * 进入service方法之前
	 */
	public void before2(JoinPoint point) {
		String methodName = point.getSignature().getName();
		if (isSlave(methodName)) {
			//走写库
			DynamicDataSourceHolder.markMaster();
		}else {
			//走读库
			DynamicDataSourceHolder.markSlave();
		}
	}

	/**
	 * 判断是否为读库
	 */
    private Boolean isSlave(String methodName) {
        // 方法名以query、find、get开头的方法名走从库
    	boolean flag = true;

    	if (methodName.contains("query")||
    		methodName.contains("find") ||
    		methodName.contains("get")) {
    		flag = false;
		}
    	return flag;
    }
}
###4.DynamicDataSource
package com.test.spring.master;

import org.springframework.jdbc.datasource.lookup.AbstractRoutingDataSource;

public class DynamicDataSource extends AbstractRoutingDataSource{

	@Override
	protected Object determineCurrentLookupKey() {
		System.out.println("----------DynamicDataSource---------");
		return DynamicDataSourceHolder.getDataSourceKey();
	}

}
###5.DynamicDataSourceHolder
package com.test.spring.master;

import org.slf4j.Logger;
import org.slf4j.LoggerFactory;

public class DynamicDataSourceHolder {

	private static final Logger LOGGER = LoggerFactory.getLogger(DynamicDataSourceHolder.class);

	//写库对应的数据源key
	private static final String MASTER = "master";

	//读库对应的数据源key
	private static final String SLAVE = "slave";

    //使用ThreadLocal记录当前线程的数据源key
    private static final ThreadLocal<String> holder = new ThreadLocal<String>();

    /**
     * 设置数据源key
     * @param key
     */
    public static void putDataSourceKey(String key) {
    	if (LOGGER.isDebugEnabled()) {
    		LOGGER.debug("------切换数据源,key:"+key+"-------");
		}
        holder.set(key);
    }

    /**
     * 获取数据源key
     * @return
     */
    public static String getDataSourceKey() {
        return holder.get();
    }

    /**
     * 标记写库
     */
    public static void markMaster(){
        putDataSourceKey(MASTER);
    }

    /**
     * 标记读库
     */
    public static void markSlave(){
        putDataSourceKey(SLAVE);
    }
}
###6.db.properties
driverClassName=com.mysql.jdbc.Driver
#主数据库
master_jdbc_url=jdbc:mysql://192.168.2.11:3306/test?useUnicode=true&characterEncoding=UTF-8
master_jdbc_username=root
master_jdbc_password=123456

#从数据库
slave_jdbc_url=jdbc:mysql://192.168.2.11:3307/test?useUnicode=true&characterEncoding=UTF-8
slave_jdbc_username=root
slace_jdbc_password=654321
注意:mysql搭建在同一台主机上,仅仅端口不同
###7.spring-mybatis.xml
<?xml version="1.0" encoding="UTF-8"?>
<beans xmlns="http://www.springframework.org/schema/beans"
	xmlns:xsi="http://www.w3.org/2001/XMLSchema-instance"
	xmlns:context="http://www.springframework.org/schema/context"
	xmlns:tx="http://www.springframework.org/schema/tx"
	xmlns:aop="http://www.springframework.org/schema/aop"
	xsi:schemaLocation="http://www.springframework.org/schema/beans http://www.springframework.org/schema/beans/spring-beans.xsd
		http://www.springframework.org/schema/context http://www.springframework.org/schema/context/spring-context-4.2.xsd
		http://www.springframework.org/schema/aop http://www.springframework.org/schema/aop/spring-aop-4.1.xsd
		http://www.springframework.org/schema/tx http://www.springframework.org/schema/tx/spring-tx-4.1.xsd">

	<!-- 读取配置文件 -->
	<context:property-placeholder location="classpath:db.properties"/>

	<!-- 配置master数据源 -->
	<bean id="masterDataSource" class="com.alibaba.druid.pool.DruidDataSource" init-method="init" destroy-method="close">
		<property name="driverClassName" value="${driverClassName}"></property>
		<property name="url" value="${master_jdbc_url}"></property>
		<property name="username" value="${master_jdbc_username}"></property>
		<property name="password" value="${master_jdbc_password}"></property>
	</bean>

	<!-- 配置slave数据源 -->
	<bean id="slaveDataSource" class="com.alibaba.druid.pool.DruidDataSource" init-method="init" destroy-method="close">
		<property name="driverClassName" value="${driverClassName}"></property>
		<property name="url" value="${slave_jdbc_url}"></property>
		<property name="username" value="${slave_jdbc_username}"></property>
		<property name="password" value="${slace_jdbc_password}"></property>
	</bean>

	<!-- 动态数据源 -->
	<bean id="dataSource" class="com.test.spring.master.DynamicDataSource">
		<!-- 设置多个数据源 -->
		<property name="targetDataSources">
			<map key-type="java.lang.String">
				<!-- 这里的key要和程序中保持一致 -->
				<entry key="master" value-ref="masterDataSource"></entry>
				<entry key="slave" value-ref="slaveDataSource"></entry>
			</map>
		</property>
		<!-- 默认数据源 -->
		<property name="defaultTargetDataSource" ref="masterDataSource"></property>
	</bean>


	<!-- 配置sqlSessionFactory -->
	<bean id="sqlSessionFactoryBean" class="org.mybatis.spring.SqlSessionFactoryBean">
		<!-- 数据源 -->
		<property name="dataSource" ref="dataSource" />
		<!-- 自动扫描mapping.xml文件 -->
		<property name="mapperLocations" value="classpath:com/test/spring/mapper/*.xml" />
	</bean>
	<!-- 配置mapper扫描器 -->
	<bean class="org.mybatis.spring.mapper.MapperScannerConfigurer">
		<!-- 扫描包路径,如果需要扫描多个包,用英文 逗号隔开 -->
		<property name="basePackage" value="com.test.spring.mapper" />
		<!-- 关联mapper扫描器 与 sqlsession管理器 -->
		<property name="sqlSessionFactoryBeanName" value="sqlSessionFactoryBean" />
	</bean>


	<!-- 配置事务管理器 -->
	<bean id="transactionManager" class="org.springframework.jdbc.datasource.DataSourceTransactionManager">
		<property name="dataSource" ref="dataSource"></property>
	</bean>

	<!-- 配置事务属性 -->
	<tx:advice id="txAdvice" transaction-manager="transactionManager">
		<tx:attributes>
			<!-- 定义查询方法只读 -->
			<tx:method name="query*" read-only="true"/>
			<tx:method name="find*" read-only="true"/>
			<tx:method name="get*" read-only="true"/>

			<!-- 主数据库操作 -->
			<tx:method name="save*" propagation="REQUIRED"/>
			<tx:method name="update*" propagation="REQUIRED"/>
			<tx:method name="delete*" propagation="REQUIRED"/>

			<!-- 其它方法使用默认事务策略 -->
			<tx:method name="*"/>

		</tx:attributes>
	</tx:advice>

	<!-- 配置切面 -->
	<aop:config>
		<aop:pointcut expression="execution(* com.test.spring.service.impl.*Impl.*(..))" id="txPointcut"/>
		<aop:advisor advice-ref="txAdvice" pointcut-ref="txPointcut"/>
	</aop:config>

	<!-- 切面bean配置 -->
 	<bean id="dataSourceAspect" class="com.test.spring.master.DataSourceAspect"></bean>
	<aop:config>
		<aop:pointcut expression="execution(* com.test.spring.service.*.*(..))" id="aspectPointcut"/>
 		<aop:aspect ref="dataSourceAspect" order="-9999">
			<aop:before method="before2" pointcut-ref="aspectPointcut"/>
		</aop:aspect>
	</aop:config>

</beans>
###8.实现层
package com.test.spring.service.impl;

import java.util.List;

import org.springframework.beans.factory.annotation.Autowired;
import org.springframework.stereotype.Service;

import com.test.spring.bean.User;
import com.test.spring.mapper.UserMapper;
import com.test.spring.service.UserService;

@Service
public class UserServiceImpl implements UserService {

	@Autowired
	private UserMapper userMapper;

	/**
	 * 获取用户列表
	 */
	@Override
	public void getUserList() {

		System.out.println("走 从数据库");

		List<User> listUser = userMapper.getUserList();
		System.out.println(listUser);

		System.out.println("================");
	}

	/**
	 * 更新用户信息
	 */
	@Override
	public void updateUser(String userId,String userName) throws Exception{
		System.out.println("走 主数据库");
		int sucess = userMapper.updateUser(userId, userName);
		System.out.println(sucess);
		throw new RuntimeException();
	}
}
###9.测试
亲测,
1.可以实现动态切换数据库
2.事务也可以起效
3.主从同步在mysql那一篇已经实现
来源:oschina
链接:https://my.oschina.net/u/2312022/blog/748703